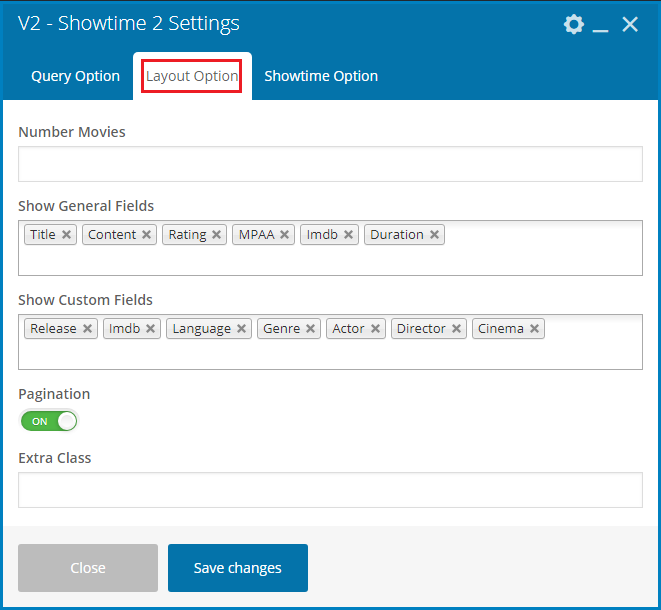
Demo Content
This option allows you to install or uninstall demo content by some clicks.
From Dashboard => AmyMovie => Demo Content.

You can visit Demo Installation to get the detail guide for this part.
The best theme for your movie website
AmyMovie is a fully responsive WordPress theme designed for Movie websites.
The various, modern and professional interface with clean code will make your Movie sites powerful, attractive and easy-to-use. You are easy to import movie data from IMDb website and with amazing showtime features, visitor can spend only some seconds to get the Movie Schedules in the different cinemas. With One-click demo feature, you can set up a website totally like our demo in seconds.
Your site will make everybody discover new movies and know when those movies will show at the particular cinemas.
AmyMovie offers you free lifetime updating.
» Support time: 8AM - 5PM GMT +7, Monday to Friday
» Response Time: Within 24 hours (1 business day).
Note: Support is NOT available on Saturday & Sunday due to our weekend break. All of the questions sent at the weekend will be solved on Monday of the next week
To use AmyMovie, please be sure that you are using WordPress version 4.0 or later, PHP version 2.5 or higher and MySQL version 5.0 or higher. And before going to the theme detail, we would like to provide you some references about WordPress. We think these references are usefull for users who are new to WordPress as well as experienced users.
» New to WordPress: Show basic WordPress information
» Installation: How to install WordPress
Installation shows you what is included in AmyMovie package and help you learn how to install theme via FTP, via WordPress and how to install required and recommended plugins using for AmyMovie theme.
From your account on themeforest.net, you can download the entire package of AmyMovie theme. The theme package is a zip file including the following structures:
» amymovie.zip: A WordPress theme.
» Licensing: General license information.
» Resources: All of required and recommended plugins using for AmyMovie.
» Docunentation: The instruction to user AmyMovie theme.
Follow the steps below to learn how to install theme via FTP
Step 1: Login to your hosting space via an FTP software
Step 2: Unzip the AmyMovie file and only use the extracted AmyMovie folder
Step 3: Upload the extracted AmyMovie folder into wp-content => Theme folder
Step 4: Activate the newly installed theme by going to Appearance => Themes and click on Activate button to activate theme
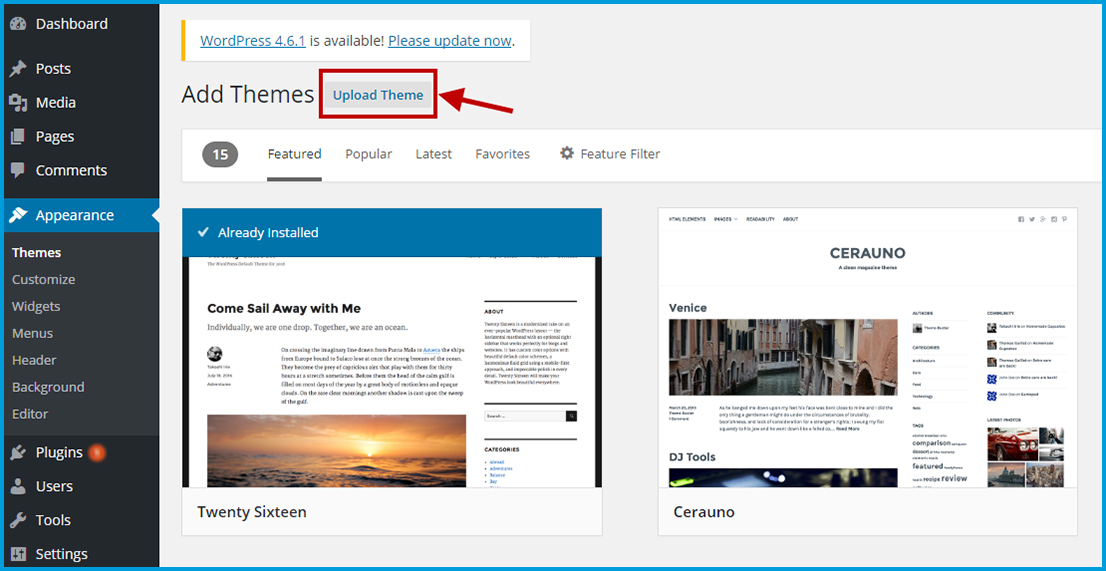
Follow the steps below to learn how to install theme via WordPress
Step 1: From backend, go to Appearances => Themes => Add New button, click on Upload button at the top of the page
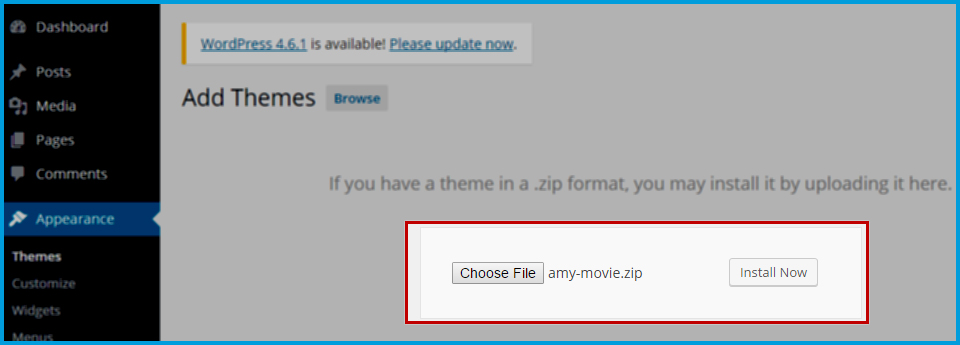
Step 2: Click on Choose File to choose theme from your local computer, the file requirement is zip format. Press Install Now button to install theme.
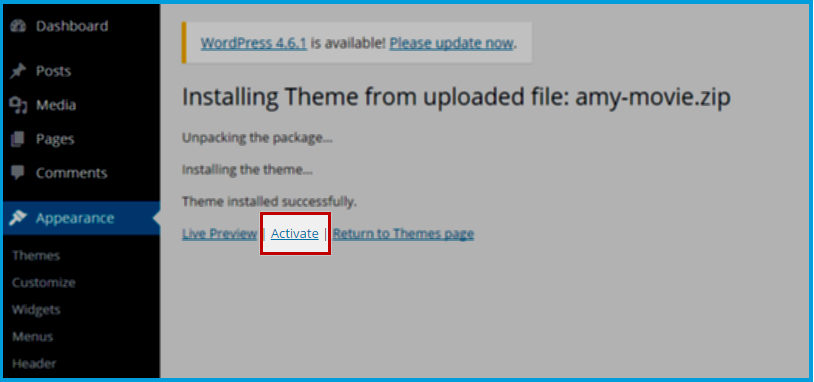
Step 3: Wait for few seconds, the theme will be uploaded and extracted automatically by WordPress. After this process complete, you only need to press on Activate link under the message for successful installed theme.
Once you ativate AmyNews, you will receive notification message to install plugins. Follow the steps of Plugins Installation part below to learn how to do this
Step 1: Once you activate AmyMovie, you will receive a notification message at the top of the screen that shows you which are required plugins and which are recommended plugins for theme
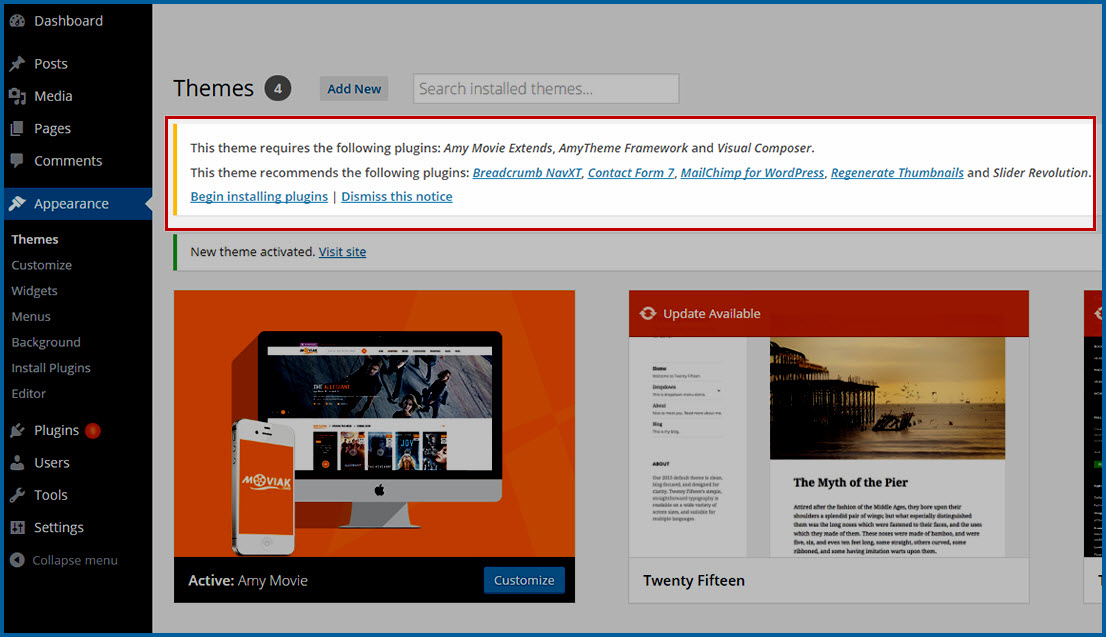
Step 2: Click on Begin Install Plugins link under the message to go to Plugin’s list in which you can install and activate the required and recommended plugins. Tick on the box for plugins you wish to install => Click on Bulk Action to see drop-down list => Install => Apply button
Important: Required plugins are compulsory plugins to make AmyMovie work.
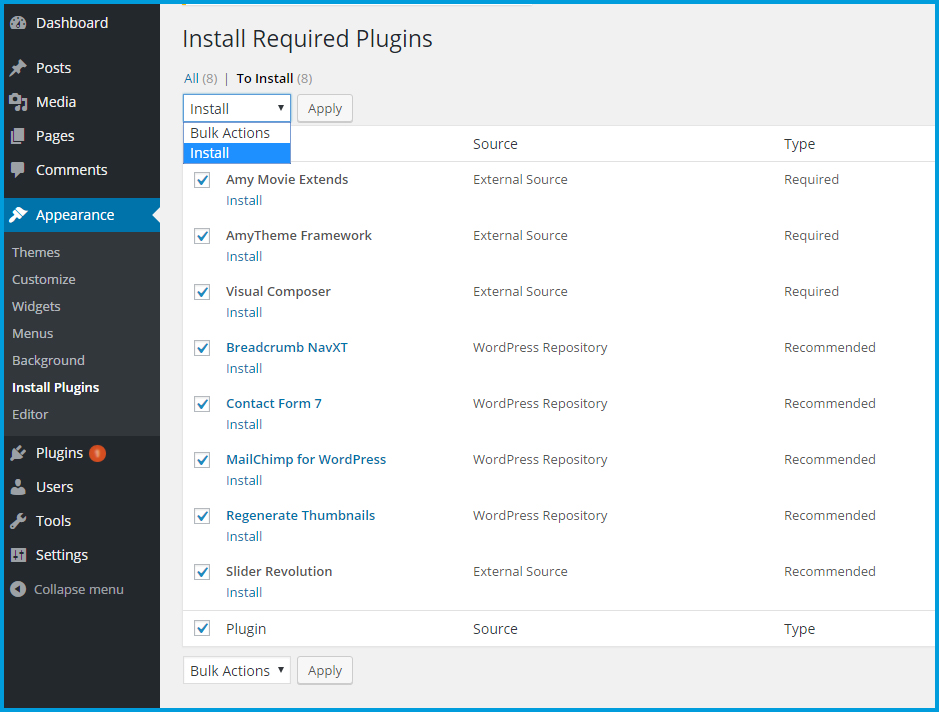
Step 3: Wait for some seconds, after all of the plugin is installed, from Dashboard => Plugins, you will activate the plugins as you want.
By One-Click Demo, you are easy to set up a site the same as AmyMovie's demo in seconds. AmyMovie offers you two homepage and you are easy to install one as you want.
Important: Before installing demo, you need to make sure that AmyMovie theme and required plugins (Amy Movie Extends, AmyTheme Framework and WPBakery Visual Composer) are installed and activated successfully
From Dashboard => AmyMovie => Demo Content => There are two demo layouts to choose. Click on Install button at Homepage layout you want to install, a popup will appear to ask if you want to continue installing the demo content. Click on OK button if you want to continue. Please wait for some seconds, once the installing process is completed, you will see the message Demo's Installed
Once the instlling demo precess completed, you will see the informing message
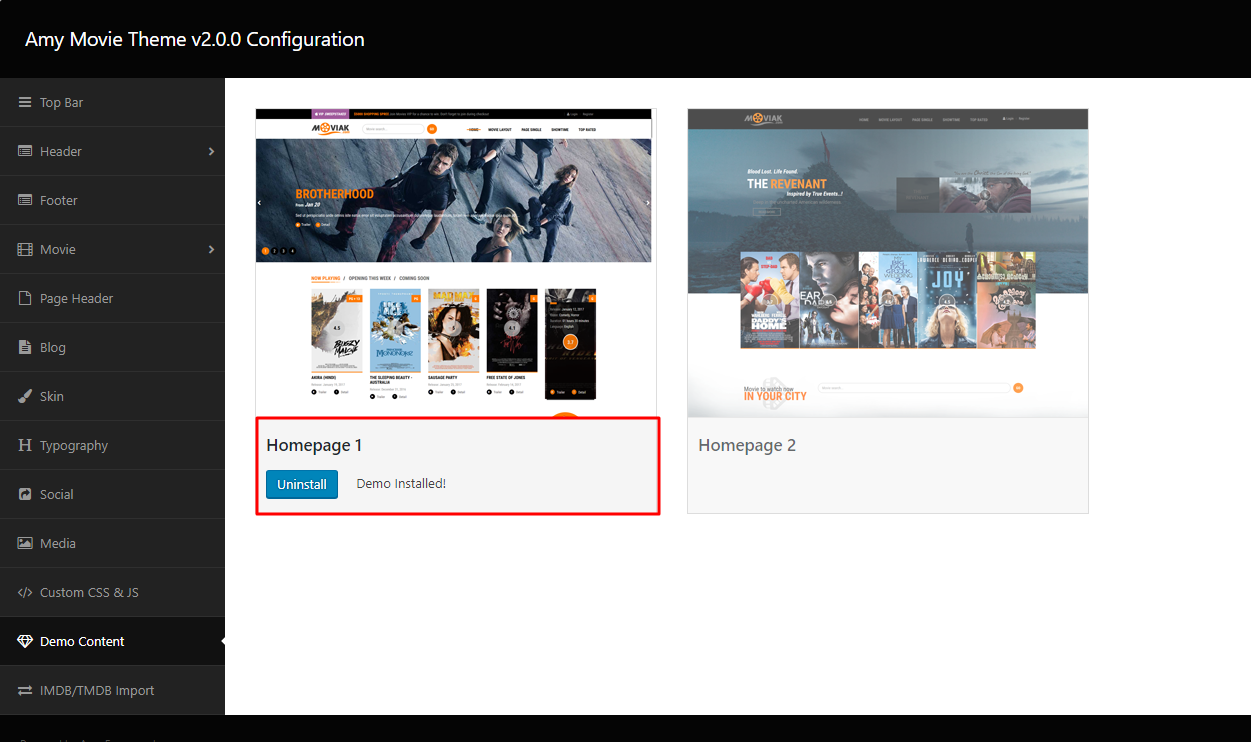
Uninstall Demo: If you want to uninstall the demo, from Dashboard => AmyMovie => Content Demo => Click on Uninstall button and wait for some seconds.

After installing AmyMovie quickstart successfully, you need to change the general information for the theme to make it step by step become your own website.
By theme options, you are allowed to tweak a theme’s global settings. You can change the logo, topbar, theme color, theme footer, copyright, social network, and more...
From Dashboard => AmyMovie, you can change the settings of theme options here.
This section allows you to customize theme top bar. You can add modules to display Text, Link, Social List, WP login or Menu on the top bar.
From Dashboard => AmyMovie => Topbar => you can add module for top bar right or top bar left.
Choose On for Enable Top Bar option to enable theme top bar. You can add modules on the top bar position.
» Top Bar left: Click on Add New Module button => Module Type => click on Arrow Down button to choose a module from the list.
» Top Bar Right: Click on Add New Module button => Module Type => click on Arrow Down button to choose a module from the list.
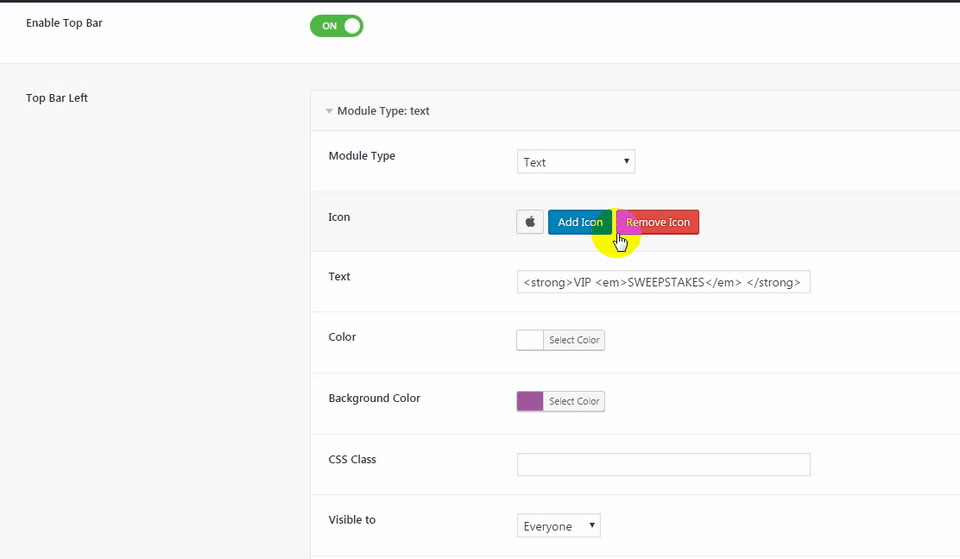
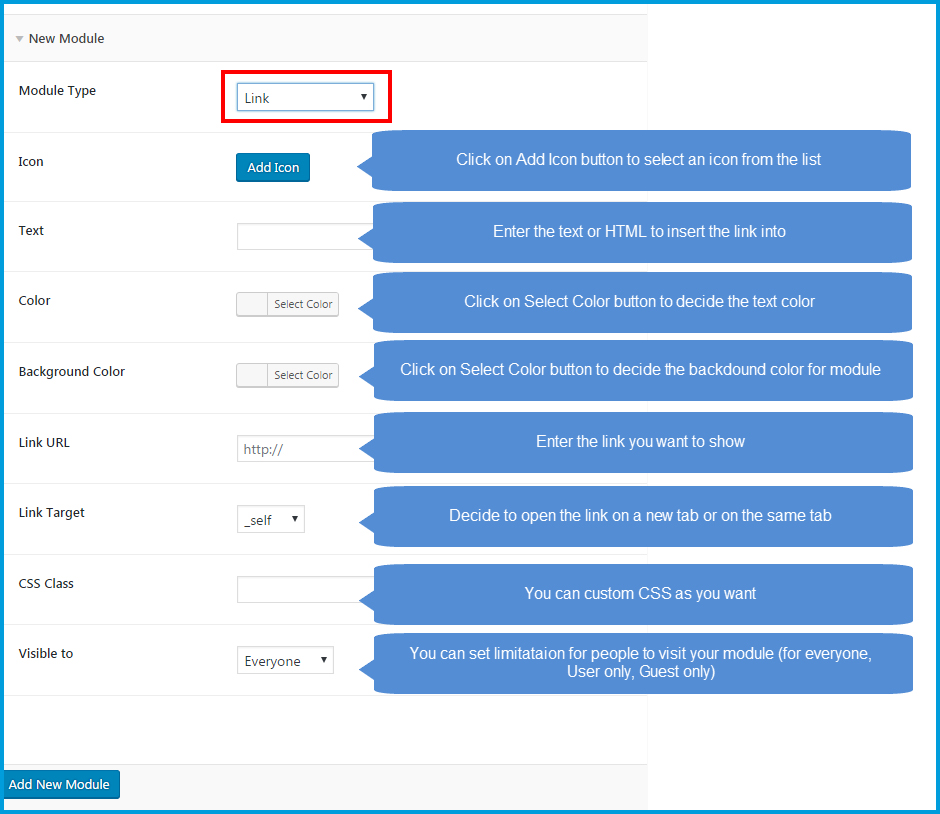
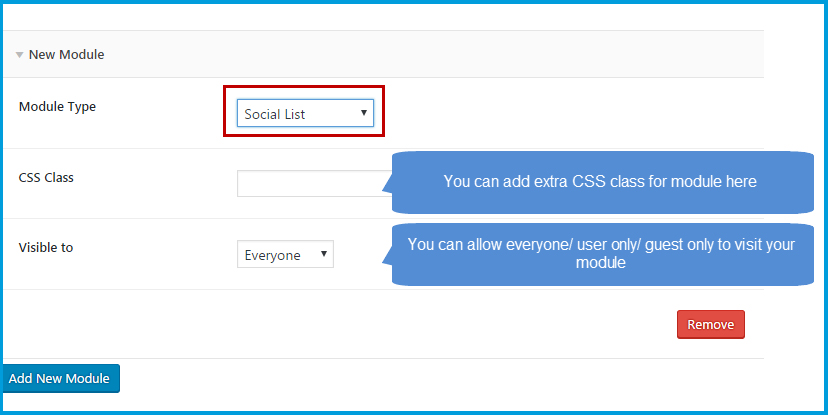
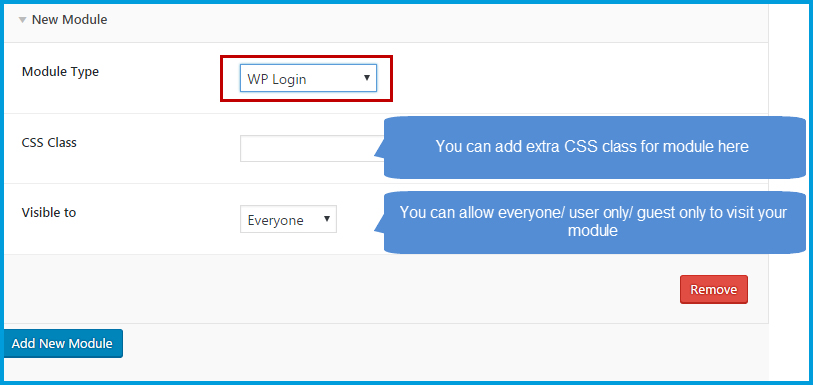
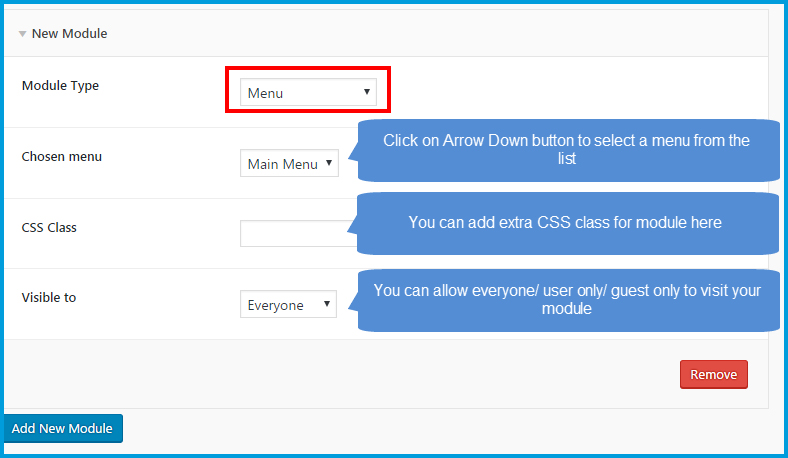
Here we introduce you the detail guide to add modules into the top bar. AmyMovie supports 5 module types, they are Text, Link, Social List, WP Login, Menu.
1. Link module: If you choose Module Type is Link, at the backend you can see
2. Text module: If you choose Module Type is Text, at the backend you can see

3. Social module: If you choose Module Type is Social, your social network (Facebook, Google+, Twitter, Pinterest will appear on the module.
4. WP Login module: If you choose Module Type is WP Login, the default WordPress login module will display on the top bar.
5. Menu module: If you choose Module Type is Menu, a menu will display on the top bar.
On the frontend, you can see theme top bar here

Header section allows you to change theme favicon, logo, header style, header skin (dark, light) and enable/ disable search module at Header part.
From Dashboard => AmyMovie => Header => Logo.
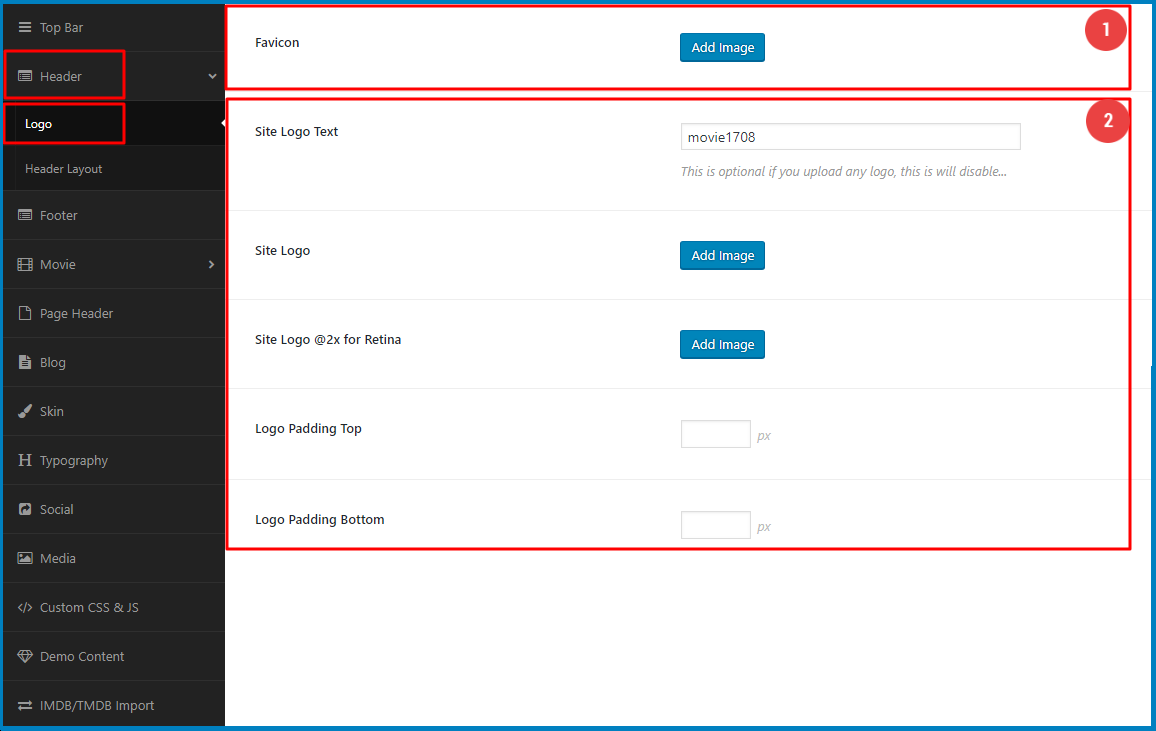
![]() Favicon: is known as a page icon or an urlicon, it is an icon associated with a particular website or webpage.
Favicon: is known as a page icon or an urlicon, it is an icon associated with a particular website or webpage.
There are two ways to upload Favicon for your site
Note: If you choose Second Way to upload a favicon, First Way will be invalid.
![]() Logo: is associated with the value of the brand. AmyMovie allows you to add the logo as an image or a text.
Logo: is associated with the value of the brand. AmyMovie allows you to add the logo as an image or a text.
Note: if you upload a logo image, the logo text will be disabled automatically.
From Dashboard => AmyMovie => Header => Header Layout.
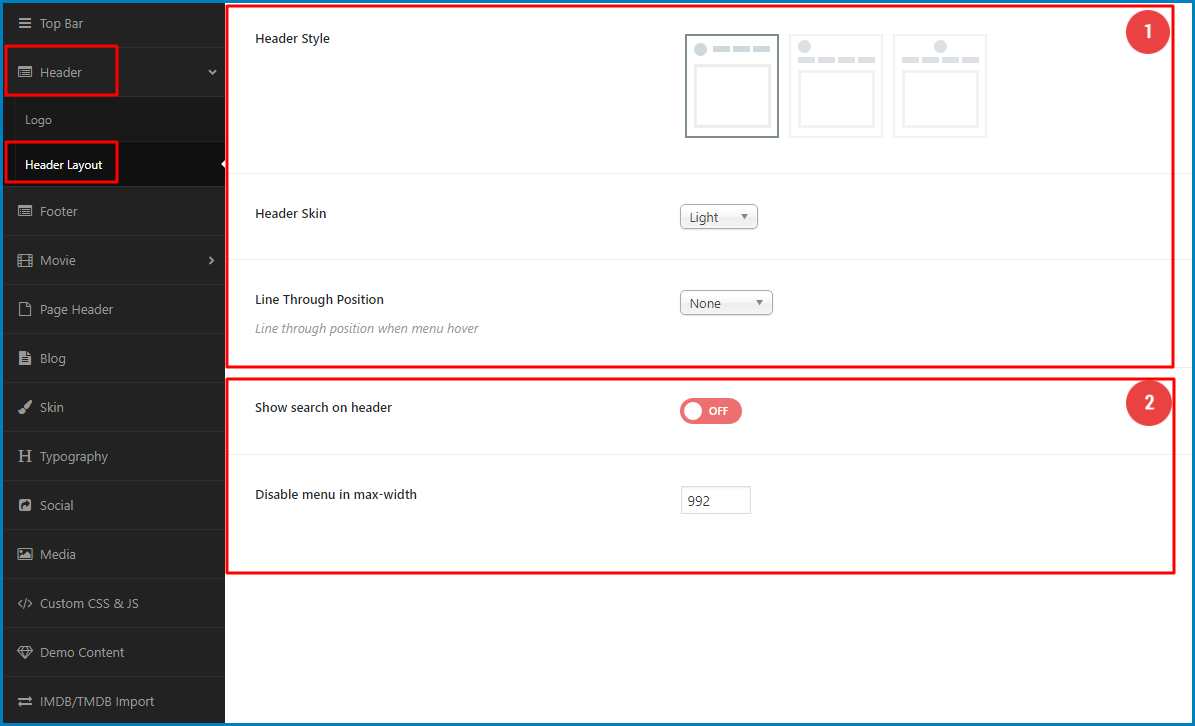
![]() Header Style: AmyMovie offers three nice header styles and 2 header skins (dark skin and light skin). Each header includes one logo and one main menu.
Header Style: AmyMovie offers three nice header styles and 2 header skins (dark skin and light skin). Each header includes one logo and one main menu.
» Style 1: Logo top left + Menu top right

» Style 2: Logo top left + Menu under

» Style 3: Logo top center + Menu top center

» Header Light Skin and Style 1

» Header Dark Skin and Style 2

» Line Through Position :You can choose line through position when menu hover such as Bottom, Center, of None.
![]() Show Search on Header: Select On/ Off to show/ hide Search module at Header.
Show Search on Header: Select On/ Off to show/ hide Search module at Header.
» Disable Menu in Max Width: The maximum width value of the screen in which the menu will change from normal style to sticky style is 992px by default.
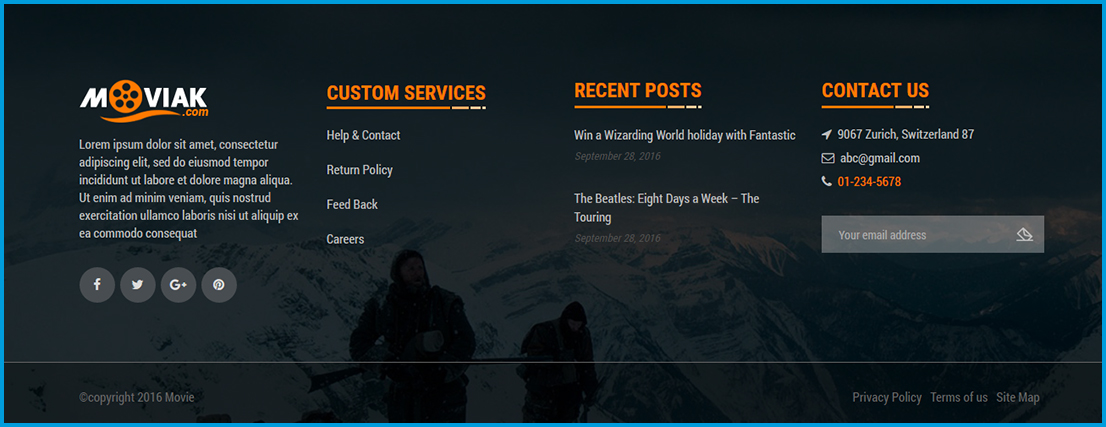
You can specific your footer columns and customize the copyright section by adding new modules (Text, Link, Social List, WP Login, Menu) like the same as Top bar section.
From Dashboard => AmyMovie => Footer.
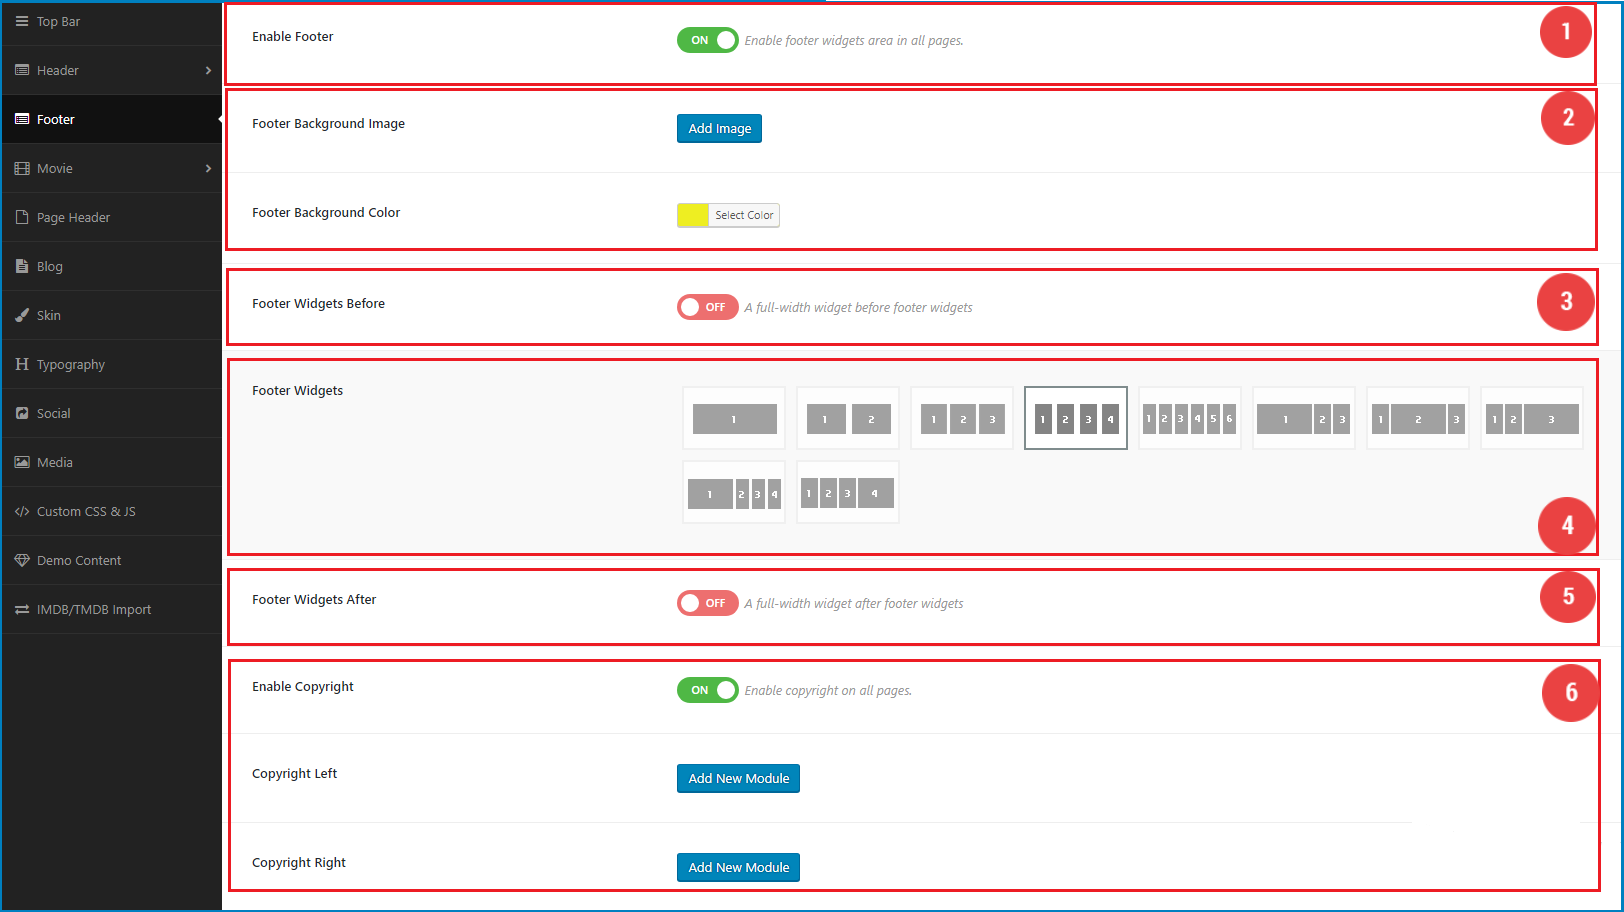
![]() Footer Widgets: Here you can decide the footer style with the number of columns. AmyMovie offers 10 nice footer styles.
Footer Widgets: Here you can decide the footer style with the number of columns. AmyMovie offers 10 nice footer styles.
After choosing one of 10 footer styles, at Appearance => Widgets, you will see the list of footer widgets area which is corresponding to the number columns of Footer style you chose before.
![]() Copyright: This section allows you to enable/ disable copyright part, and add new module like text, link, social list, WP login, or menu module to the copyright field.
Copyright: This section allows you to enable/ disable copyright part, and add new module like text, link, social list, WP login, or menu module to the copyright field.
The config of the module style is the same as the config at Topbar part
Here we show you how to add your Footer content.
Step 1: From backend => Appearance => Widgets.
Step 2: Here you will find the Footer Widget Areas.
Step 3: Drag and Drop the widgets as you like to the Footer Widget Areas.

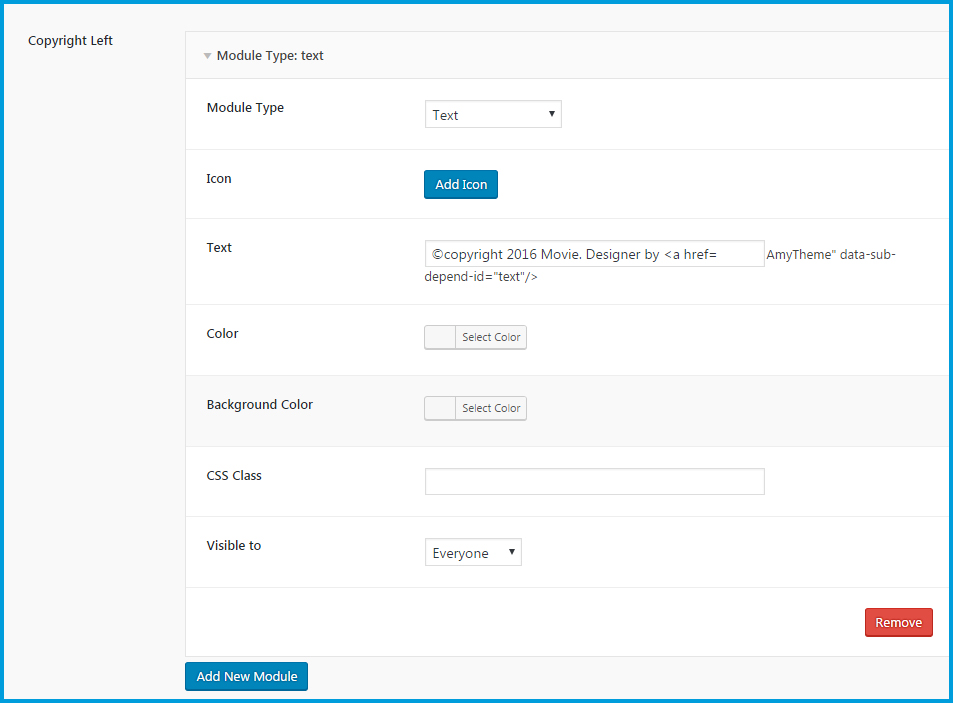
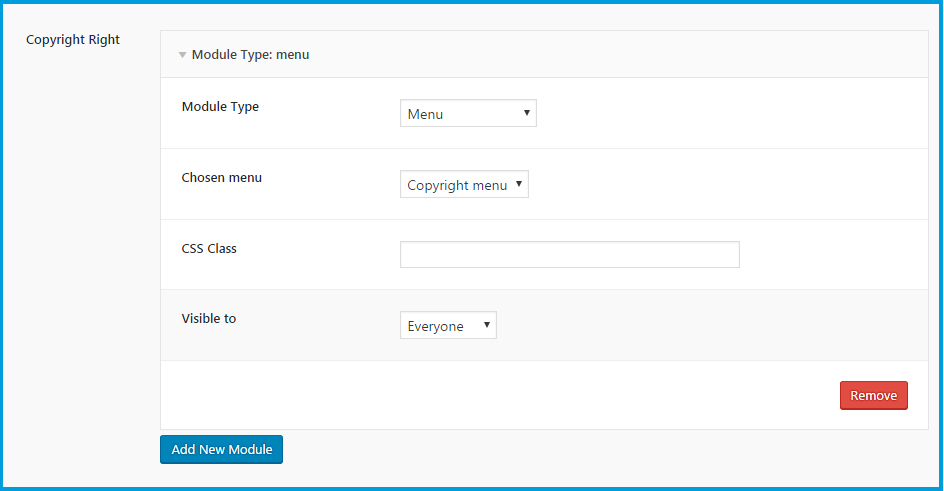
In AmyMovie demo, Copyright position includes the copyright text in the left and a menu in the right. Here we show you how to create a copyright like our demo.
Step 1: From backend => AmyMovie => Footer.
Step 2: Choose On for Enable Copyright option.
Step 3: Add Text module for Copyright Left option.
Step 4: Add Menu module for Copyright Right option.
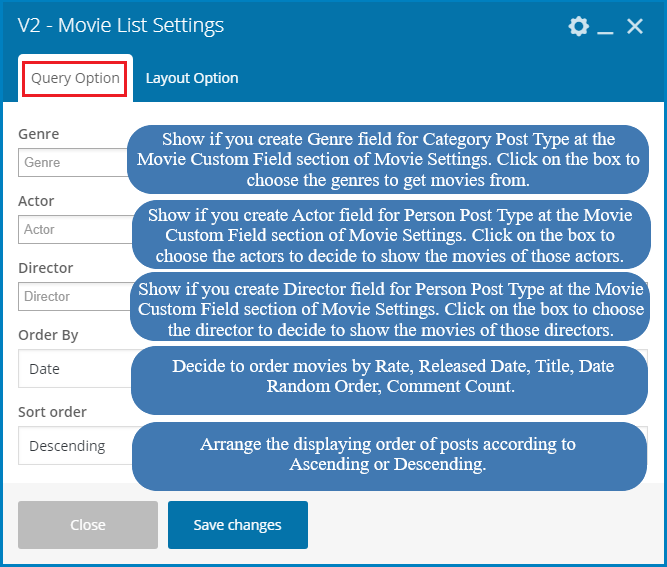
This section allows you to customize the URL of movie/ cinema/ actor/ director/ genre pages and set the global settings for the single movie pages and genre pages.
From Dashboard => AmyMovie => Movie => General.
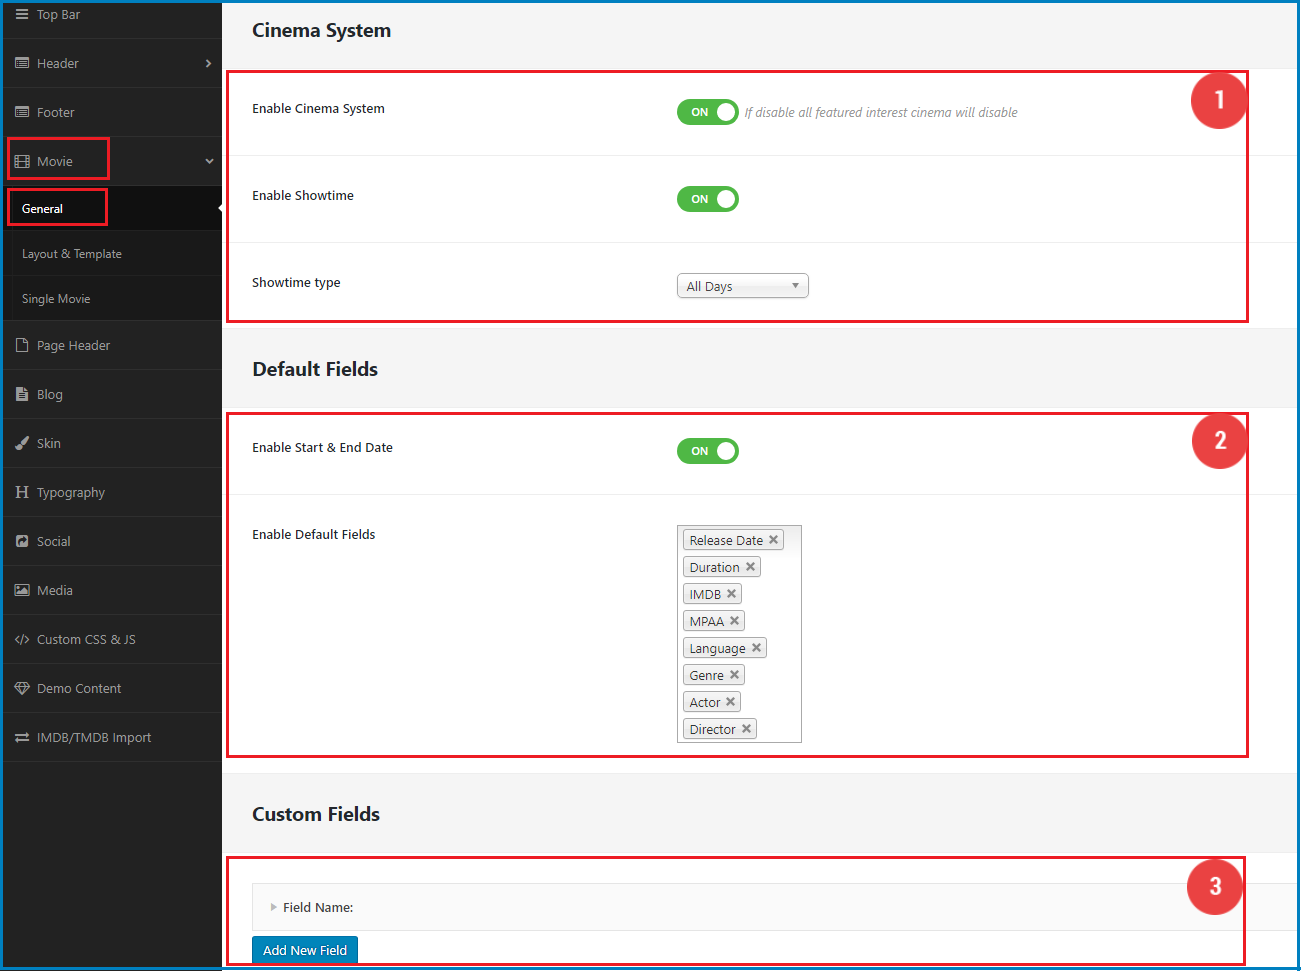
![]() Cinema System
Cinema System
![]() Default Fields
Default Fields
Custom Fields : This option allows you to create Default Fields with Fields Name and Type.
From Dashboard => AmyMovie => Movie => Layout & Template .
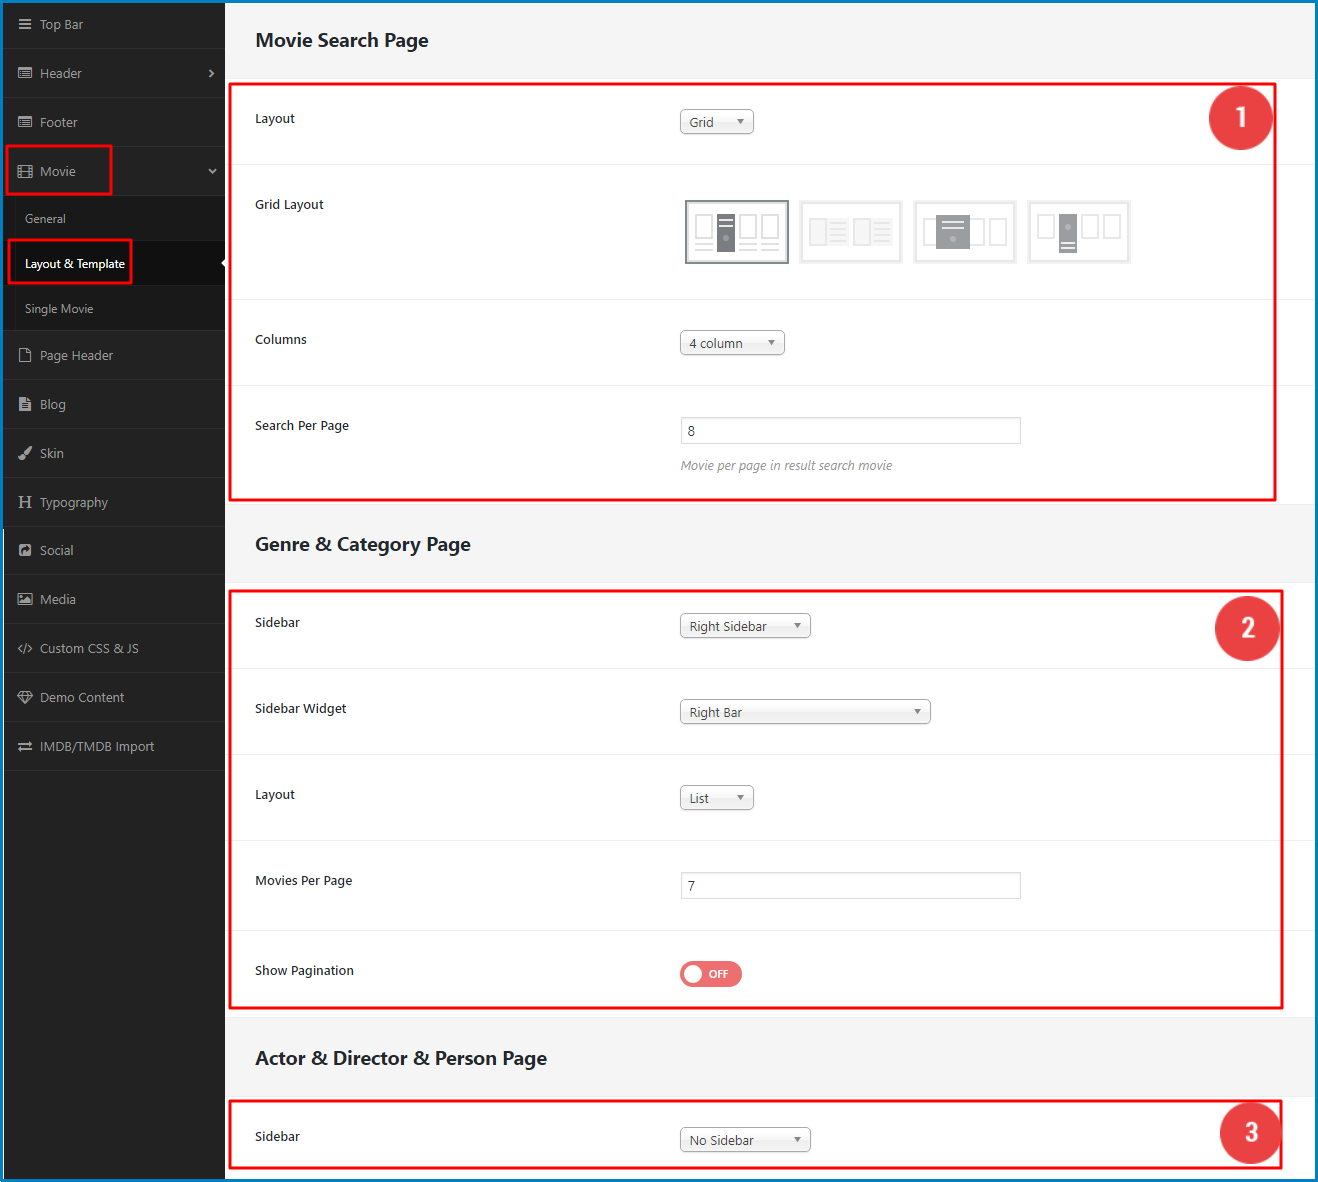
![]() Movie Search Page .
Movie Search Page .
![]() Genre & Category Page.
Genre & Category Page.
![]() Actor & Director & Person Page.
Actor & Director & Person Page.
From Dashboard => AmyMovie => Movie => Single Movie .
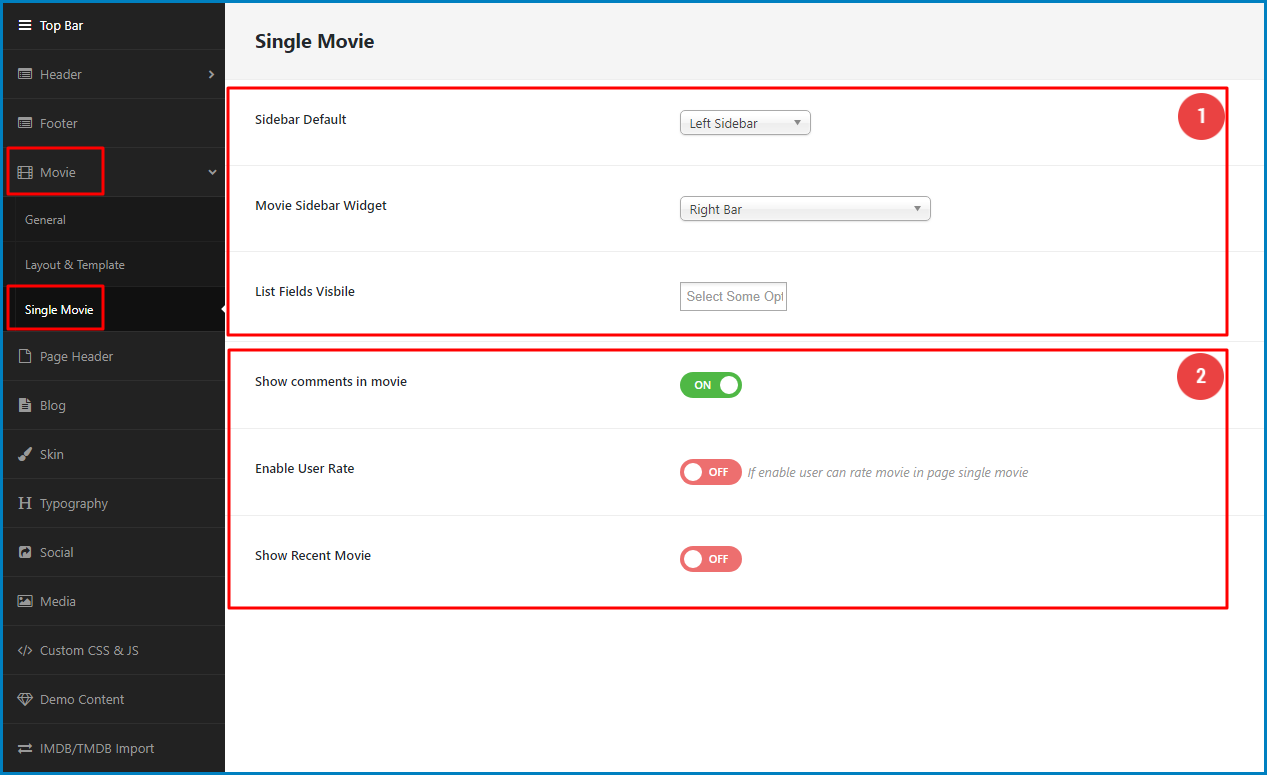
![]() Sidebar Default : You can choose Left Sidebar , Right SideBar and None SideBar for Single Movie.
Sidebar Default : You can choose Left Sidebar , Right SideBar and None SideBar for Single Movie.
![]() Show Comment in Movie: Choose On/ Off to show/ hide comments in Movie Detail page.
Show Comment in Movie: Choose On/ Off to show/ hide comments in Movie Detail page.
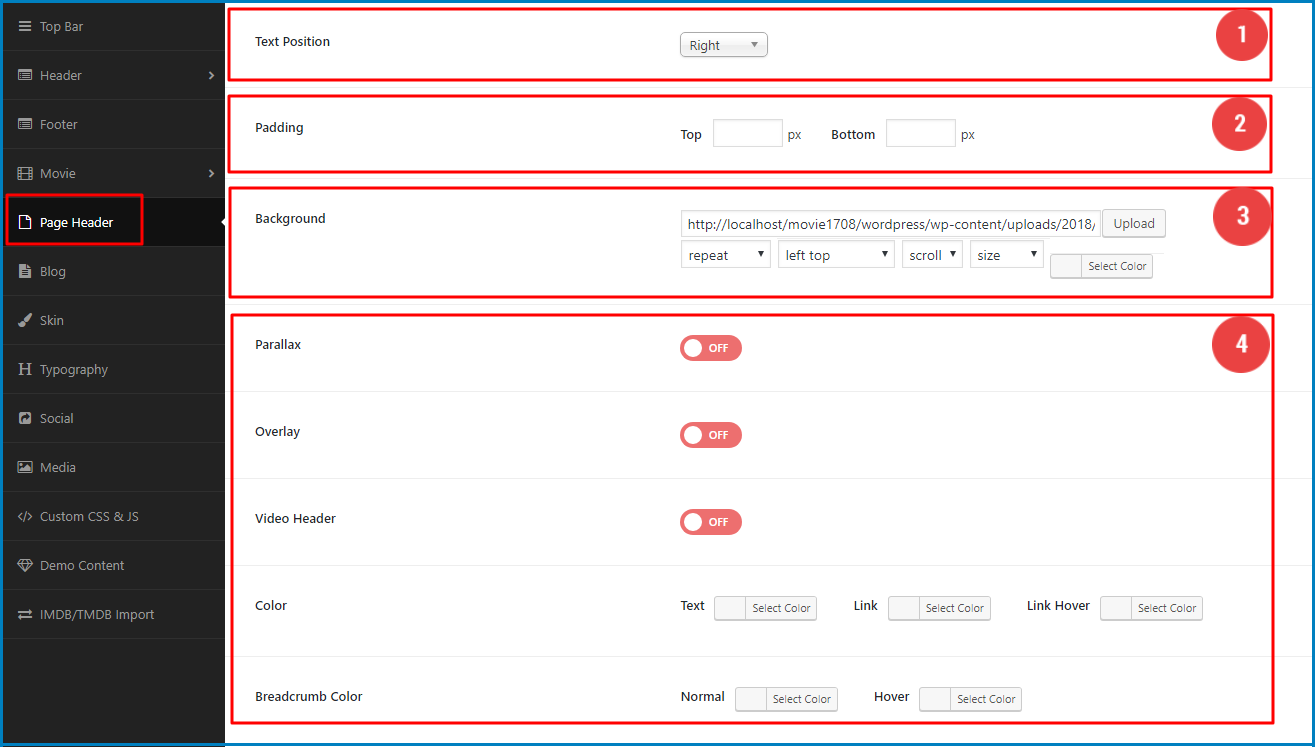
Header section allows you to set the global setting for your Page Header
From Dashboard => AmyMovie =>Page Header.
Blog section allows you to set the global setting for your blog pages: set blog page layouts with sidebar or without sidebar, list layout, grid layout or masonry layout; decide content position and enable/ disable pagination. You also can set global settings to add the recent posts for the single post page.
From Dashboard => AmyMovie => Blog.
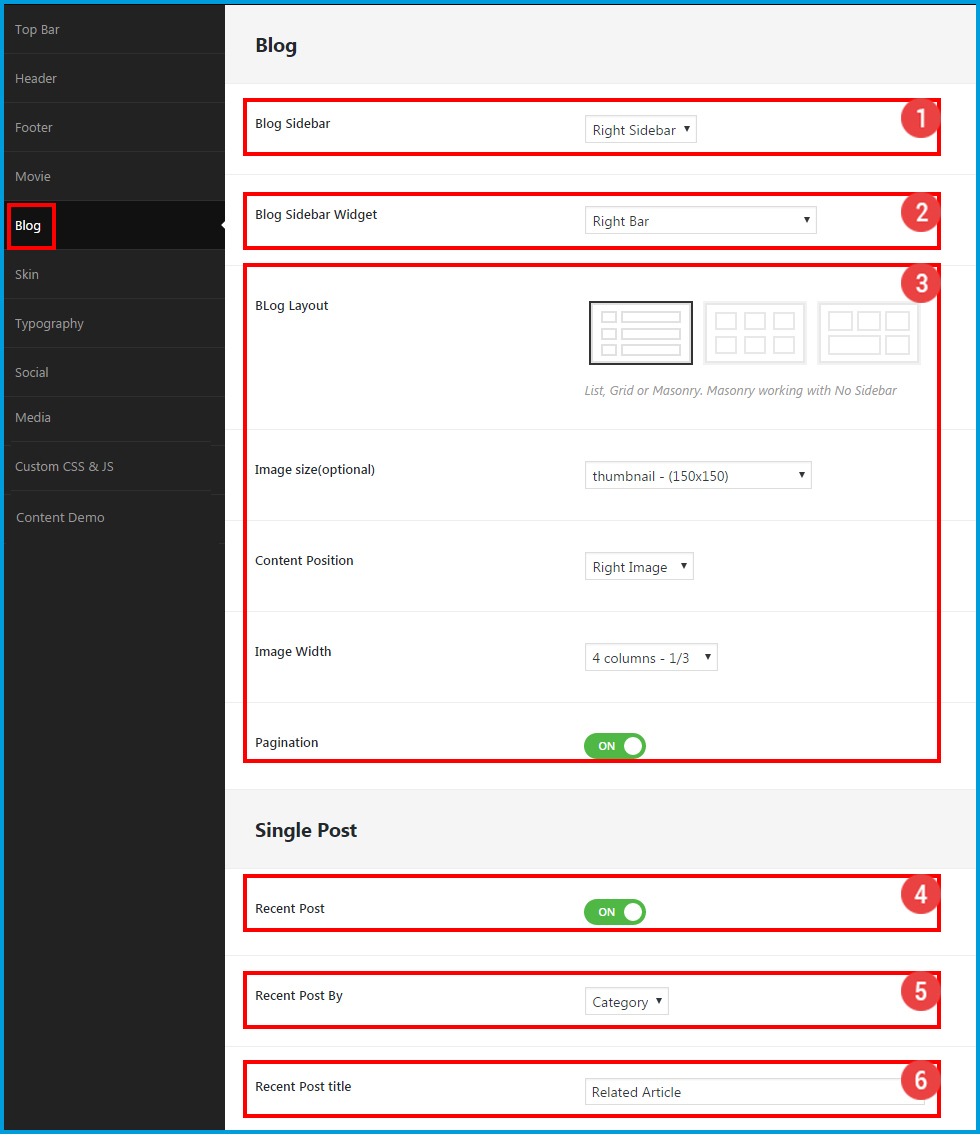
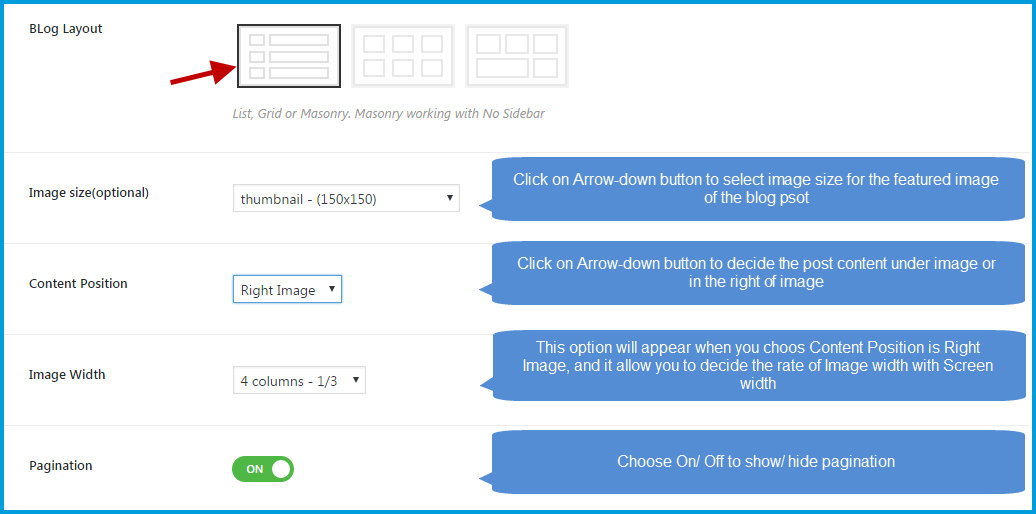
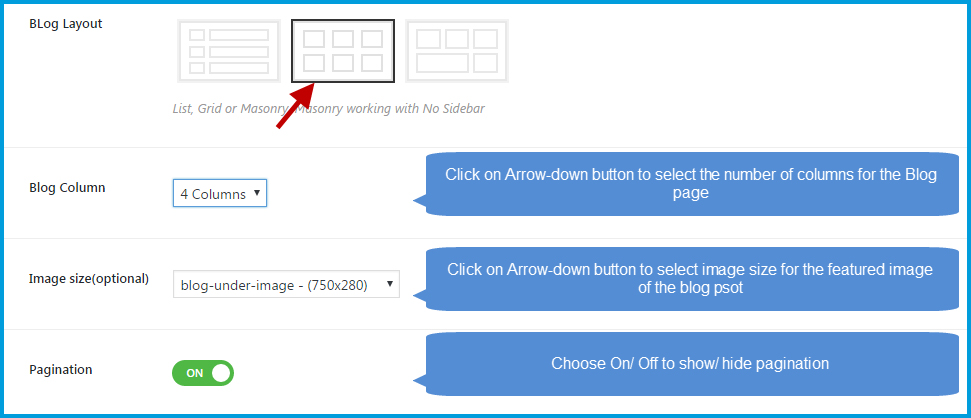
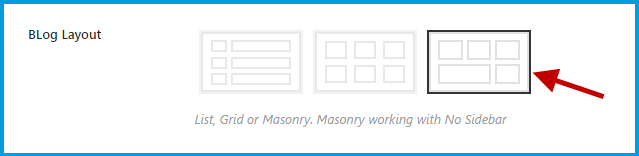
![]() Blog Layout: There are three layouts to display the posts on your Blog page.
Blog Layout: There are three layouts to display the posts on your Blog page.
» Blog Layout - List Style
» Blog Layout - Grid Style
» Blog Layout 3 - Masonry Style
Please note that Masonry style only works when you choose No Sidebar for Blog Sidebar option.
Now you can set the global configuration for Single Post page at Single Post section
Skin section allows you to change the general skin color of your website and you can set up the global page title bar.
From Dashboard => AmyMovie => Skin.
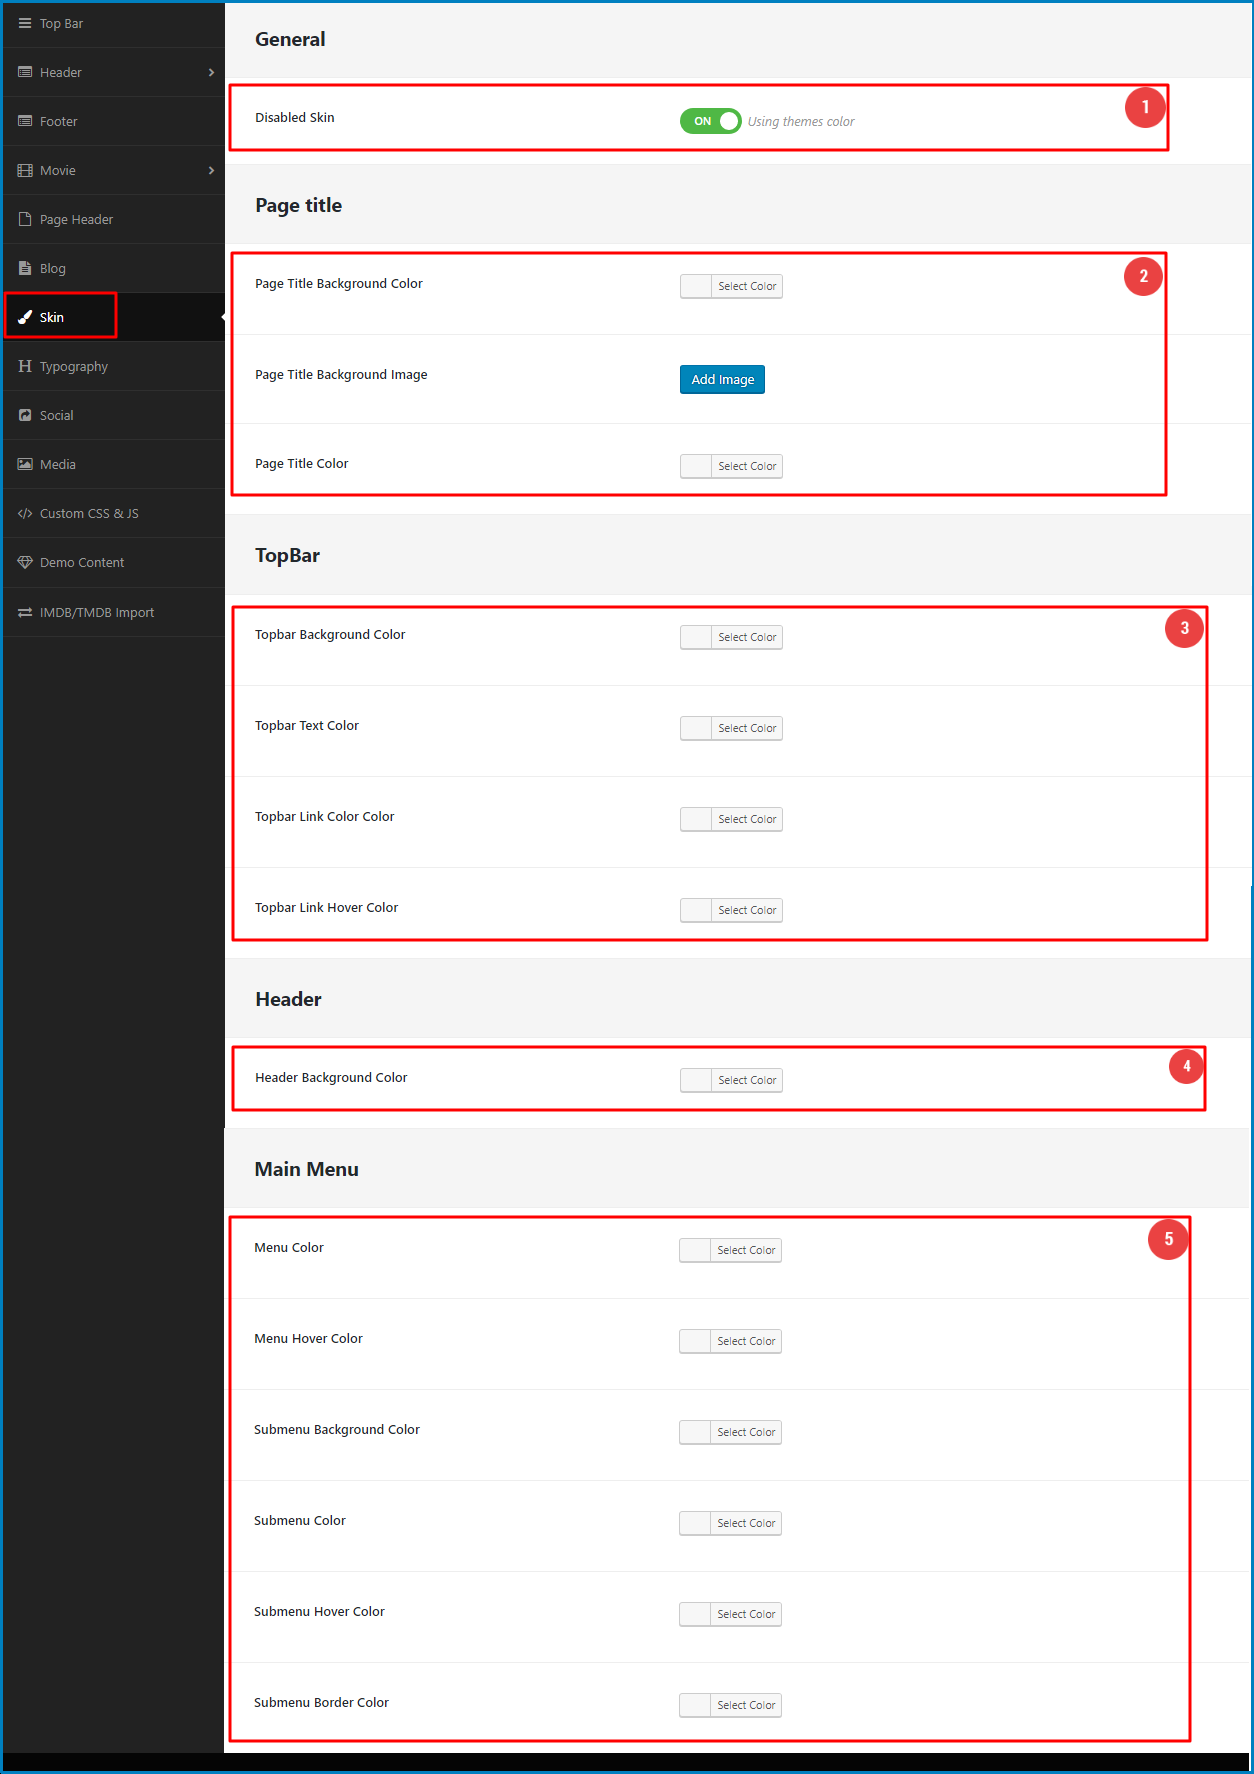
![]() General.
General.
![]() Page Title.
Page Title.
![]() Top Bar.
Top Bar.
![]() Header.
Header.
![]() Main Menu
Main Menu
From Dashboard => AmyMovie => Typography => click on Add New Typography button to add new typography for new parts
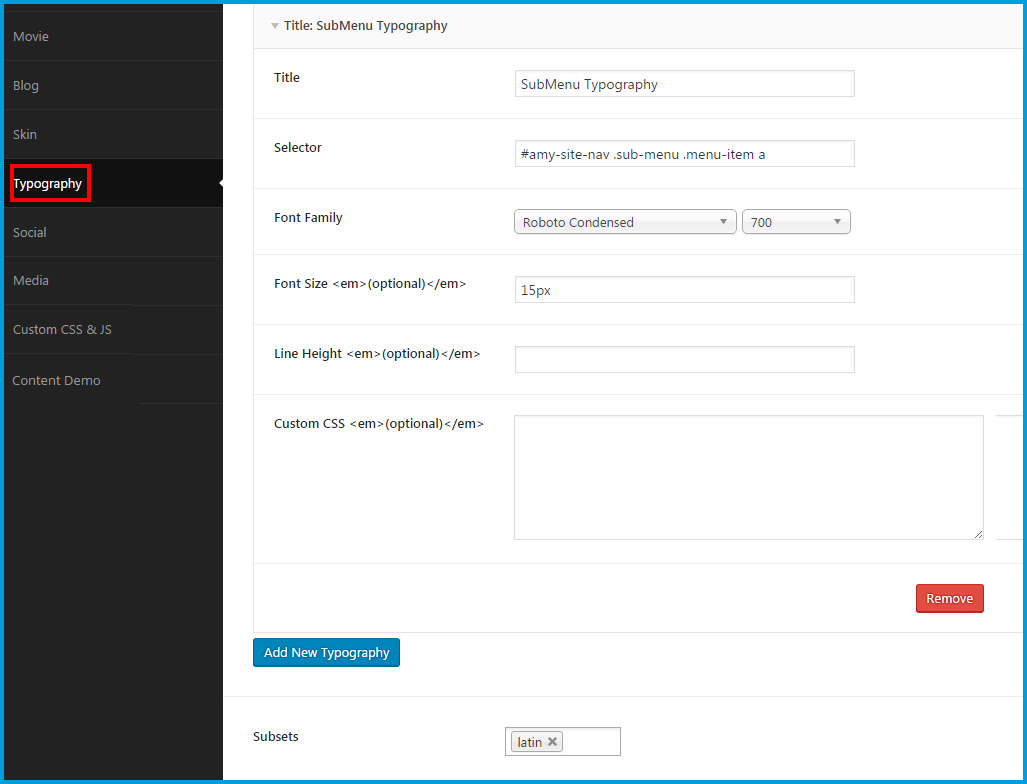
Click on Save button to save any your changes.
Media section allows you to add new image size used for Image Size option.
From Dashboard => AmyMovie => Media.
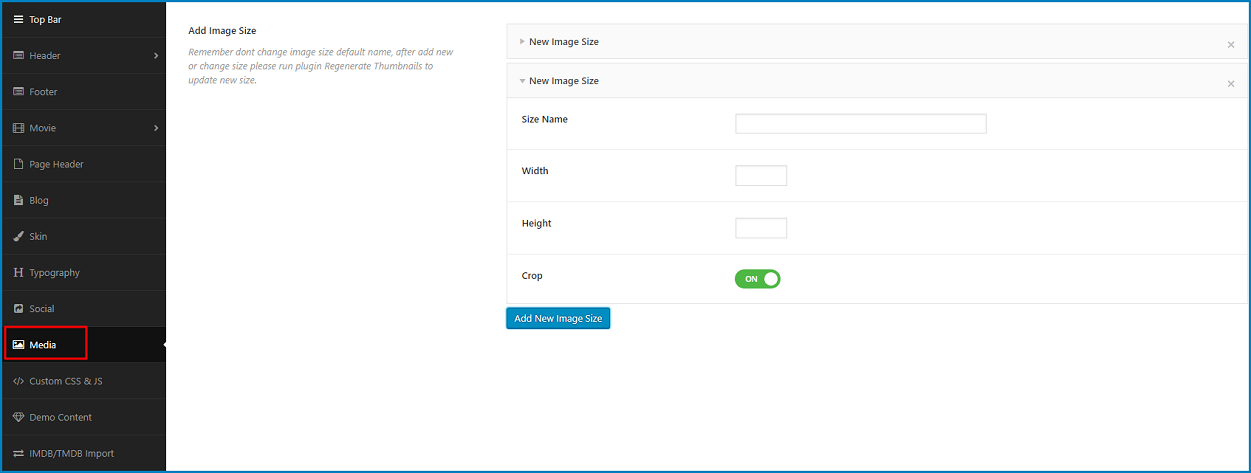
» Step 3: Enter size name to help you easy to use.
For example: if you want to create new size for images at topbar position, you can create a size name is “topbar”
» Step 4: Enter the width/ height values for image as you want (unit: pixel) at Width & Height option.
Crop option: If you choose On, the image will be cropped when its original size is larger than the custom image size you choose.
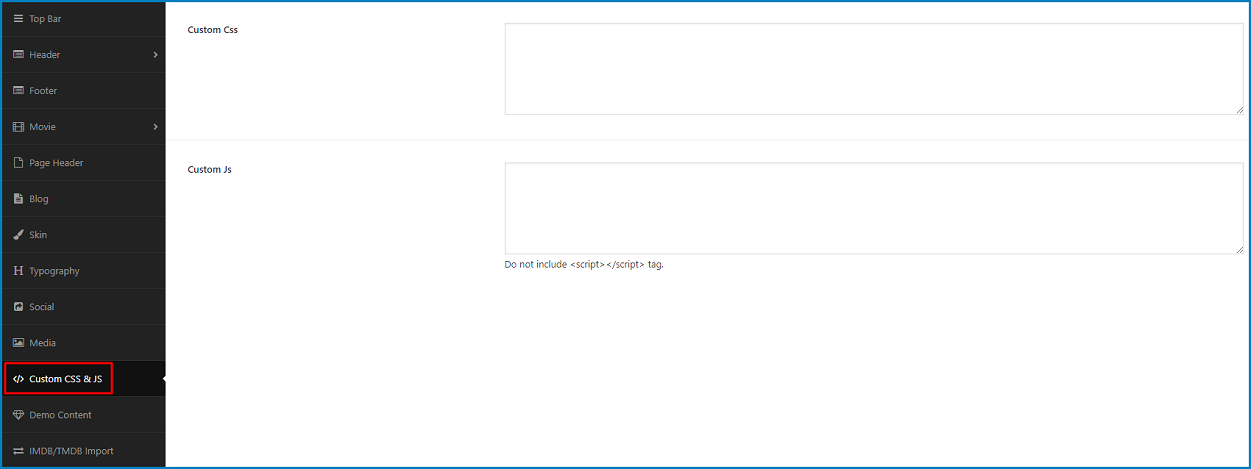
This option is optional. If you have coding knowledge, you can custom CSS and JS by yourself.
From Dashboard => AmyMovie => Custom CSS & Js.
This option allows you to install or uninstall demo content by some clicks.
From Dashboard => AmyMovie => Demo Content.
You can visit Demo Installation to get the detail guide for this part.
You can be easy and quick to import movie data from IMDb site. At IMDb Import section, you will enter your API key from "http://www.myapifilms.com/token.do"
From Dashboard => AmyMovie => IMDb Import.
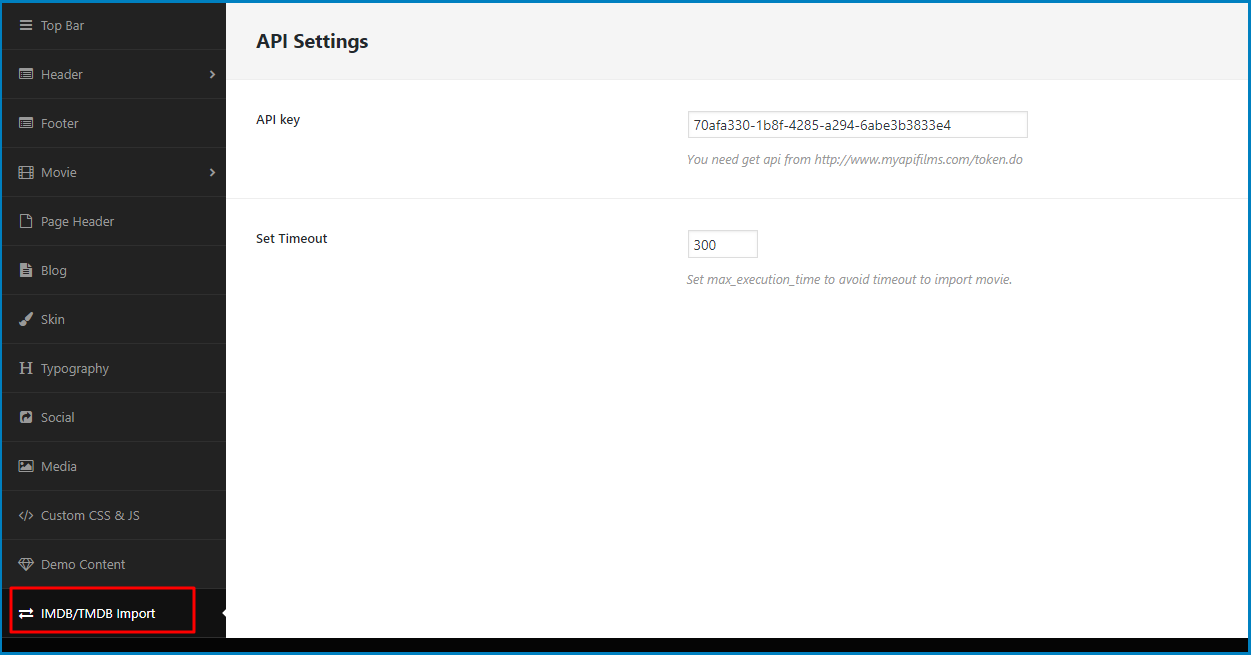
Please go to " http://www.myapifilms.com/token.do" to get your API key and note that. each IP can get one API key only.
This section guildes all the things you need to create for your movie websites. Here you will learn how to create new cinemas, actors, directors, genres, movies, blog posts, menu,... and how to set up a homepage.
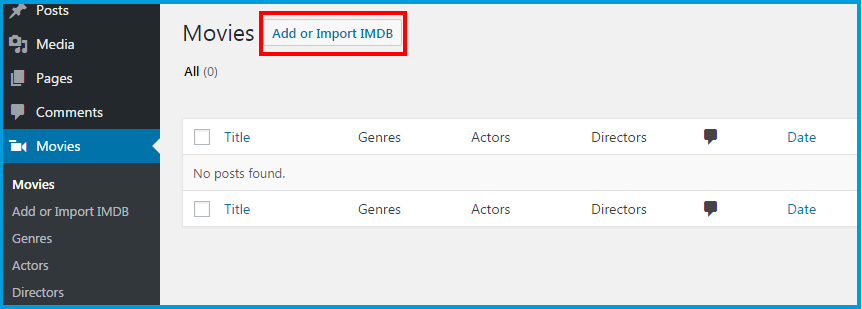
With IMDb Import feature, you are easy and quick to import movie data from IMDb website.
» Step 1: From Dashboard => AmyMovie => IMDb Importer, enter your API key => Click on Save button.
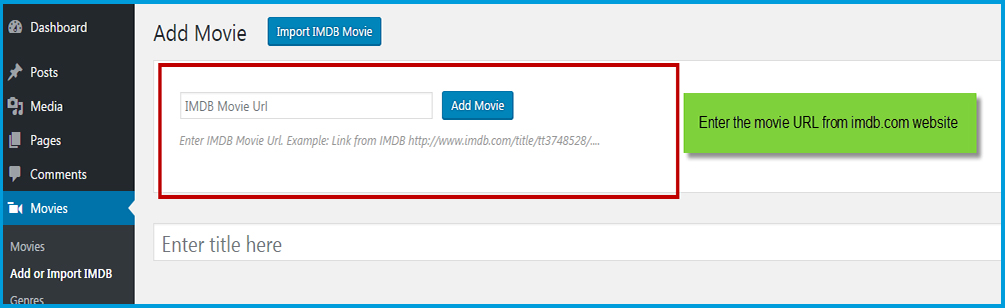
» Step 2: From Dashboard => Movies => clicl on Add or Import IMDB button
» Step 3: Click on Import IMDB Movie button.

» Step 4: Enter IMDb Movie URL from "http://www.imdb.com".
Cinemas will display on the movie page, showtime page and on the single cinema page.
From Dashboard => Cinema, you will learn how to add new cinemas.
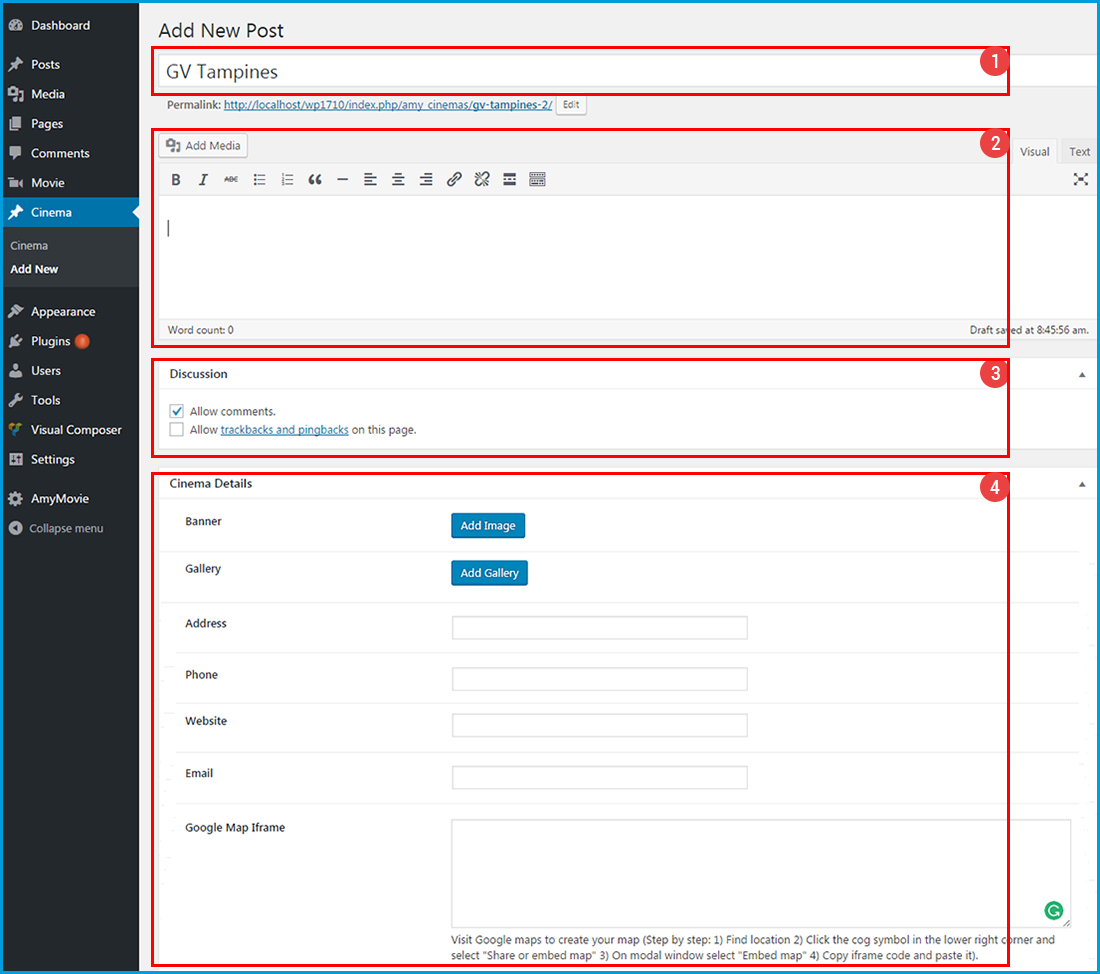
![]() Cinema Detail
Cinema Detail
After all, click on Publish button.
You can see the demo of Cinema page detail here
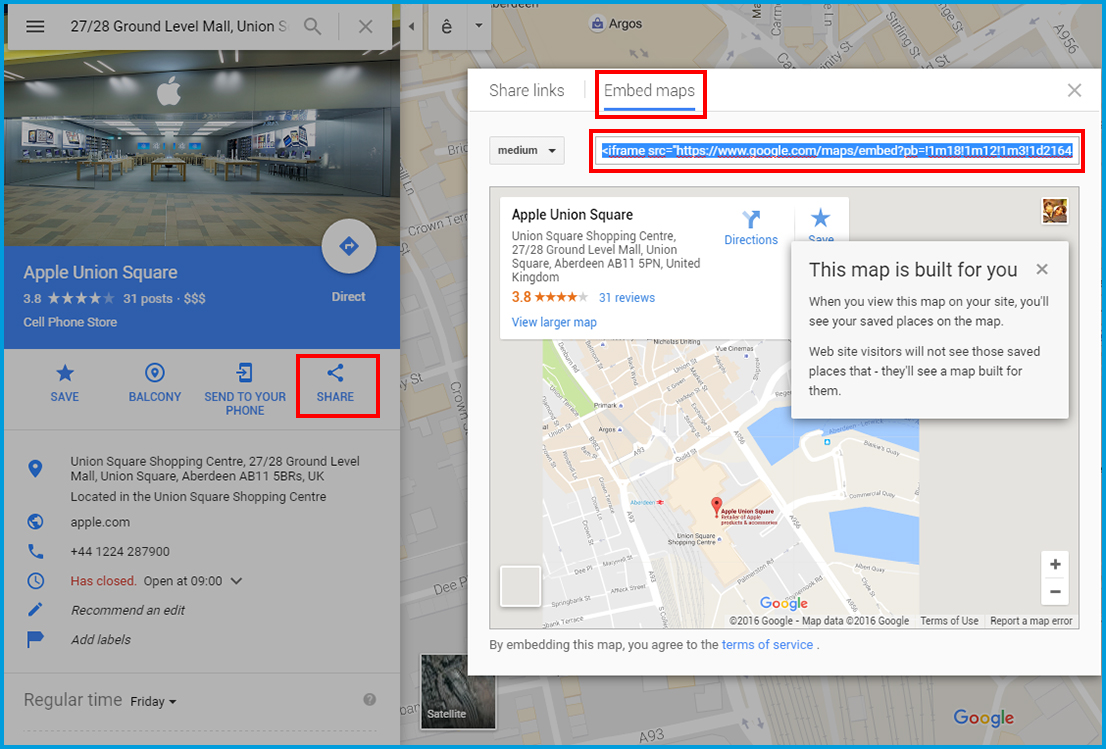
» Step 3: Click on Share button, a popup will appear, then choose Embed maps => copy the iframe code on the box.
Click on Update button to update your changes.
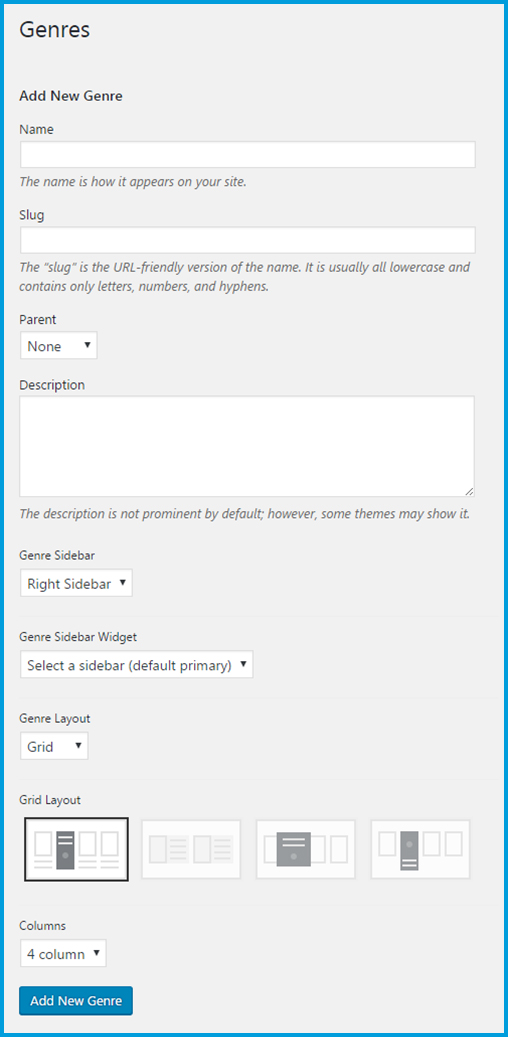
Genres will display on the movie page and on the genre page.
From Dashboard => Movie => Genres => Click on Add New Genre button. If you import movie from IMDb website, the genres will be imported and you can edit genre settings by yourself.
Actors will display on the movie page and on the actor page.
From Dashboard => Movies => Actors, you can add some images and information of actors, which will display on Actor Detail page.
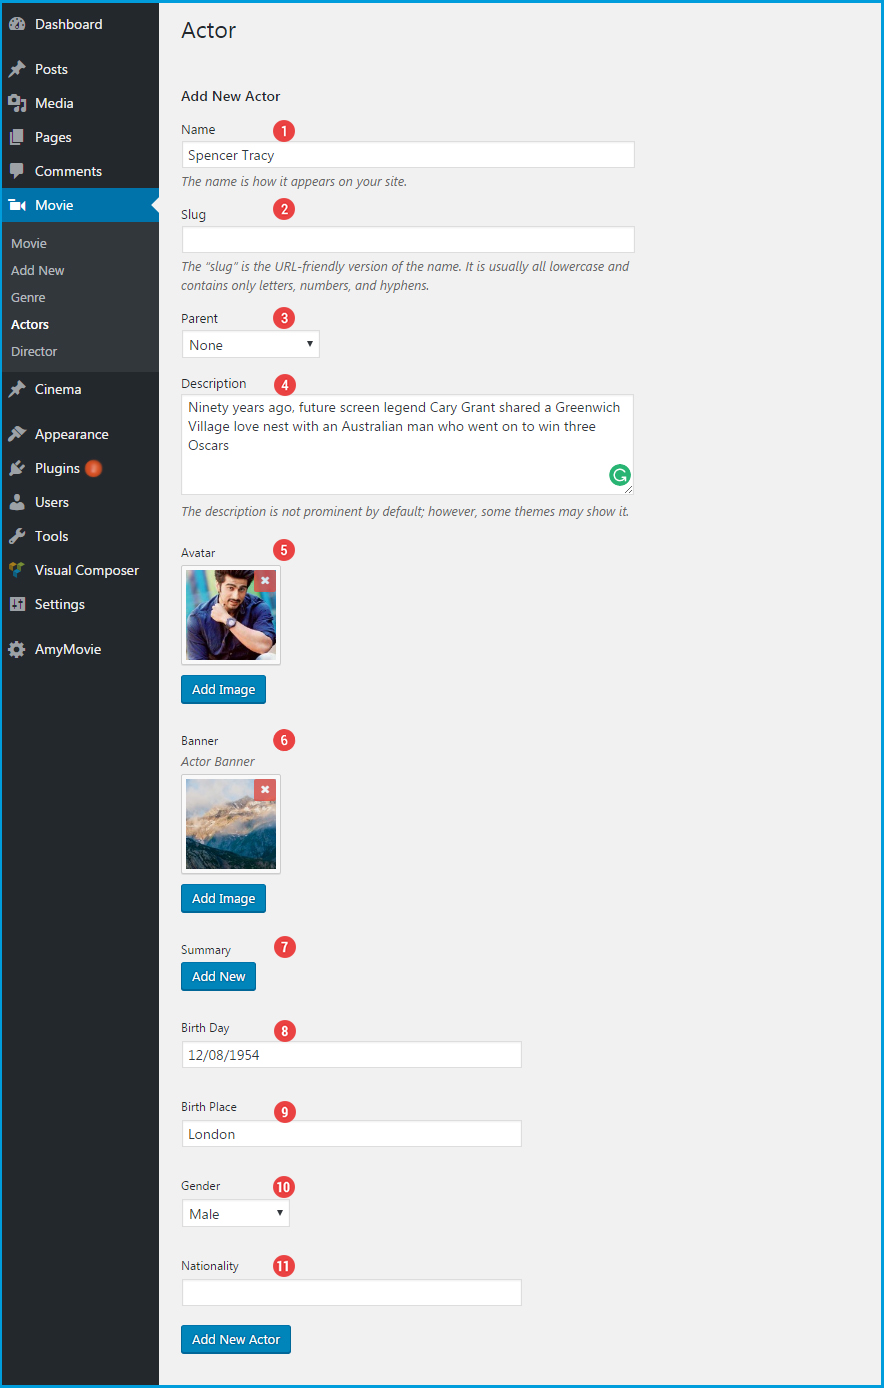
 Summary: Enter the summary of the actor.
 Birthday: Enter the actor’s birthday.
 Birth Place: Enter the birthplace of the actor.
 Gender: Choose gender of the actor: Male or Female.
 Nationality: Enter the actor’s nationality.
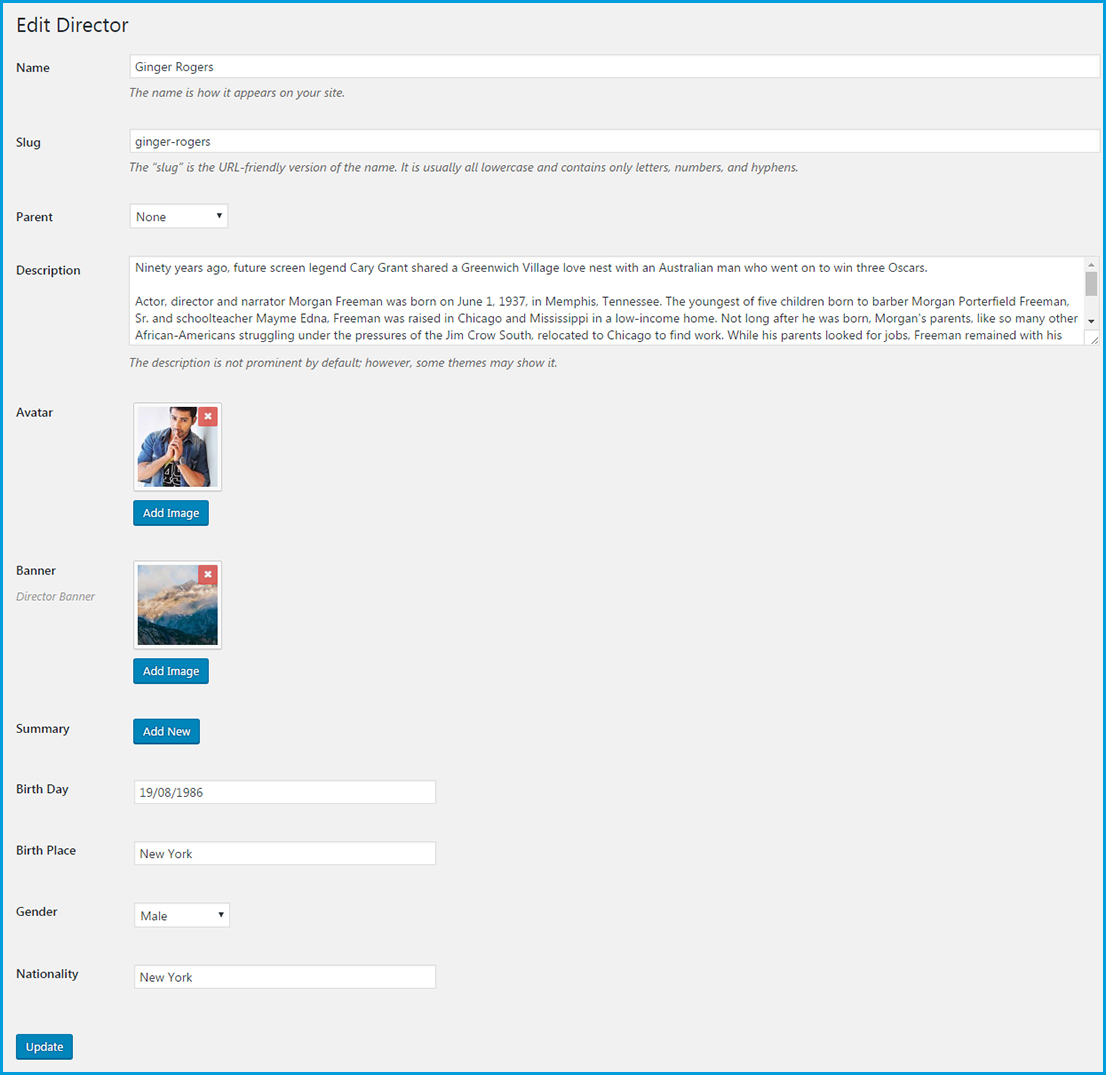
Directors will display on the movie page and on the director page
From Dashboard => Movies => Directors. The settings for a director’s information is total the same as actor’s. Please follow Actors section if you need the detail explanation
In AmyMovie, you will have two different types of options to customize the movies.
From Dashboard => Movies => click on Add or Import IMDB button to add new movie.
Please note that before creating a new movie, you need to create the data of cinemas, directors, actores, genres first.
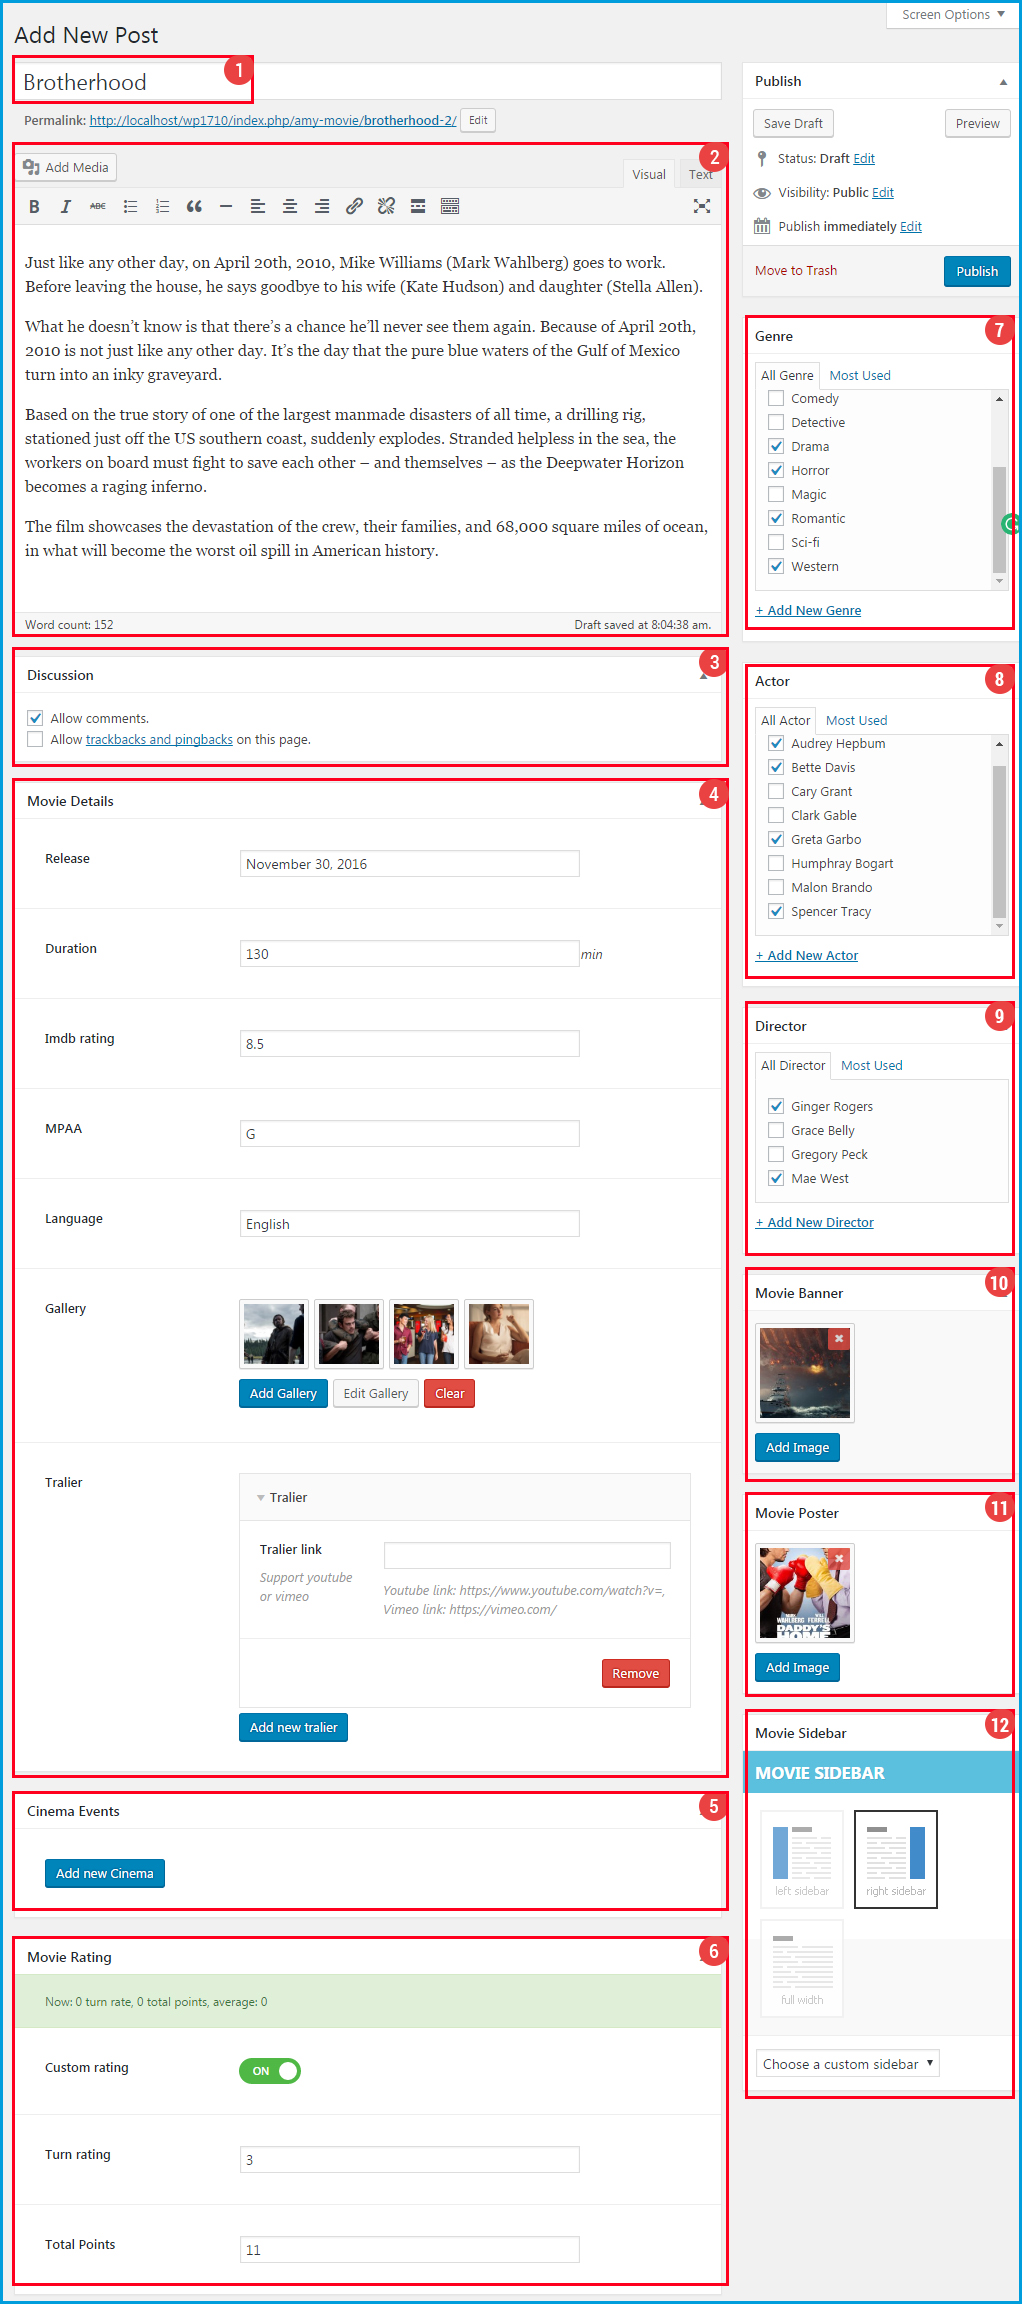
![]() Enter Movie Detail Information
Enter Movie Detail Information
The Movie Detail page will show the number of photos and the numbers of videos help visitors easy to follow.
![]() Cinema Events
Cinema Events
This section allows you to select the cinema which will show this film. You can add as many cinemas for the movie as you can, and at each cinema, you can add showing date and time.
Click on Add New Cinema button, and you will see some options like the image below
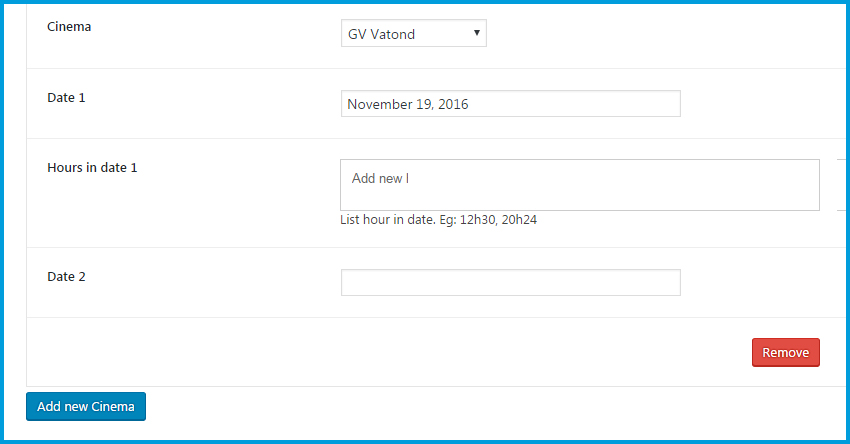
You will config like the same for Date 2. If you want to add new cinema for the movie, please continue to click on Add New Cinema button and config.
![]() Movie Rating
Movie Rating
If you choose Off for Custom Rating option, the rating will be calculated based on the rate of visitors on the frontend.
If you choose On for Custom Rating option, the admin can edit the rate at the backend
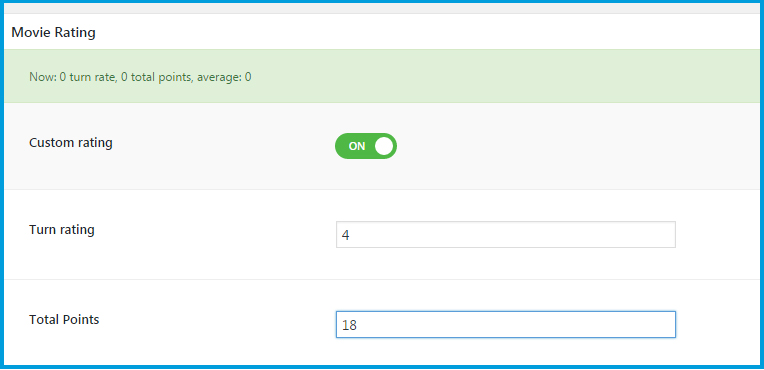
Please note that Average result = Total Points over Turn rating
The maximum of Average result is 5 (5 stars for a movie) so you need to calculate Turn rating and Total Points for a suit.
Genres: Tick on the box to select genres of the movie.
Actors: Tick on the box to select actors for the movie
Directors: Tick on the box to select directors for the film
Movie Banner: Click on Add Image button to select an image from library or upload an image from your local devices
Movie Poster: Click on Add Image button to select an image from library or upload an image from your local devices
 Movie Sidebar: You can decide the interface of Movie Detail page with Left Sidebar,
Right Sidebar or Full Width. Click on Choose a Custom Sidebar to select a sidebar from the list.
Movie Sidebar: You can decide the interface of Movie Detail page with Left Sidebar,
Right Sidebar or Full Width. Click on Choose a Custom Sidebar to select a sidebar from the list.
After all, click on Publish button to publish this movie.
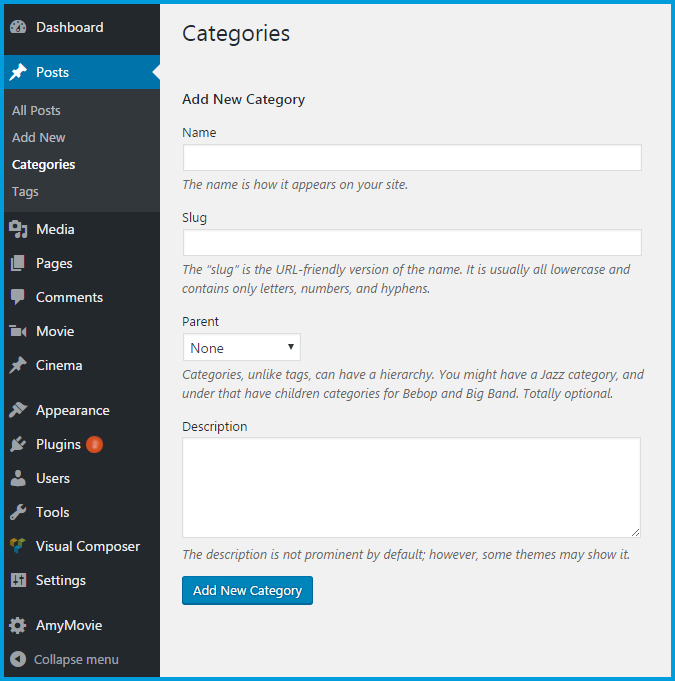
From Dashboard => Posts => Categories => Enter the category’s name at the Name option => click on Add New Category button to save and if you want you can continue to add new categories. You can explore the useful information for categories at Wordpress Codex
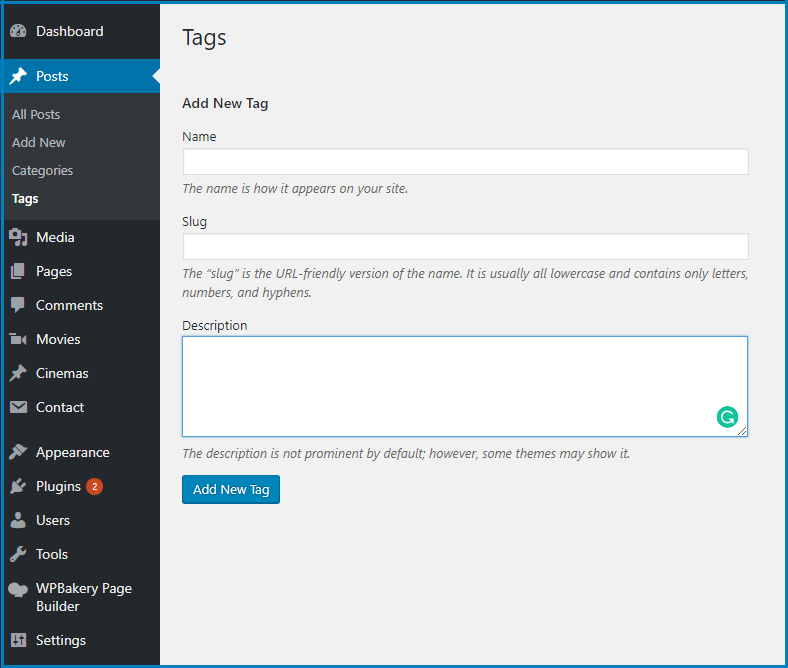
From Dashboard => Posts => Tags => Enter the tag’s name at the Name option => click on Add New tag button to save and if you want you can continue to add new tags.
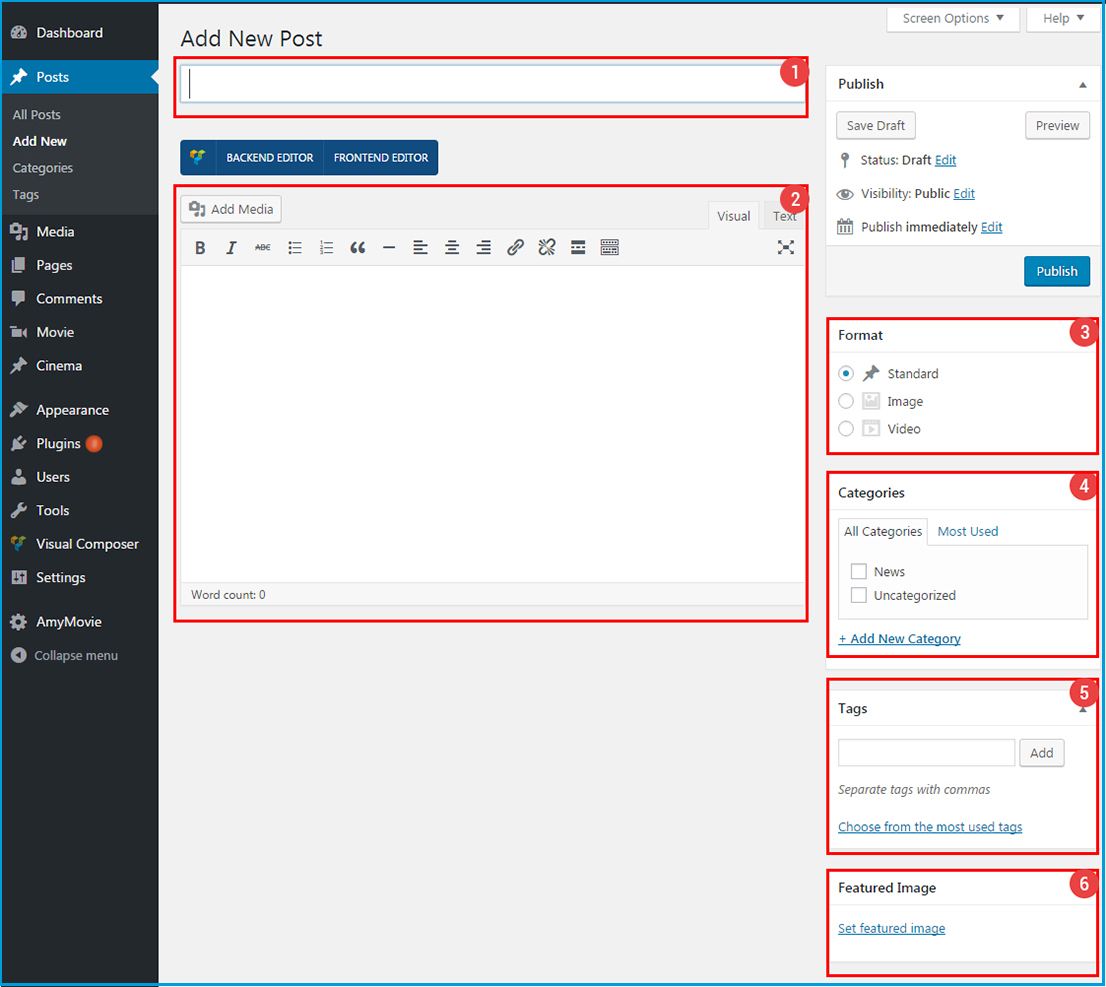
You can create as many blog posts for your movie website as you want. From Dashboard => Posts => Add New
At the single post page, you can customize the global displaying of the related articles by category or tag. Please from Dashboard => AmyMovie => Blog => Recent Post section to learn how to set up the related articles part.
By default, WordPress sets blog page as a home page for your website. Almost of time, it is not what you want, so in this guide, you can learn how to create and set up a special homepage for your site.
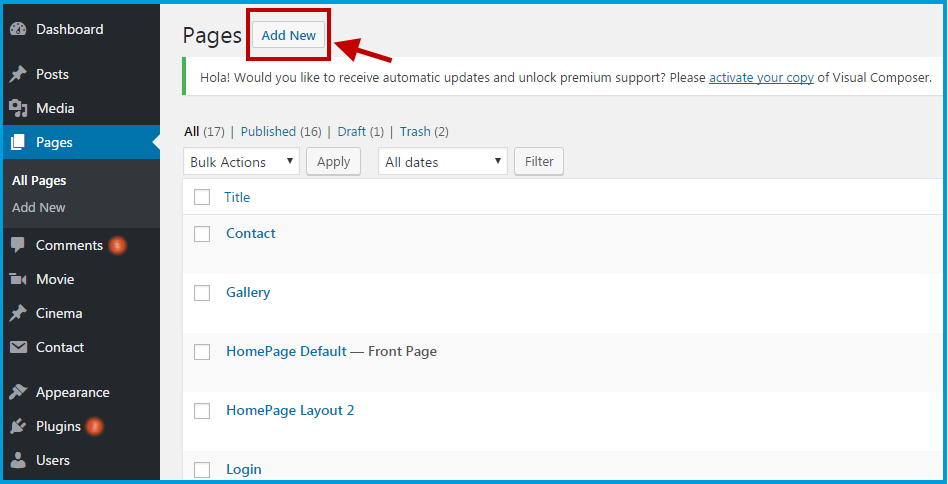
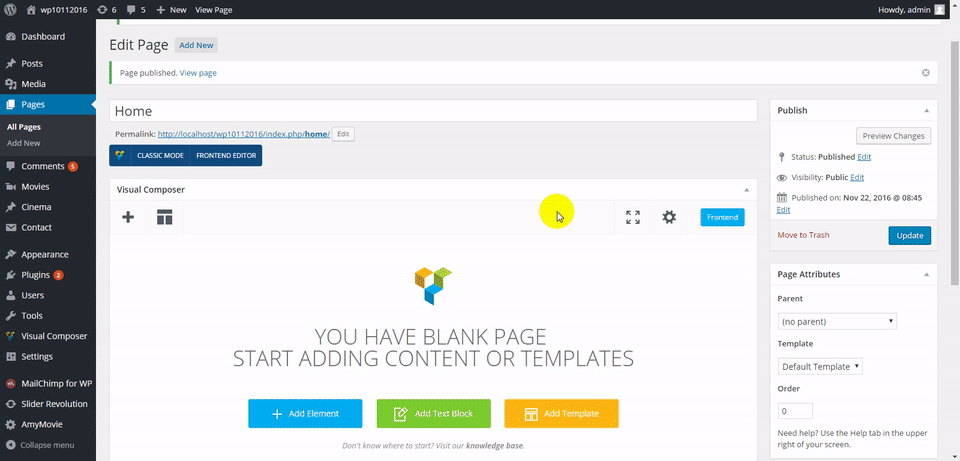
At WordPress admin site, from Dashboard => Pages => Click on Add New button to create a new page
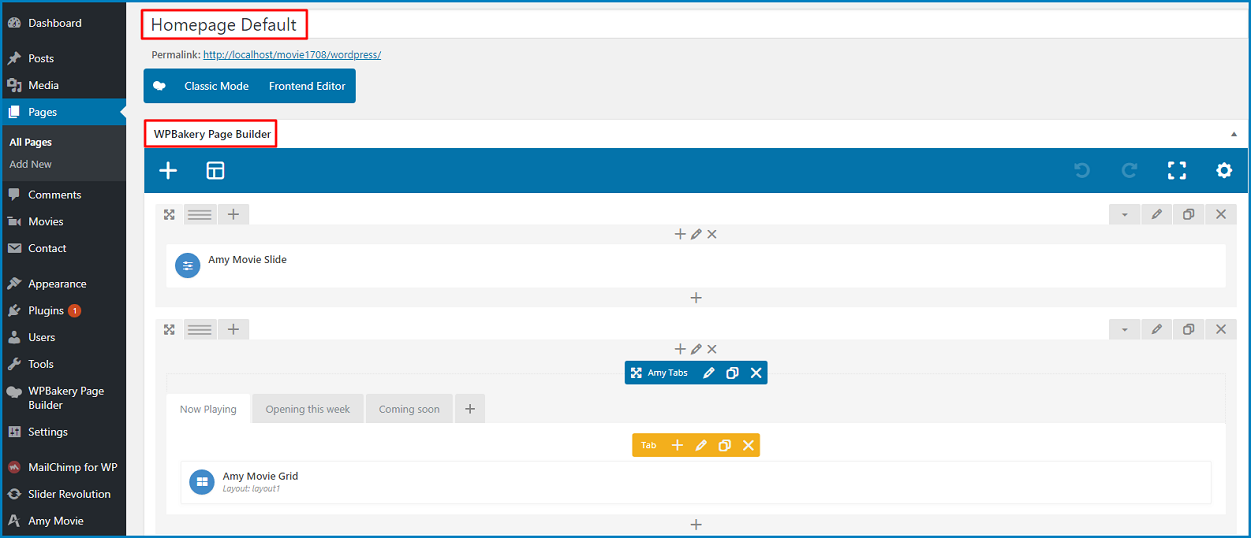
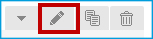
How to use WPBakery Page Builder at Amy Movie.
2.1. Row Settings
» Row layout: WPBakery Page Builder helps you easy to create different layouts for your webpage by adding
Row element. Click on Plus icon to add new element => choose Row element from the list, => select the row layout by hovering on this bar  The row automatically breaks into columns according to the layouts you choose or custom.
 . Please visit HERE if you are interested in setting row background
2.2. Add elements to build up a webpage
With the column layout you choose, click on Plus icon to add elements, you can add available elements from WPBakery Page Builder or add Amy Movie shortcodes made by AmyTheme. You will know how to use AmyMovie shortcodes at AmyMovie Shortcodes part below.
2.3 Drag & drop to reorder rows and elements
You can easily drag and drop rows and elements to any position as you want.
Page Options section allows you to add Page title bar with either image background or color background.
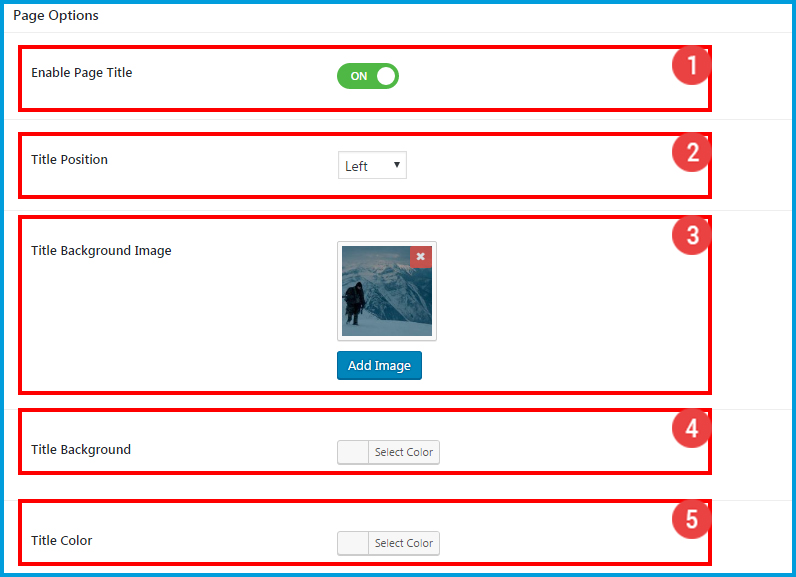
On the frontend, you can see the page title bar at the showtime page HERE
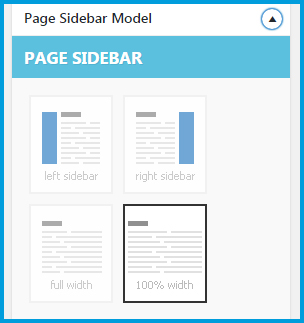
There are 4-page layouts to choose: Left Sidebar, Right Sidebar, Full Width, 100% Width
After all, click on Publish button.
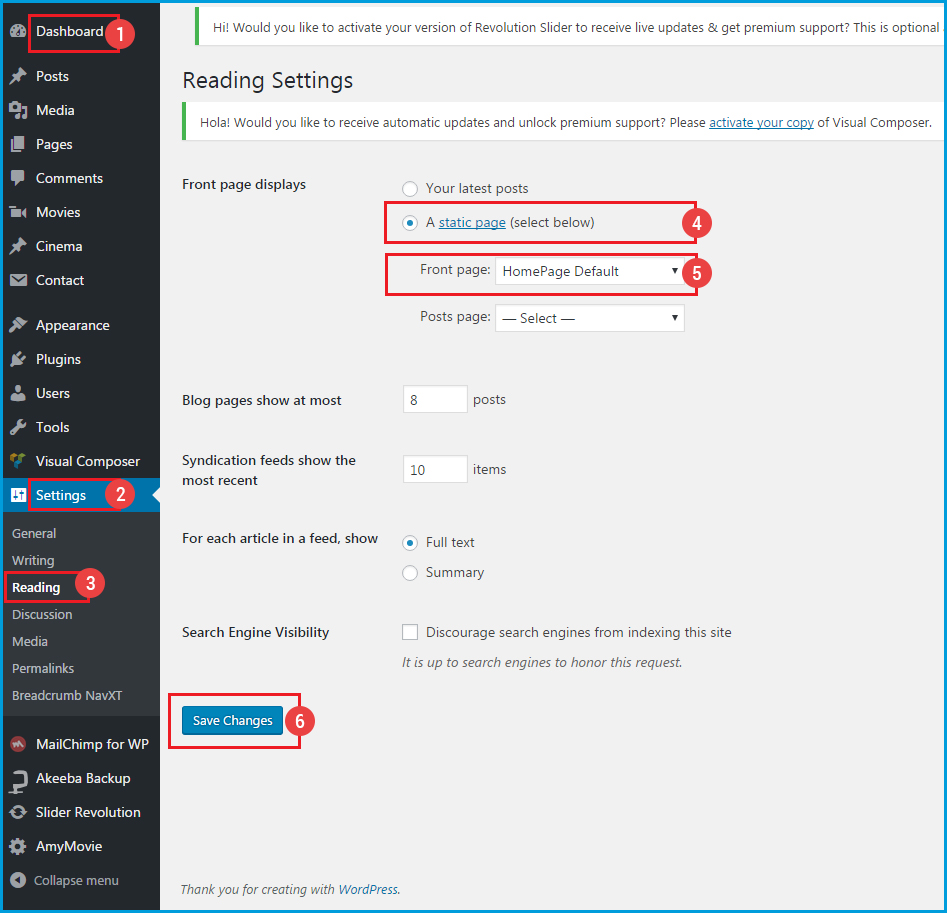
From Dashboard => Settings => Reading, you can set homepage by following the steps of the screenshot below
In general, you need to know how to create a new menu, how to add special posts, categories, pages, or custom links to the menu, need to know about menu structure and menu location. Wordpress gives you quite detailed information to reach these. You can experience at Wordpress Codex
Please visit the GIF image below to lear how to add new menu.
On the front-end, you can see.

AmyMovie allows you to customize URL structures for your movie, cinema, actor, director, genre page
From Dashboard => Settings => Permalinks => Amy Movie Custom Permalinks section.
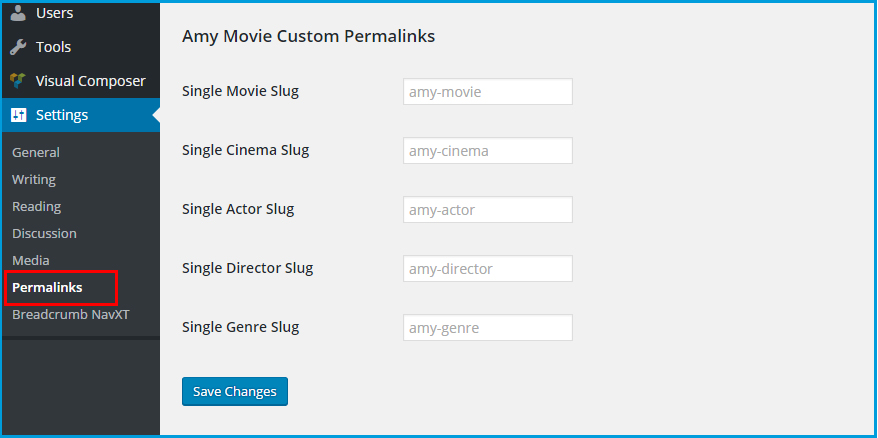
If you want, you may enter custom structures for your movie, cinema, actor, director, genre URL.
For example, using “movies” as your movie base at Single Movie Slug option would make your movie links like {root}/movie/moviename/. If you leave these blank the defaults will be used.
Please note that: All of the slugs you use at these 4 options must be different from the slugs of all pages.
Amy User Settings section allows you to enable/ disable the custom login page in a popup or in a page with sidebar or without sidebar and add Social login in that page.
From Dashboard => Users => Amy User Settings
1. General Settings
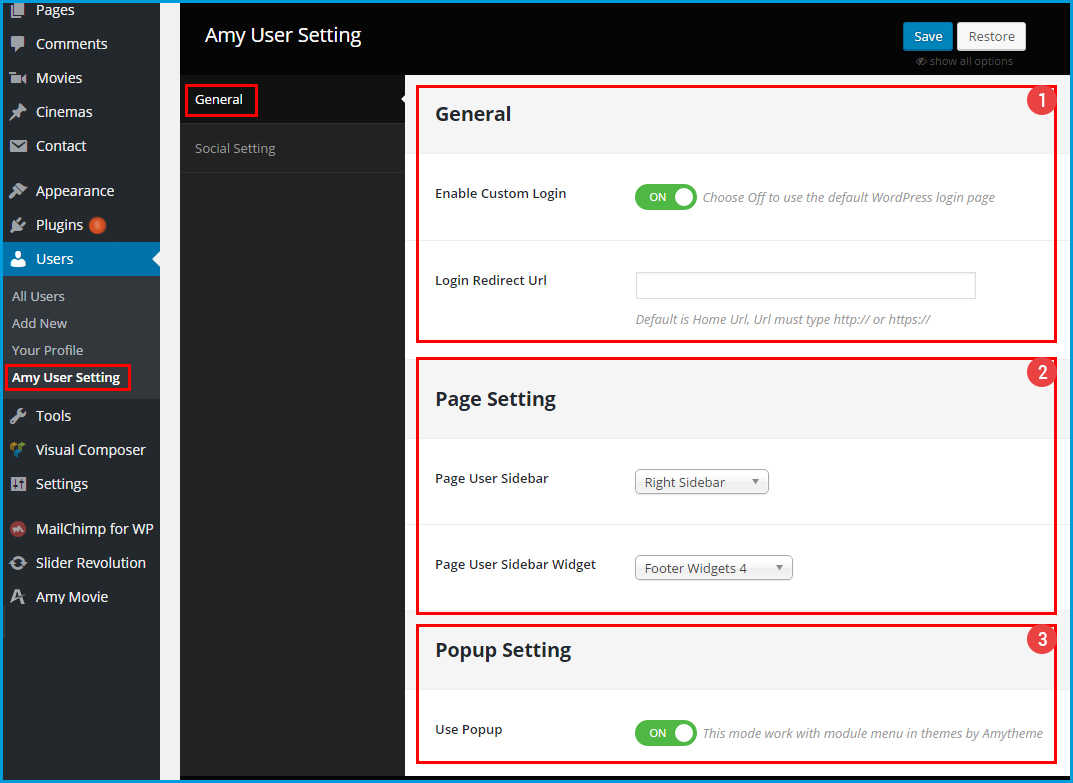
![]() General
General
![]() Page User Settings: This section allows you to decide the layout of login page with sidebar or without sidebar.
Page User Settings: This section allows you to decide the layout of login page with sidebar or without sidebar.
![]() Popup Setting: This section allows you to decide using login popup or login page.
Popup Setting: This section allows you to decide using login popup or login page.
2. Social Settings
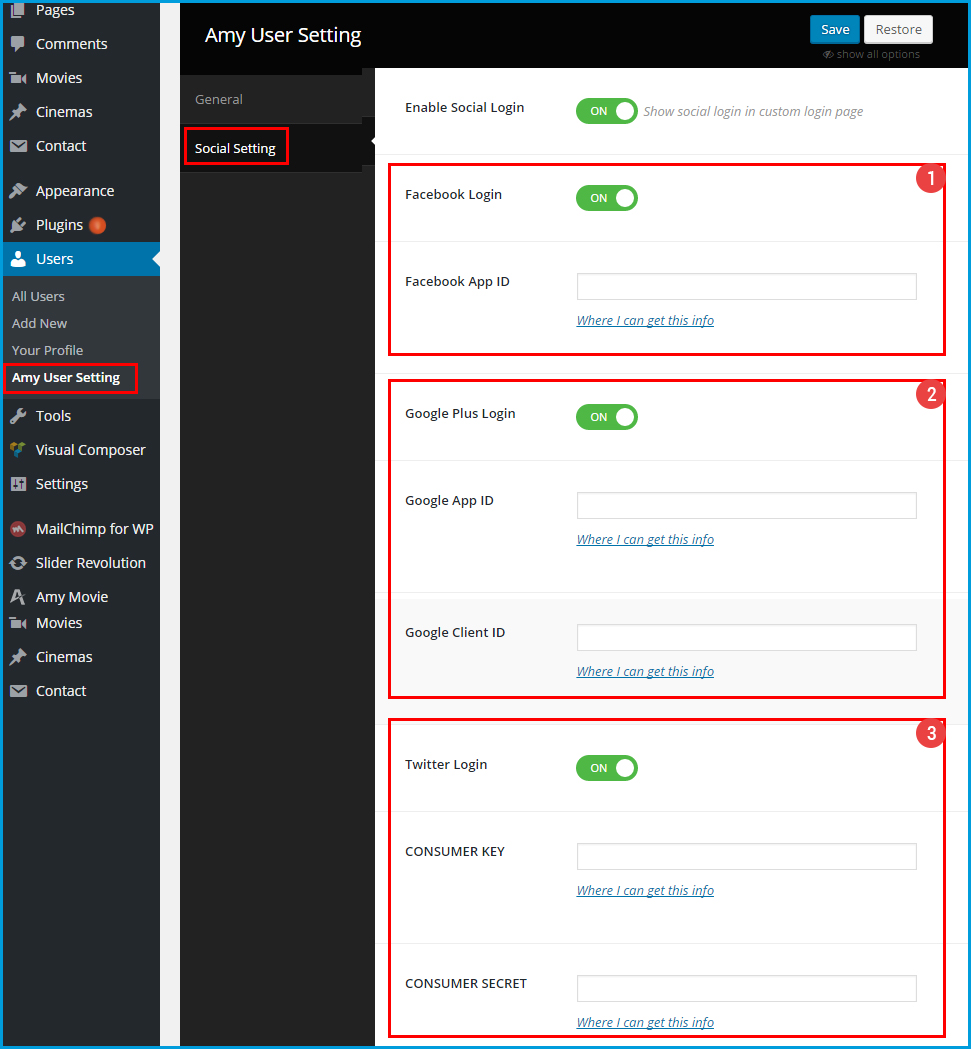
Enable Social Login: Select On/ Off to enable/ disable social login module (Facebook, Google Plus, Twitter) on the custom login page.
Please note that if you choose Off for Enable Social Login option, all of the options below will be invalid.
![]() Facebook Login Settings
Facebook Login Settings
![]() Google Plus Login Settings
Google Plus Login Settings
![]() Twitter Login Settings
Twitter Login Settings
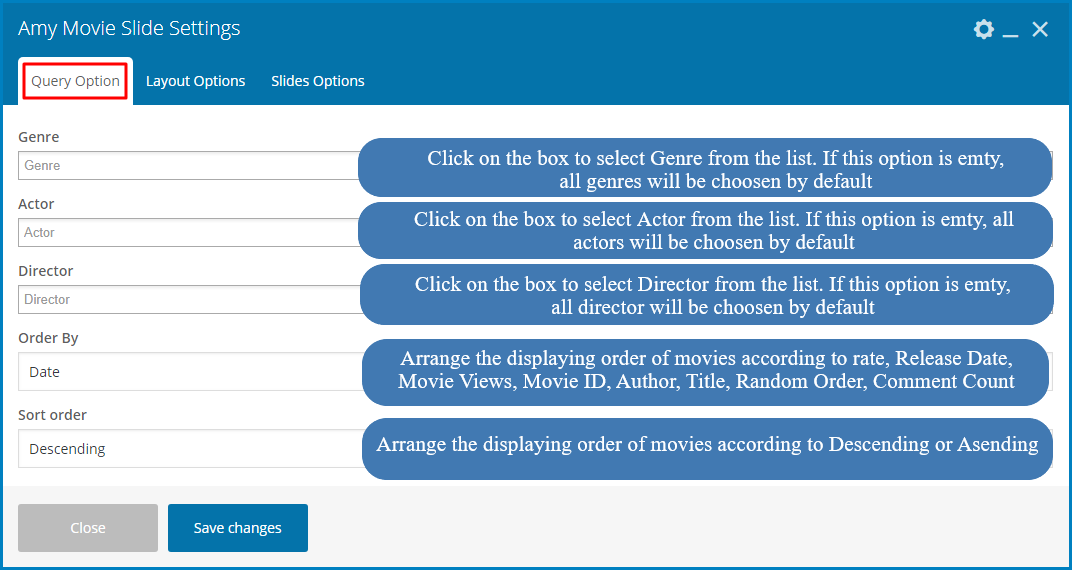
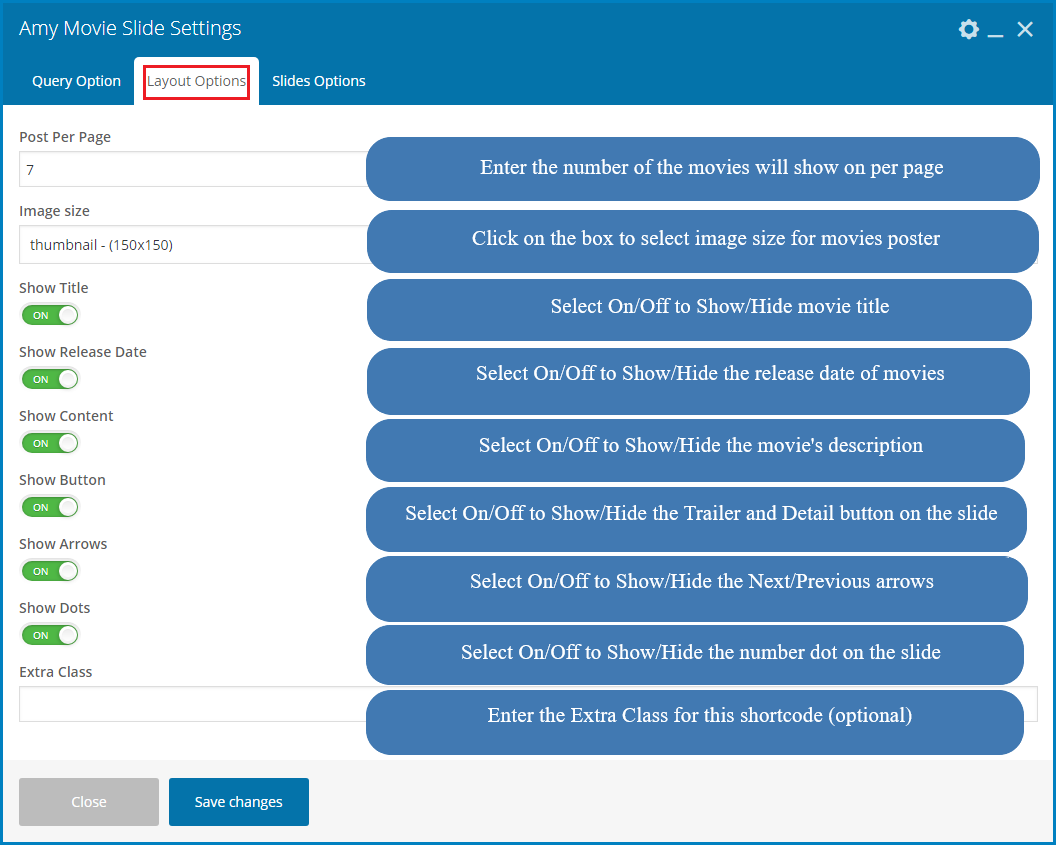
This section shows you the detail setting of each Amy Movie shortcode. It's very useful if you want to use shortcode to build up your own webpage.
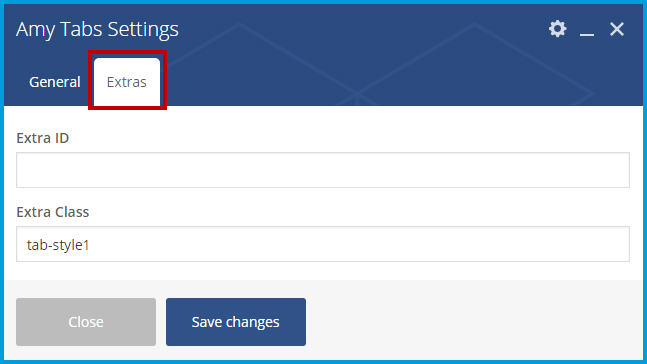
Amy Tabs allows you to easily add and edit your tabs and you can add elements into each tabs as you wish. Follow the steps below to learn how Amy Tabs works
At this step, you can learn how to set the position of tab and choose active tab
From the green bar  => click on
  button to make general setting on Tab
1.1. General Setting
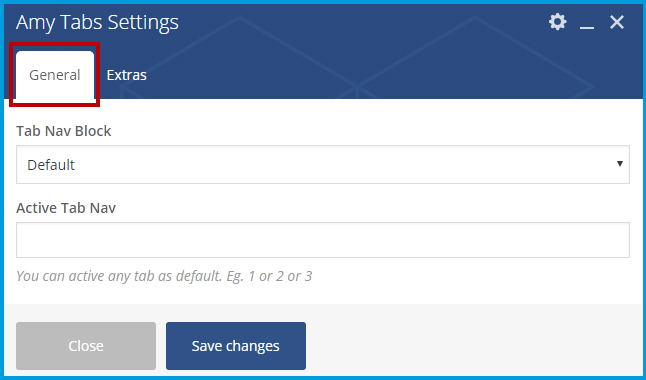
1.2. Extra Setting: This option is optional allows you to add extras ID or extras class for your tabs
You can edit tab name or add element into child tabs at yellow bar
Click on tab you want to edit => click  button at yellow bar , a popup will appear and you can change the tab name as you want

Each tab will show diferent content. To do this: click on the tab you want to add elements and click Plus icon at the yellow bar to choose elements like the image below

Please visit the GIF image helow to know about the tab settings.
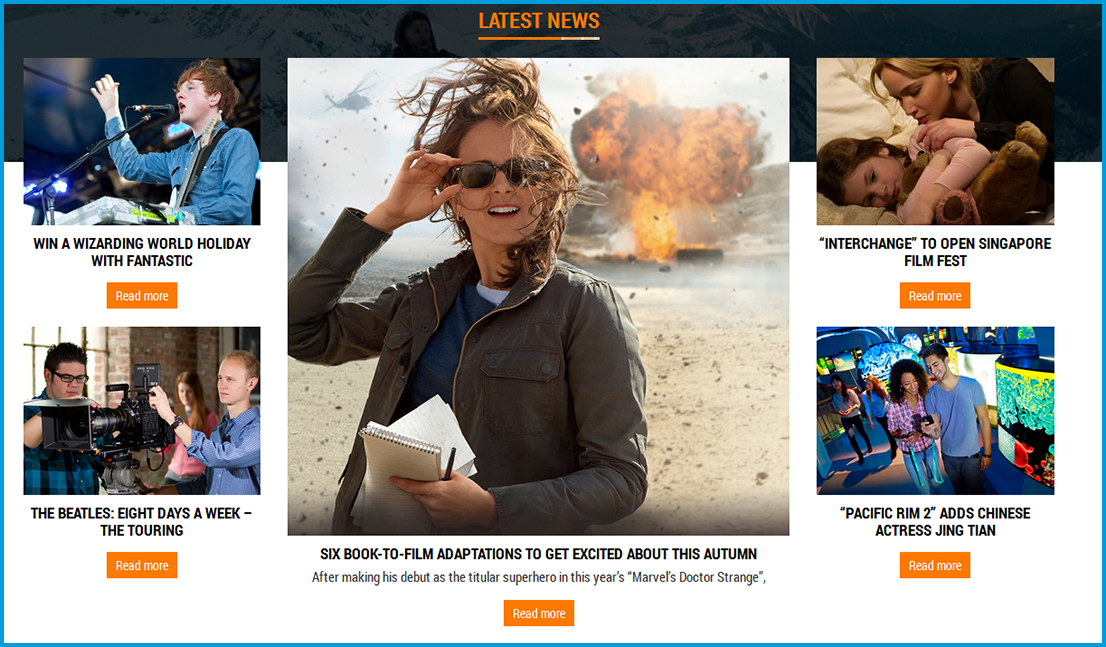
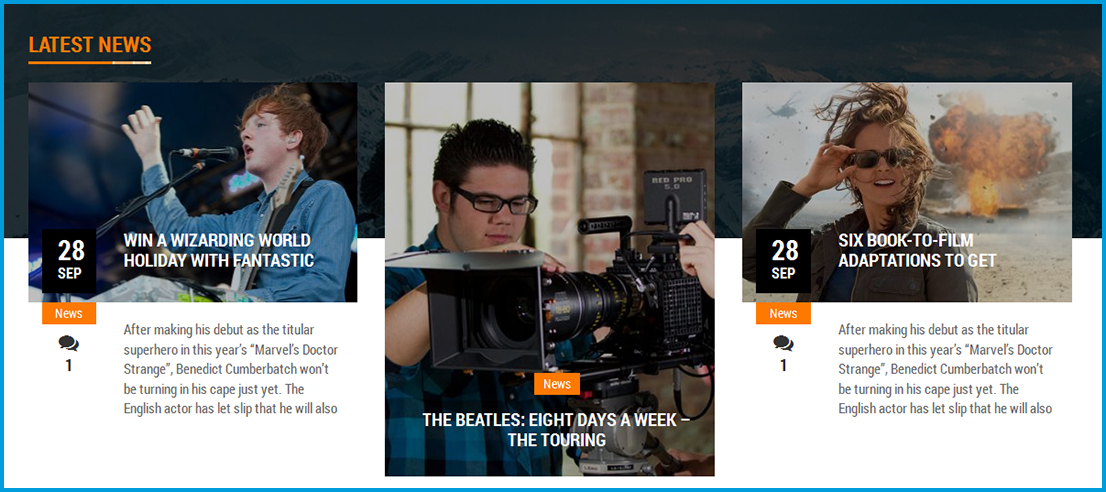
Amy Movie Blog allows you to display your blog posts with 2 nice styles and order the posts as you want.
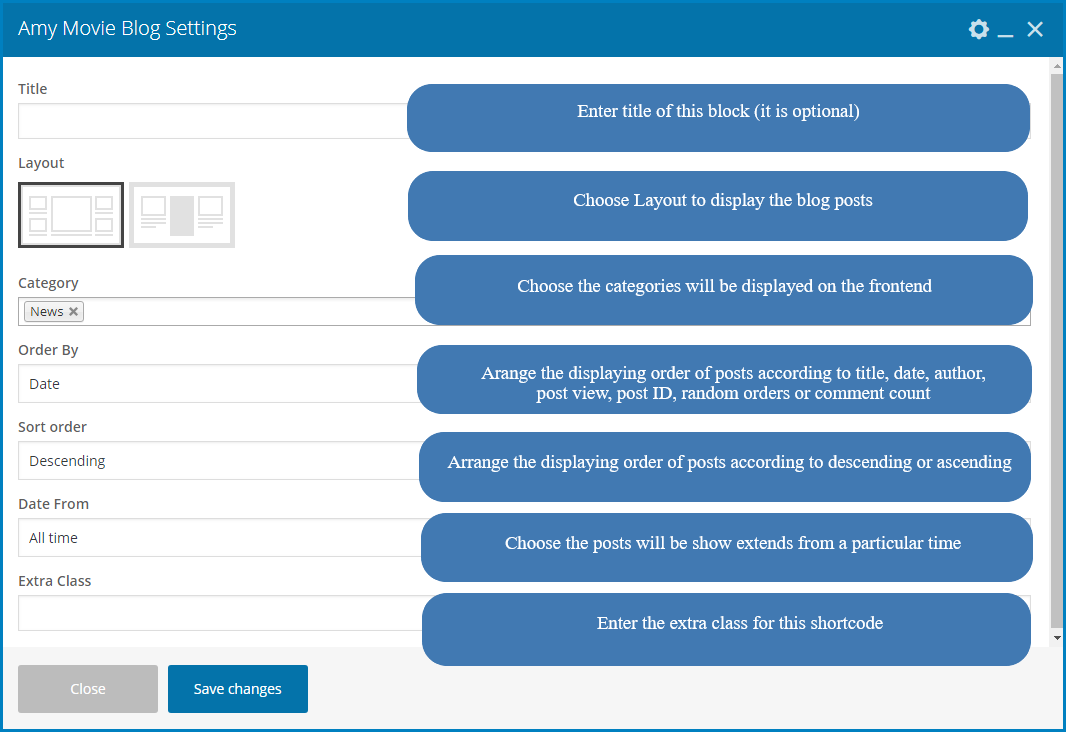
Blog layout 1, you can see
Blog layout 2, you can see
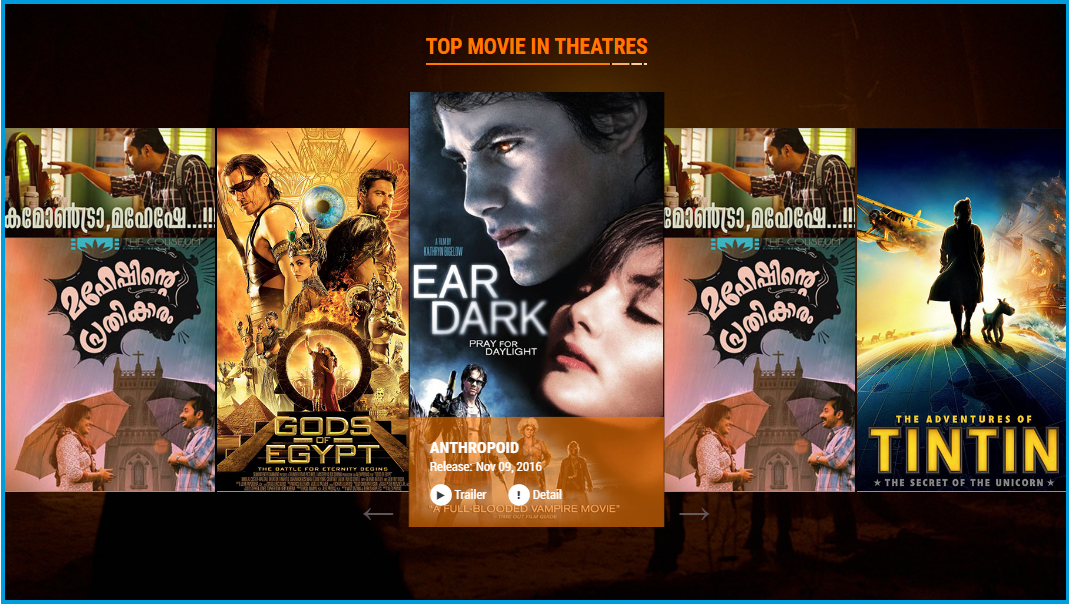
Amy Movie Carousel allows you to show multiple movies at once, it’s unlike normal slide show.
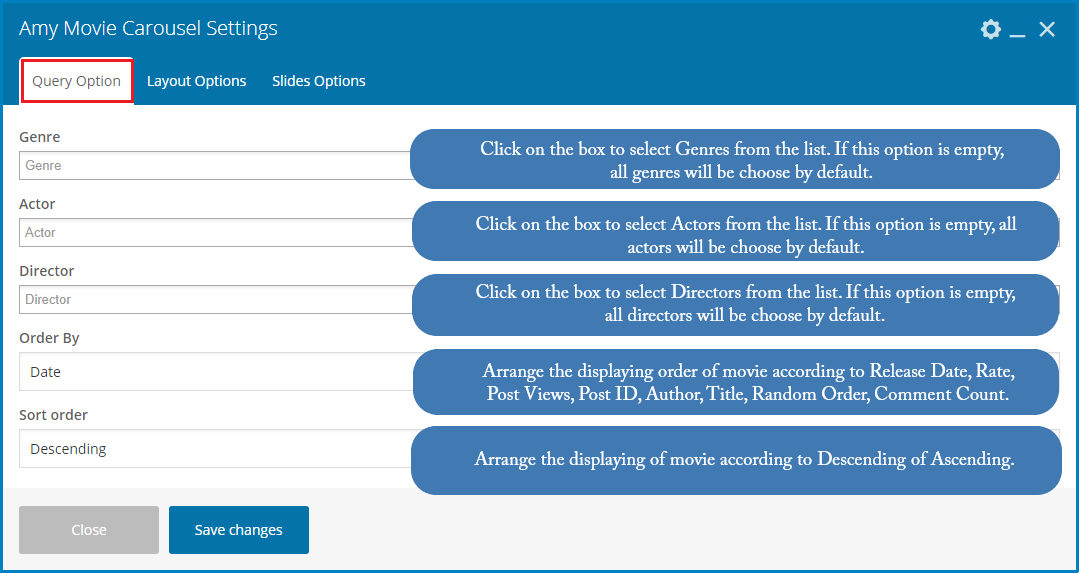
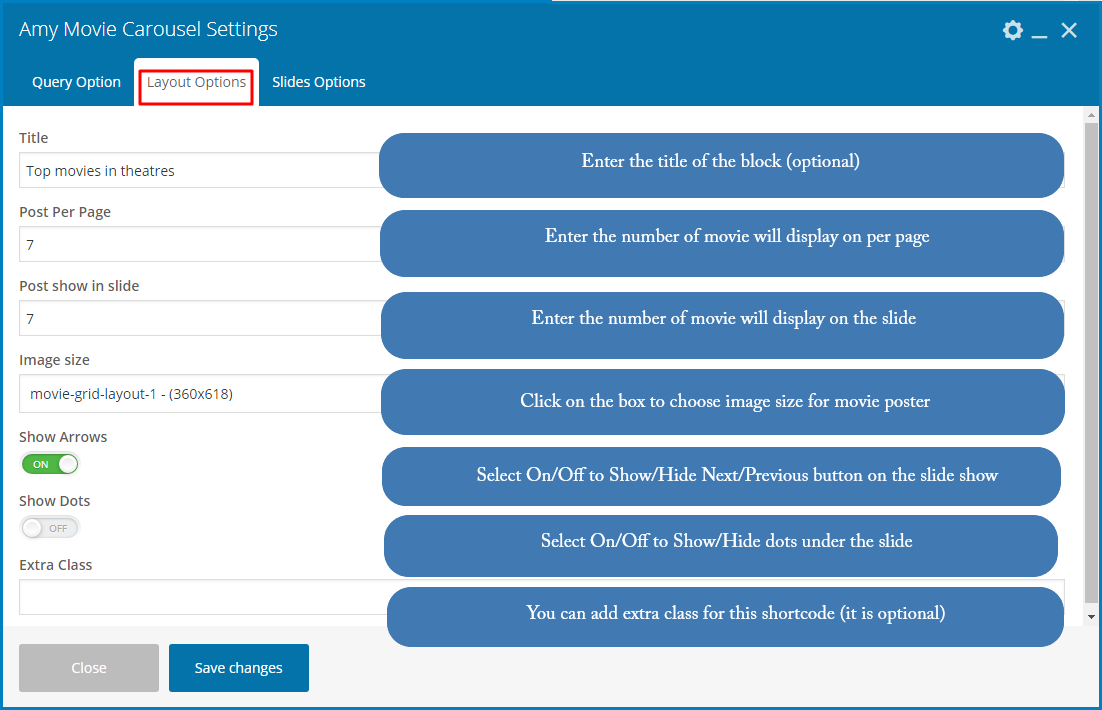
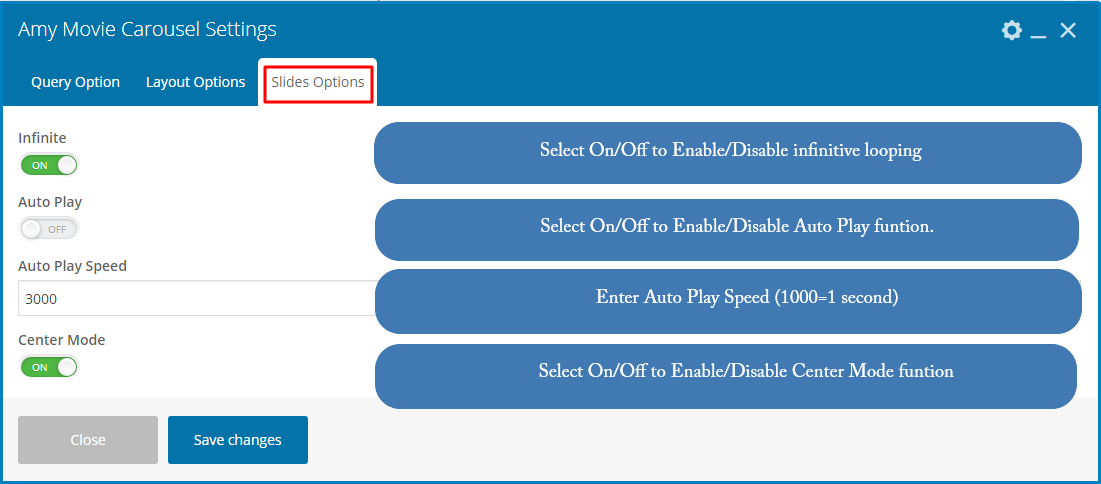
On the frontend, you can see
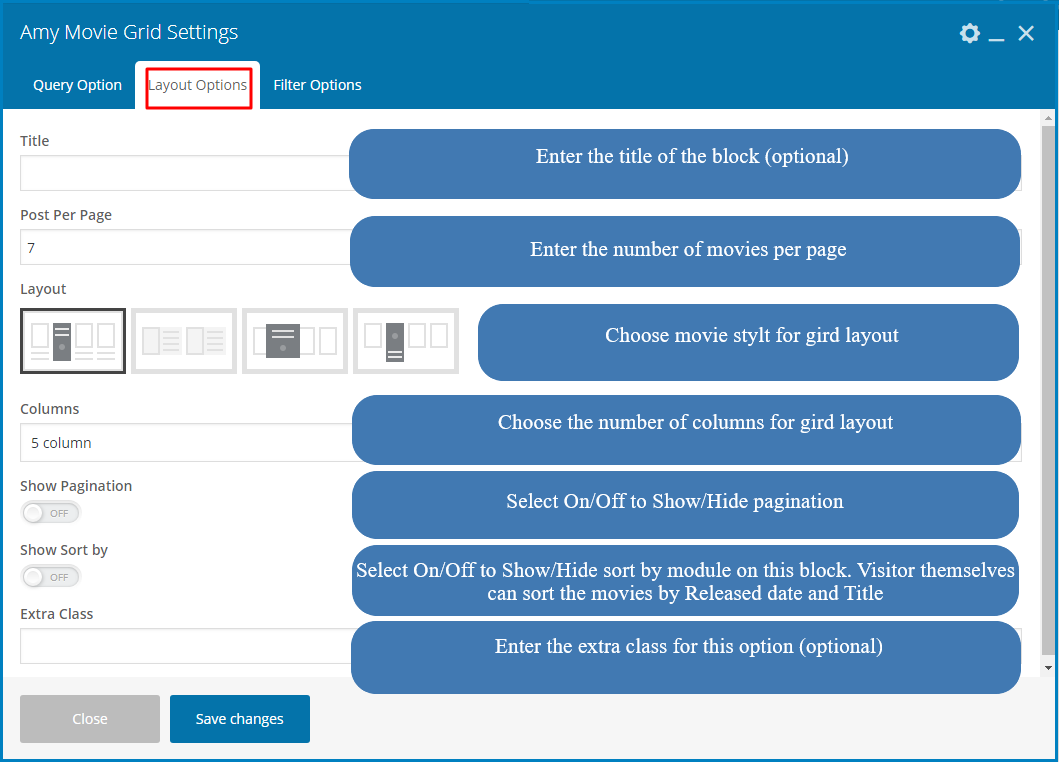
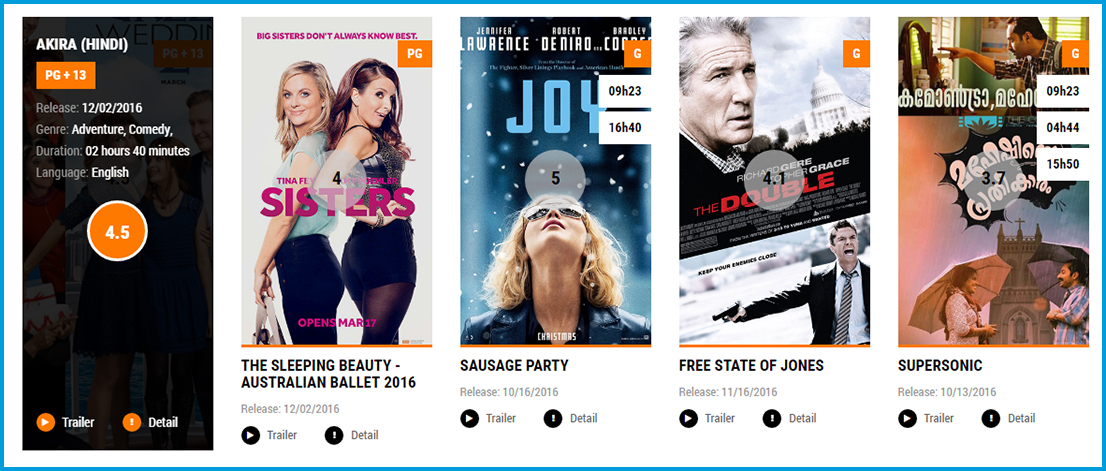
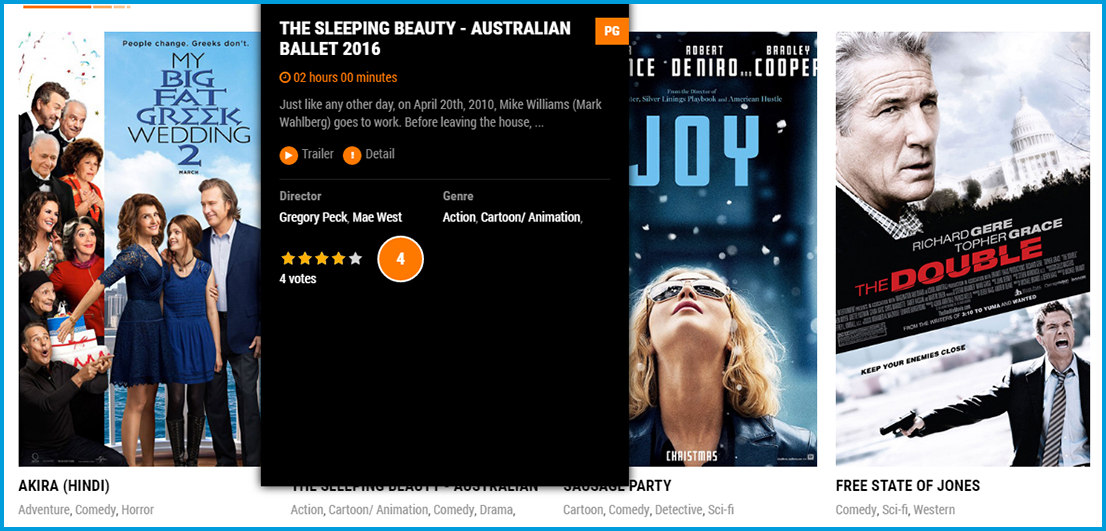
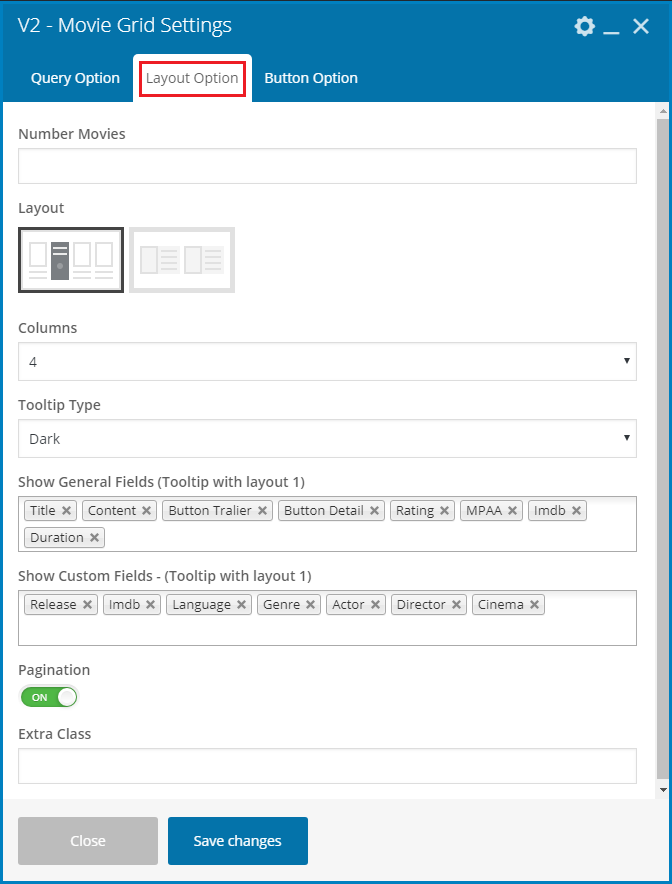
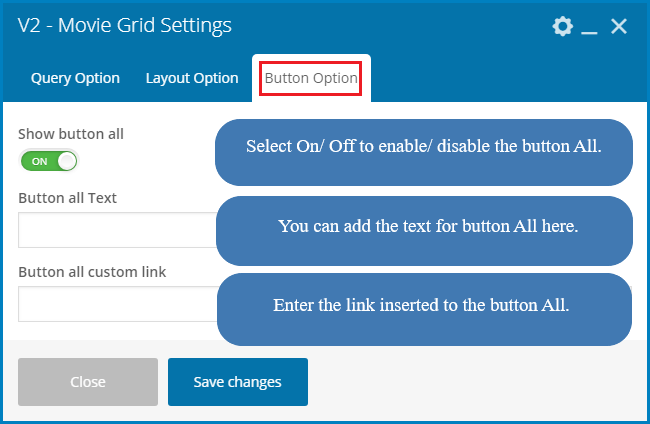
Amy Movie Grid allows you to display movies by Grid styles. This shortcode offers 4 nice layouts will make your movie site various and beautiful..
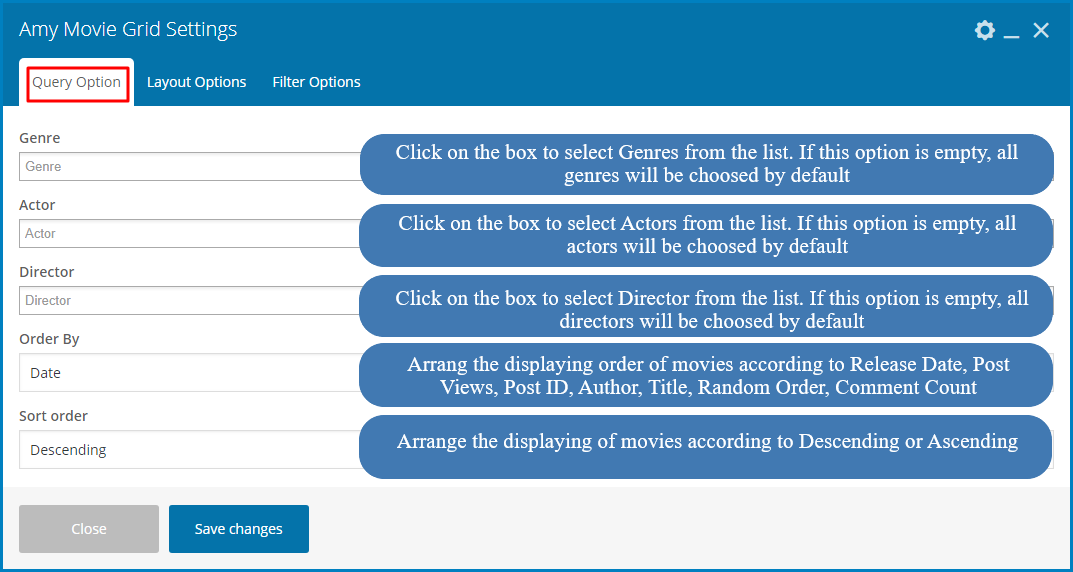
2. Layout Options
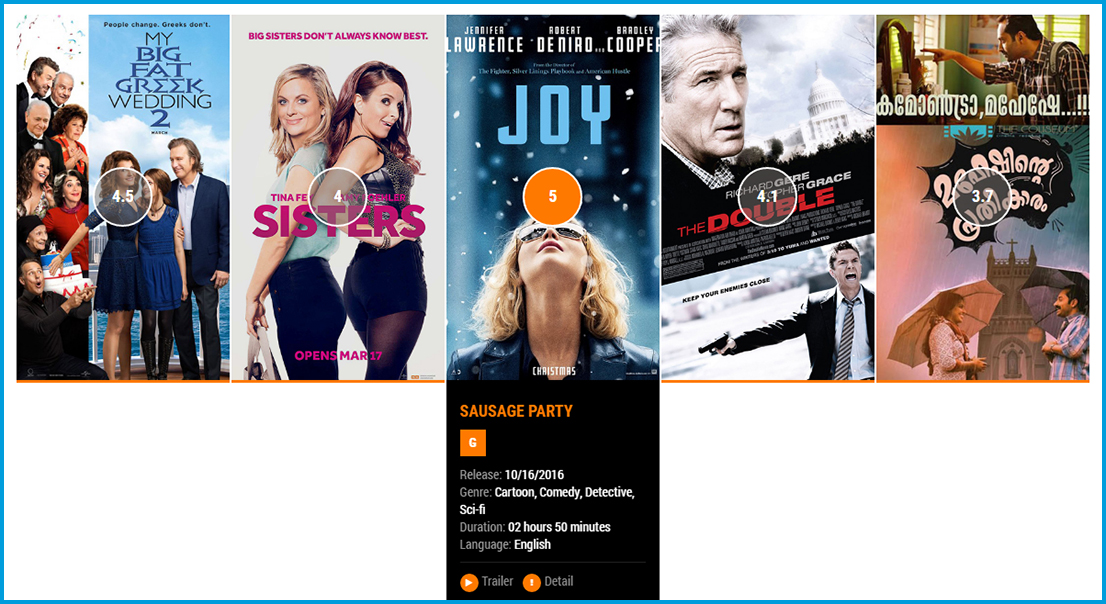
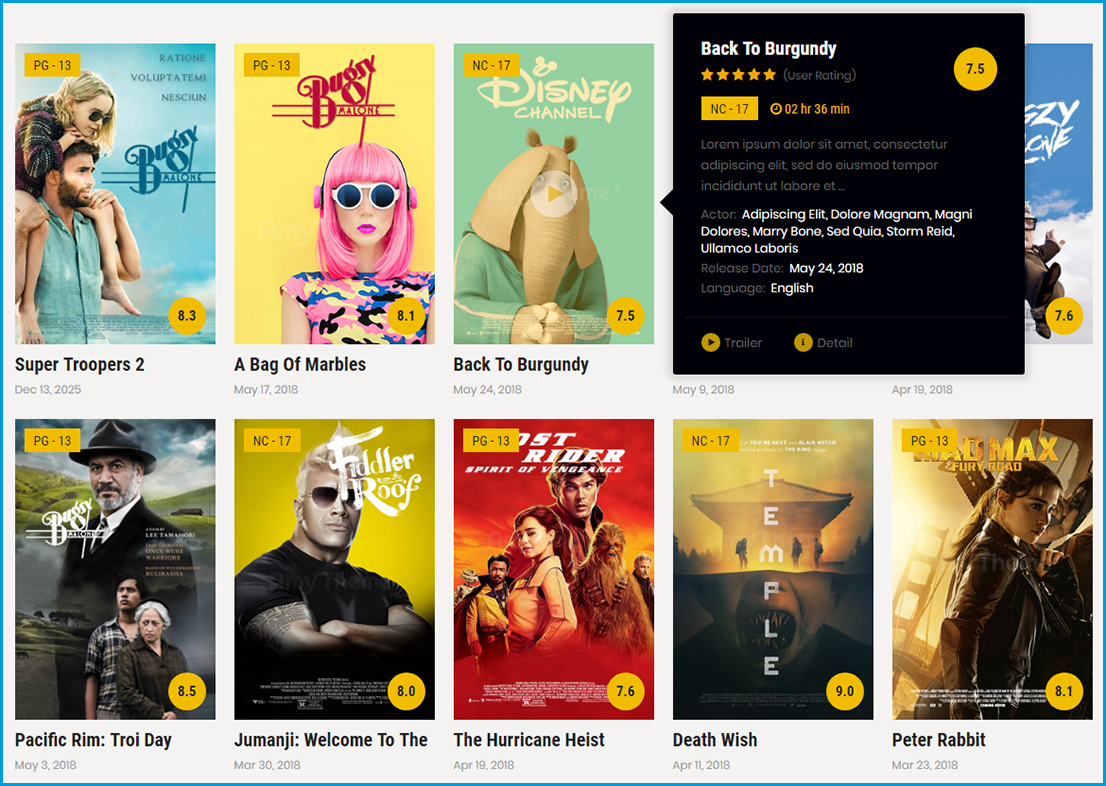
Grid Layout 1: On the frontend, you can see
Grid Layout 2: On the frontend, you can see

Grid Layout 3: On the frontend, you can see
Grid Layout 4: On the frontend, you can see
Filter Style 1 and Sort By module: On the frontend, you can see

Filter Style 2 and Sort By module: On the frontend, you can see

Amy Movie Líst allows you to show movies under the list style.
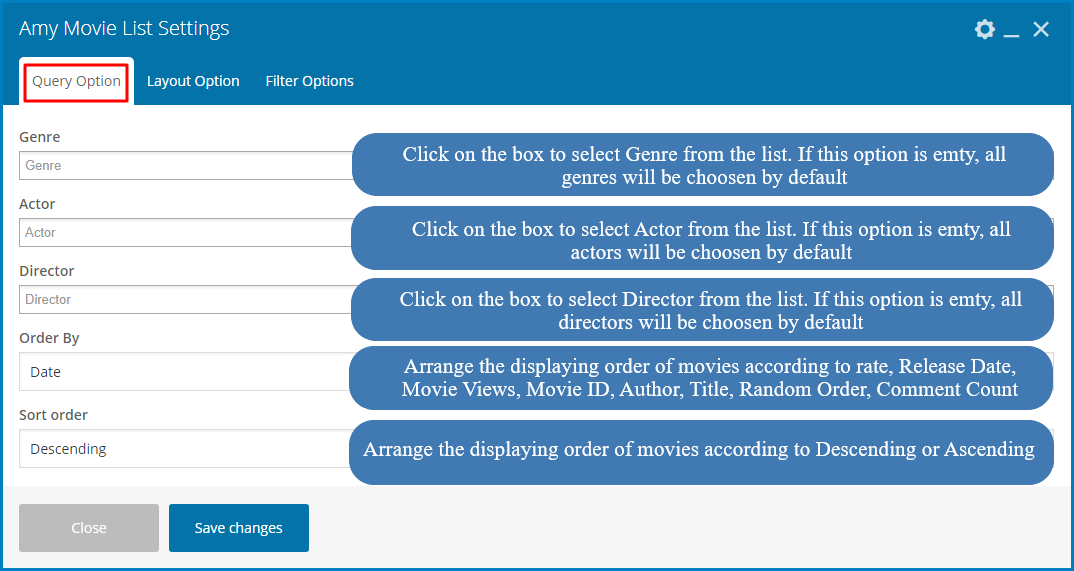
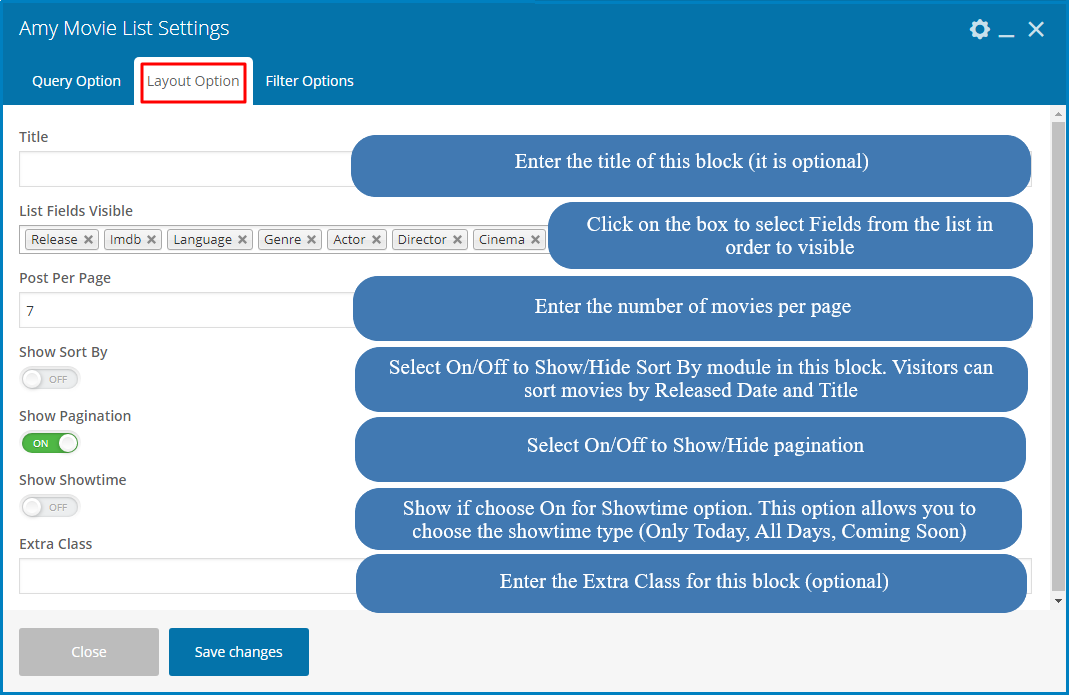
Showtime Type
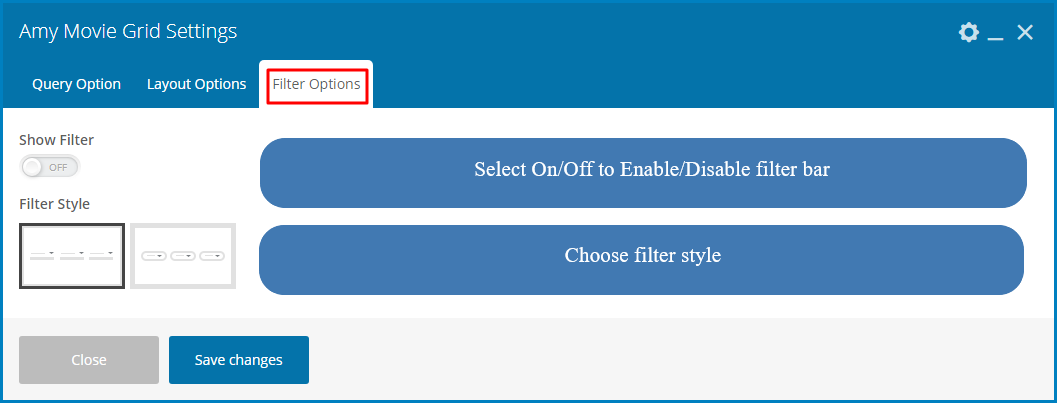
3. Filter Options
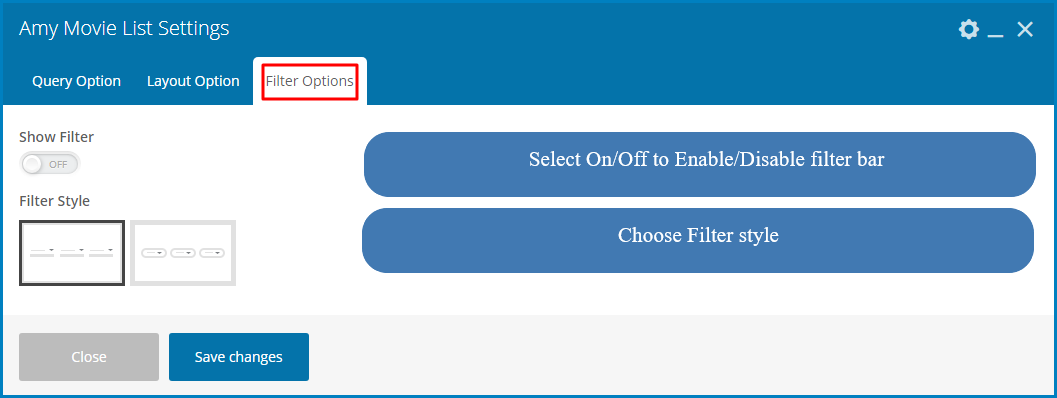
On the frontend, you can see

Amy Movie Metro Gallery allows you to add a gallery with a unique concept, and when you click on an image, it will display on the popup.
At the backend you can see

On the frontend, you can see

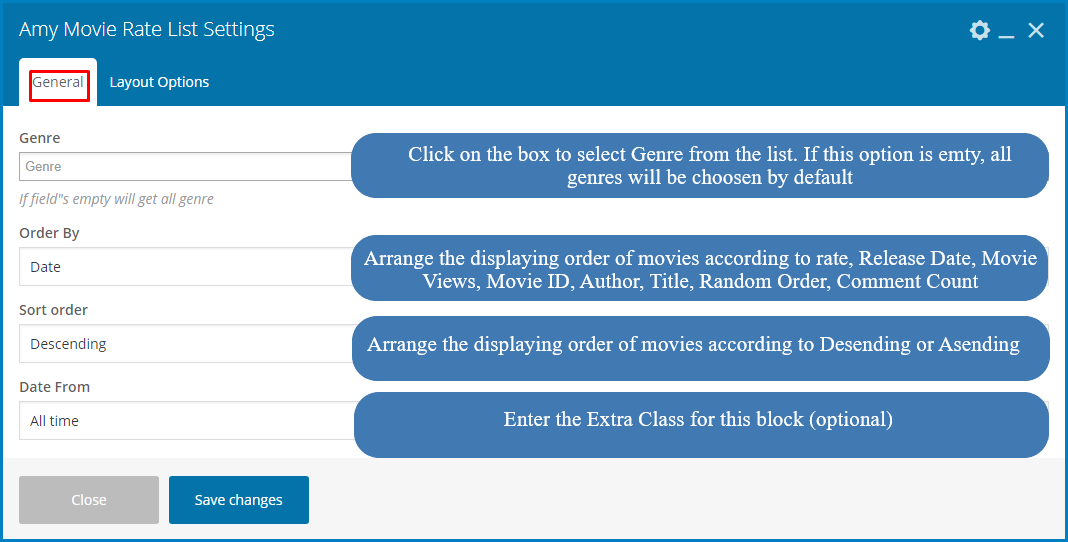
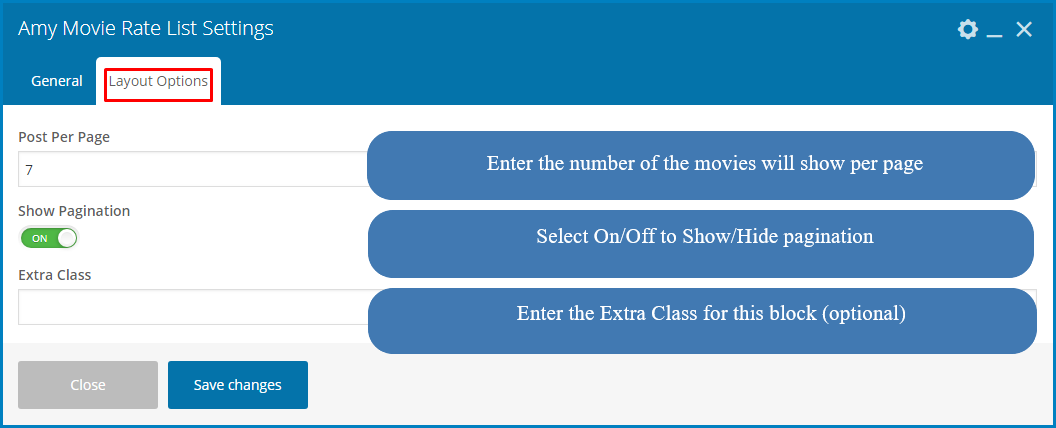
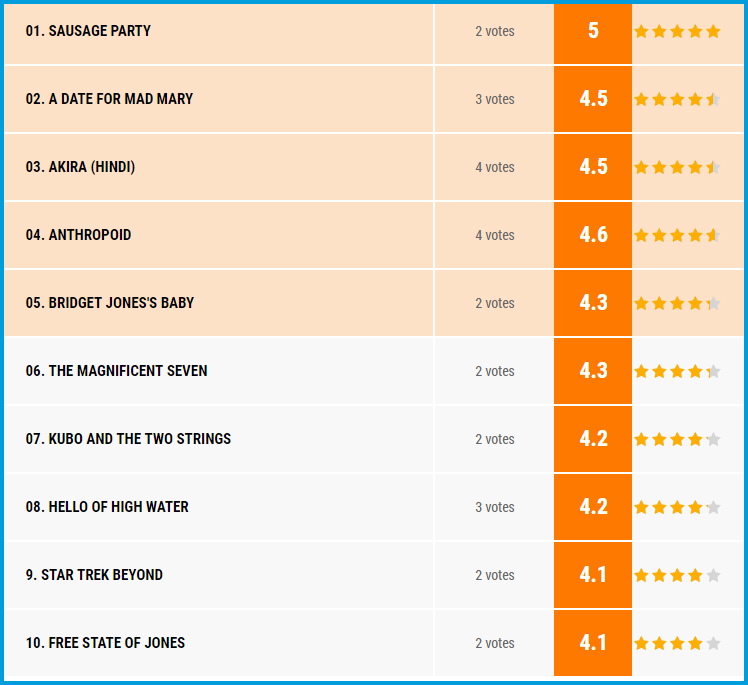
Amy Movie Rate Líst allows you to show the list of movies with rate information.
On the frontend, you can see
Amy Movie Search allows you to add search module to anywhere of your webpage. This shortcode helps users easy to search movie, cinema, actor or director.
At the backend, you can see
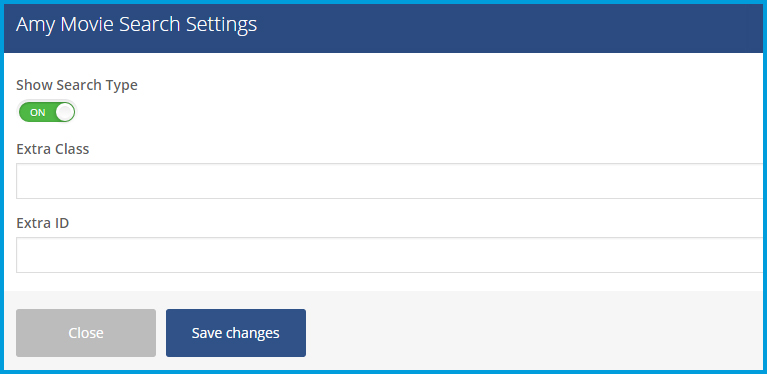
If you choose Off for Show Search Type option, visitors can search movie by the movie’s name only at Search module. On the frontend you can see:

If you choose On for Show Search Type option, visitors can search Cinema, Actor and Director by enter their name at Search module. On the frontend you can see

Both Extra Class and Extra ID opttions are optional.
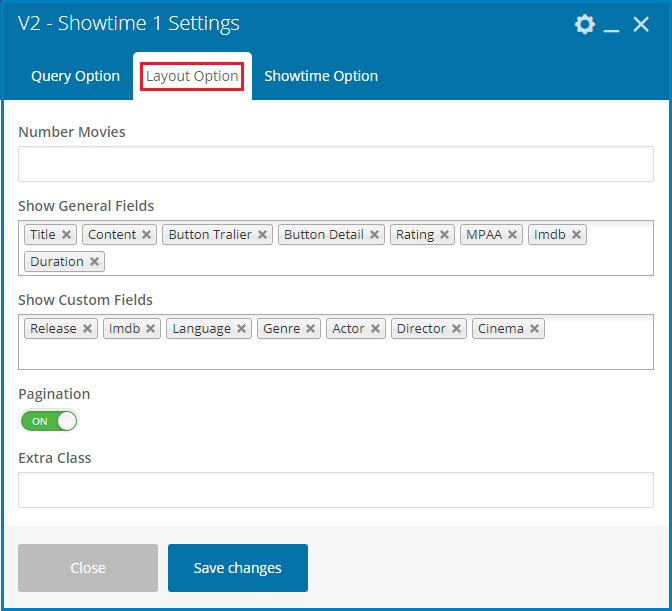
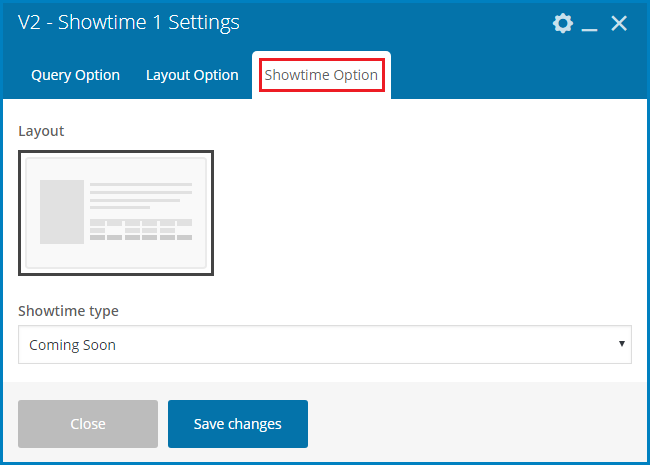
Amy Movie Showtime allows visitors easy to find the showing time of a particular movie in a particular cinema by some clicks only. This shortcode includes one option and it is optional. If you have coding knowledge, you can add some extra class for this shortcode.
At the backend you can see

Showtime Type
On the frontend, you can see
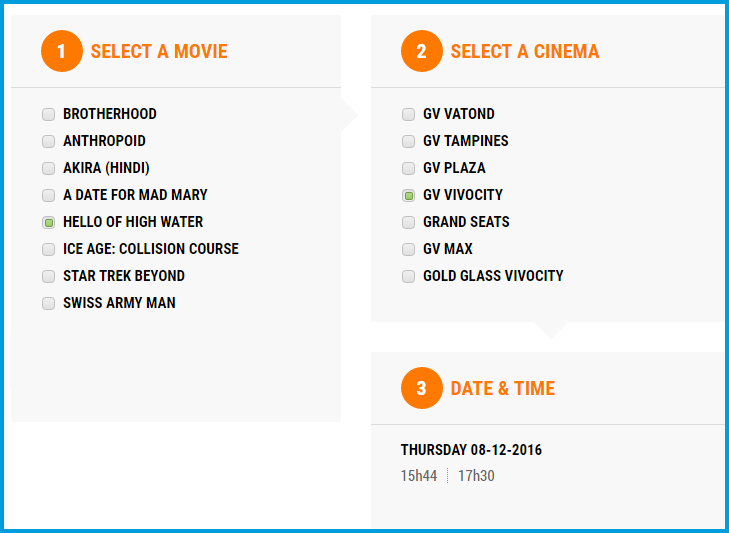
![]() Select a movie =>
Select a movie => ![]() Select a cinema =>
Select a cinema => ![]() The Date & Time will show
The Date & Time will show
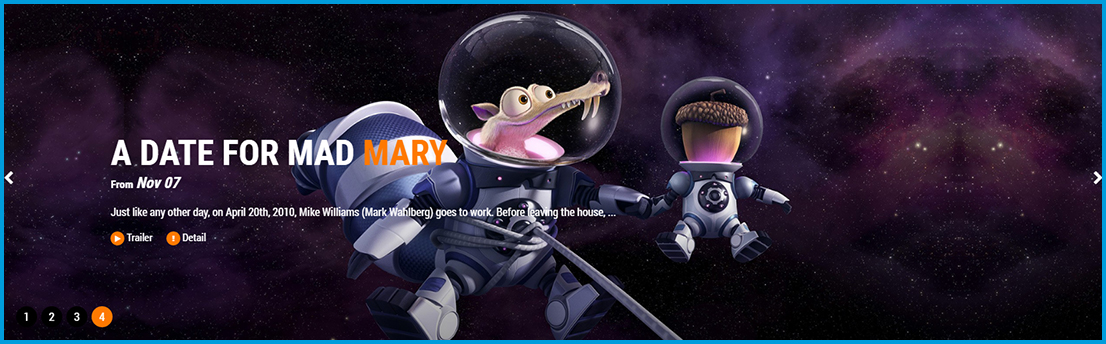
Amy Movie Slide allows you to show one by one movie on the slide.
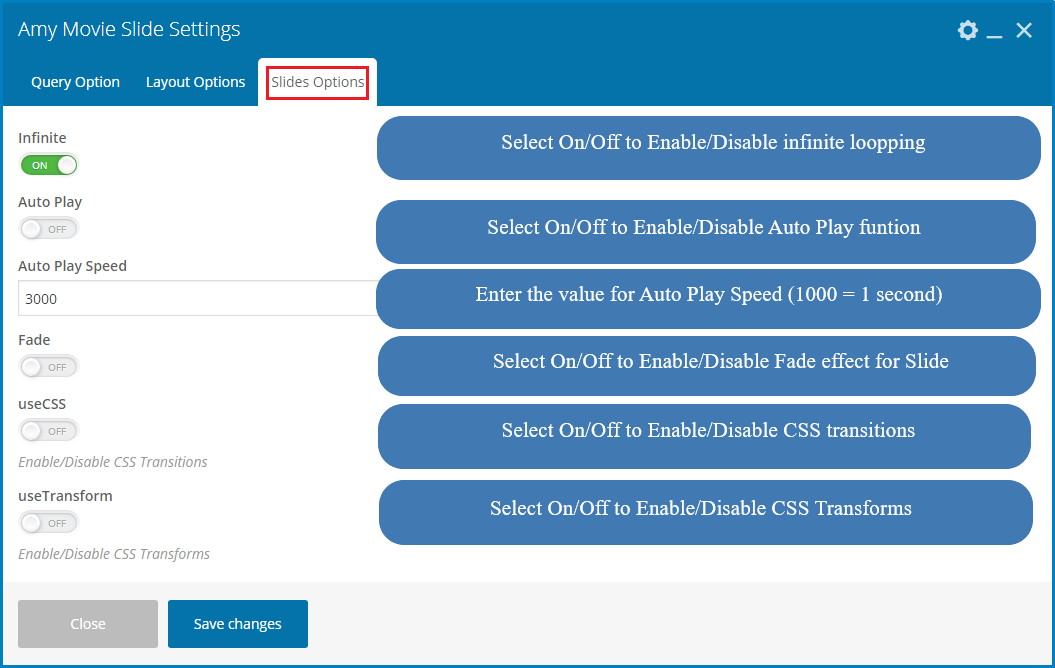
On the frontend, you can see
Click on the Plus icon to add new items, then click on the arrow icon to edit the item.

On the front-end you can see
Gallery Carousel shortcode supports you to display the image gallery in the carousel slide.
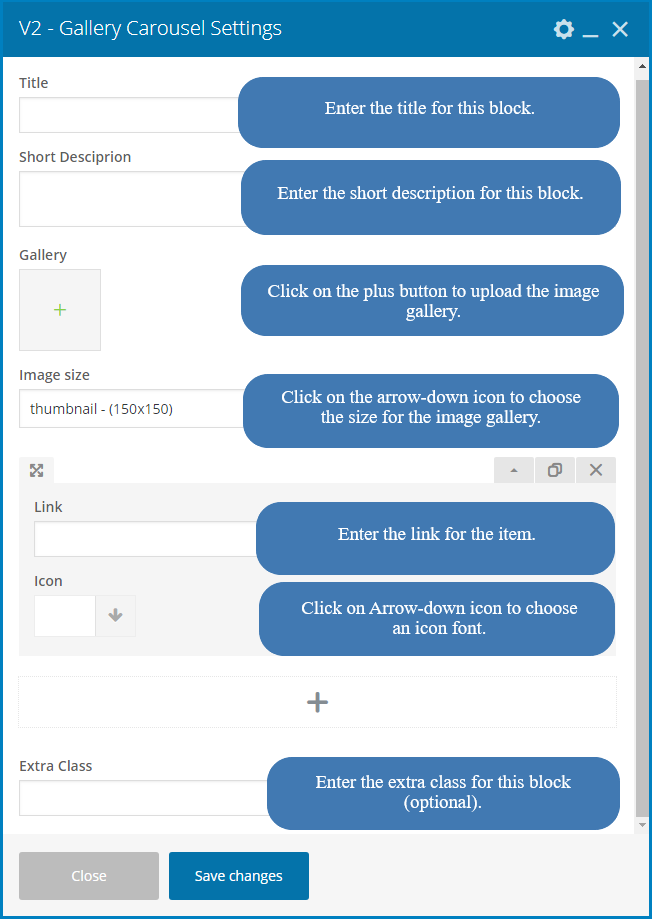
On the front-end, you can see

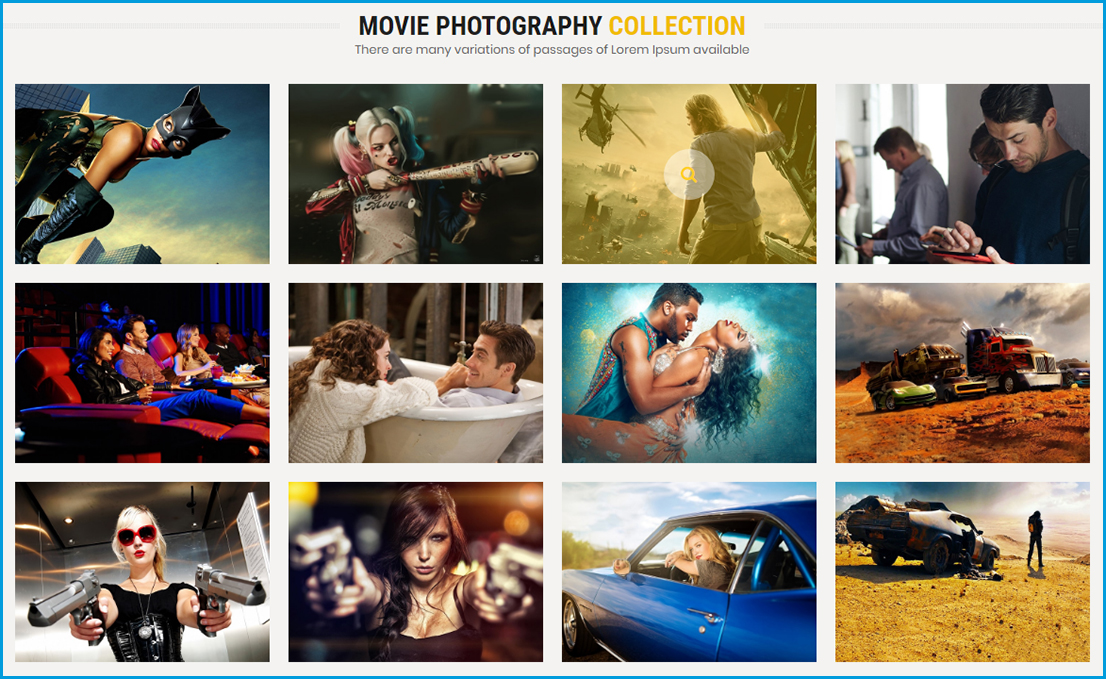
Gallery Grid shortcode helps to show the gallery in the grid layout.
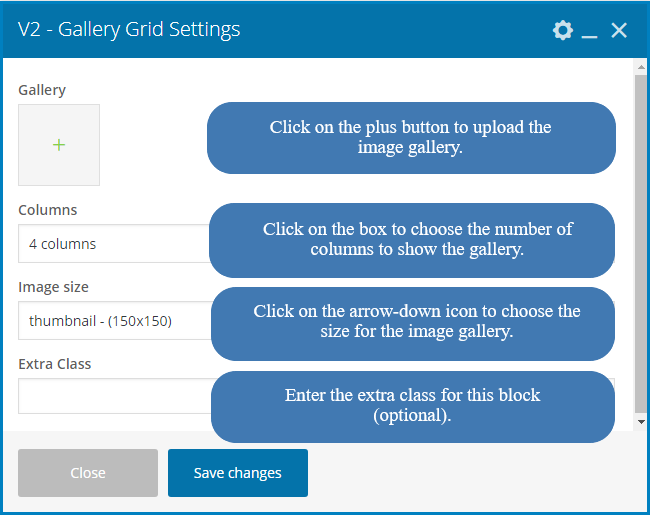
On the front-end you can see
Heading shortcode helps you easy to customize the block’s heading (the color, font size of title and subtitle).
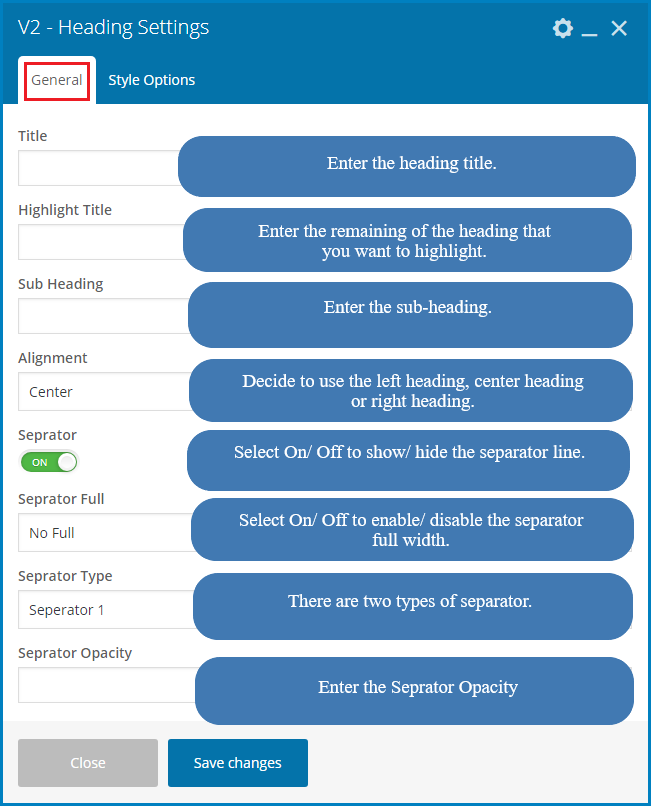
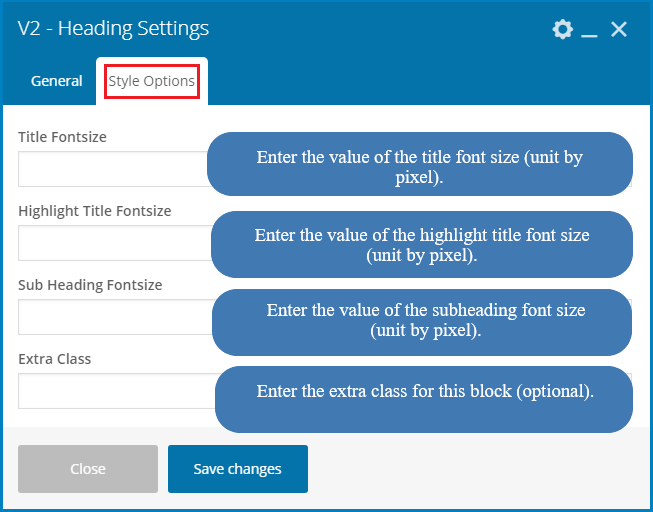
On the frontend you can see

AmyMovie supports 3 movie carousel styles. And Movie Carousel 1 shortcode supports to display the movies in the carousel style #1.
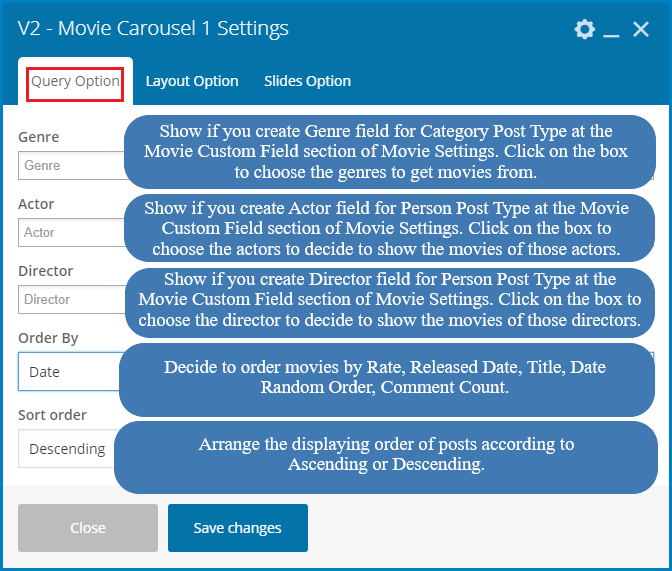
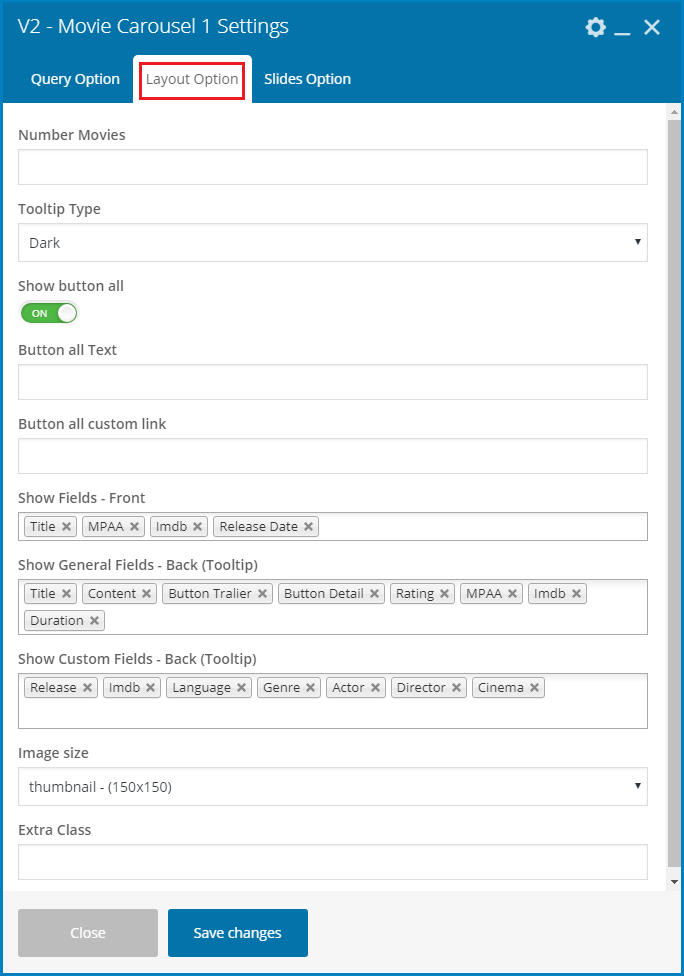

On the front-end you can see

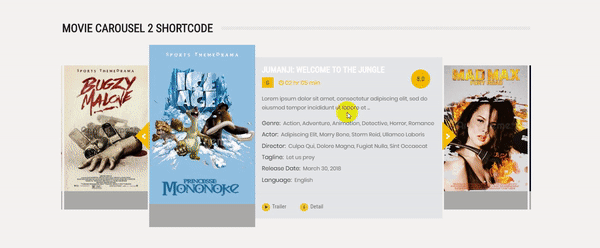
AmyMovie supports 3 movie carousel styles. And Movie Carousel 2 shortcode supports to display the movies in the carousel style #2.
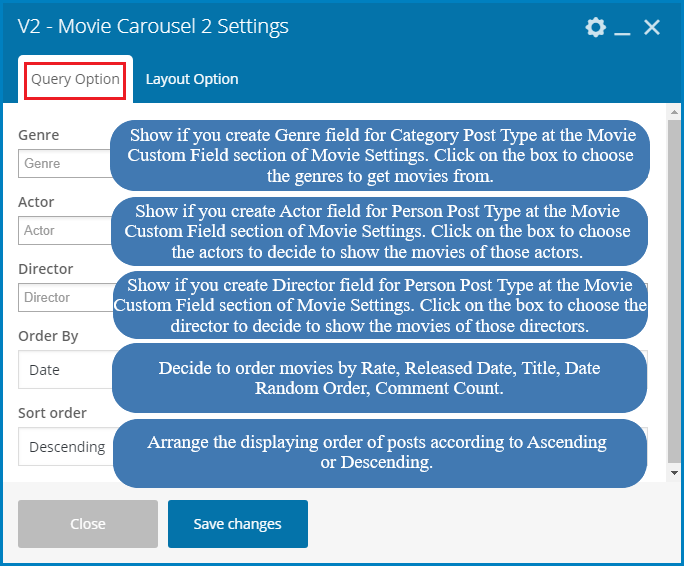
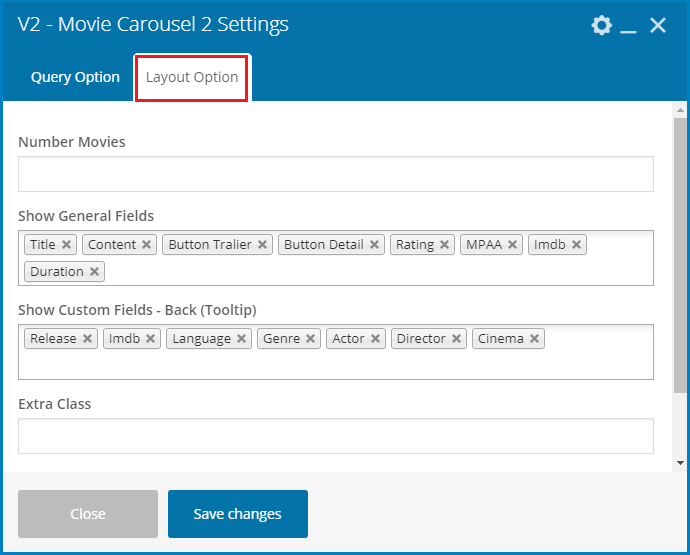
On the front-end you can see
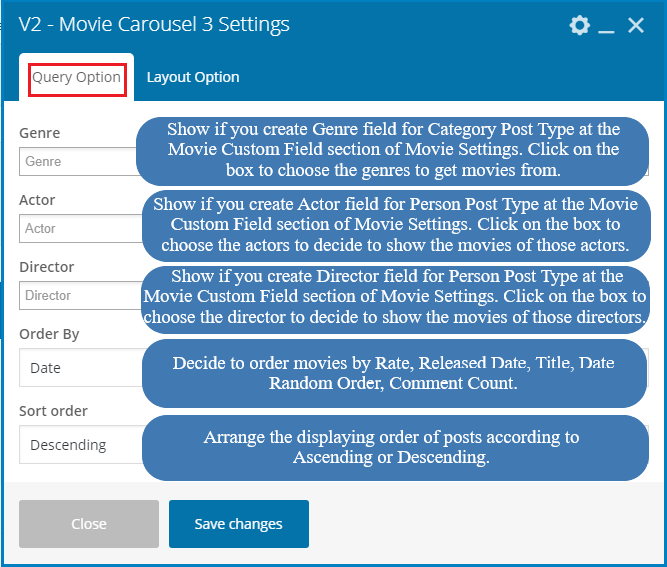
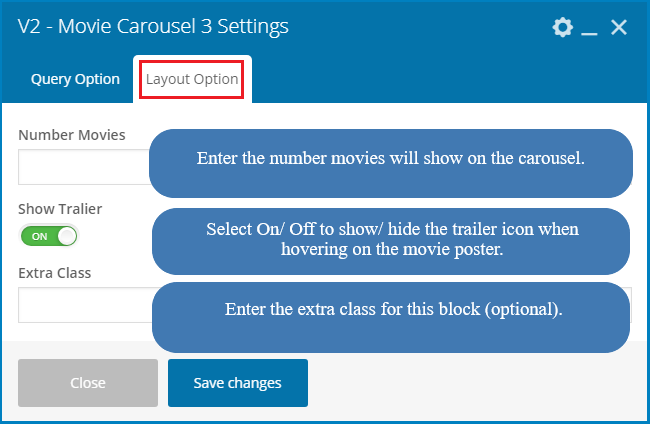
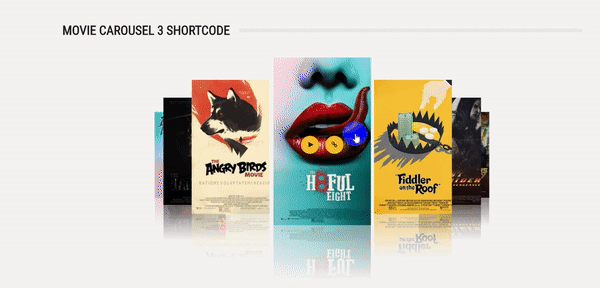
AmyMovie supports 3 movie carousel styles. And Movie Carousel 3 shortcode supports to display the movies in the carousel style #3.
On the front-end you can see
Movie Grid Shortcode supports to show the movies in the grid layout.

On the front-end, you can see
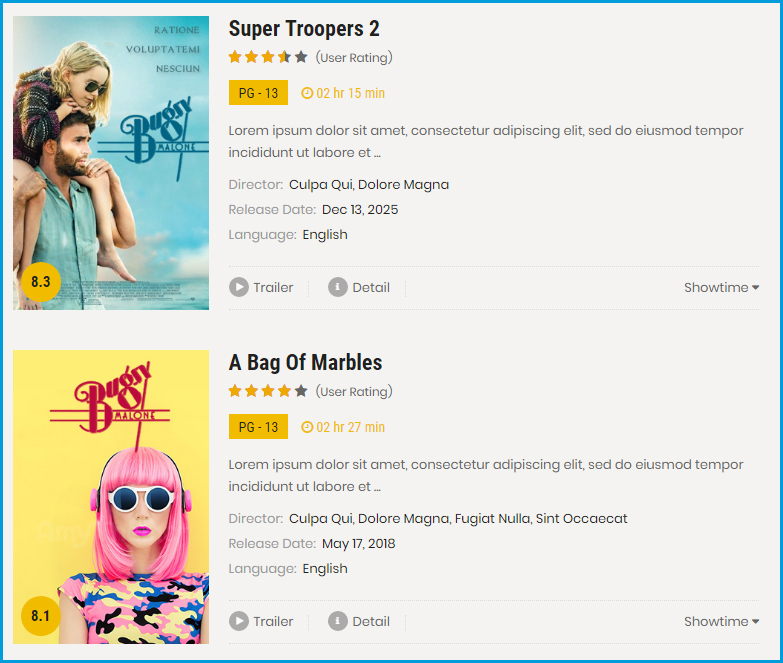
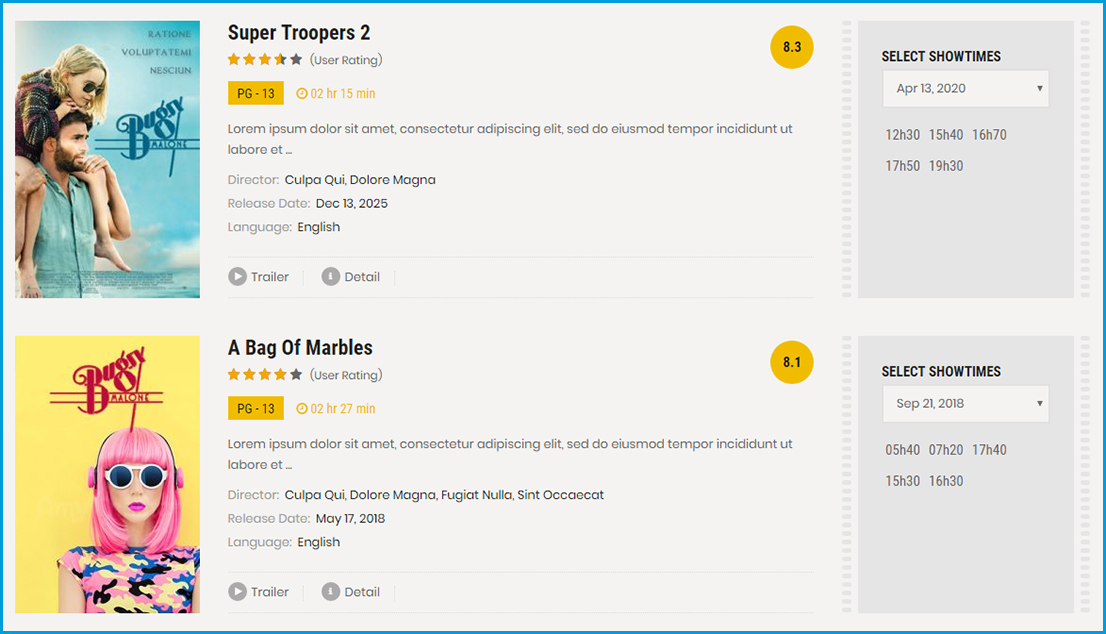
Movie List Shortcode supports to show the movies in the list layout.

On the front-end, you can see
Showtime 1 Shortcode supports to show the movies in the list layout.

On the front-end you can see
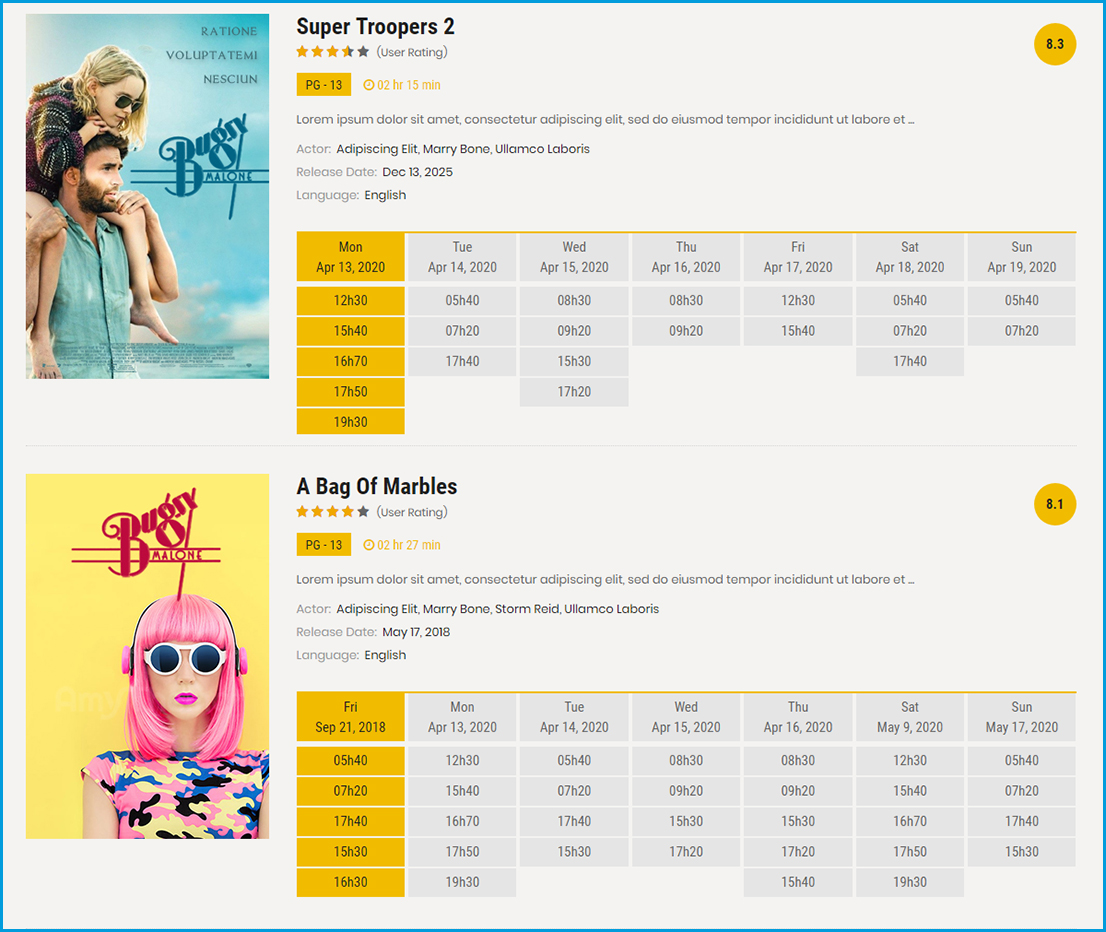
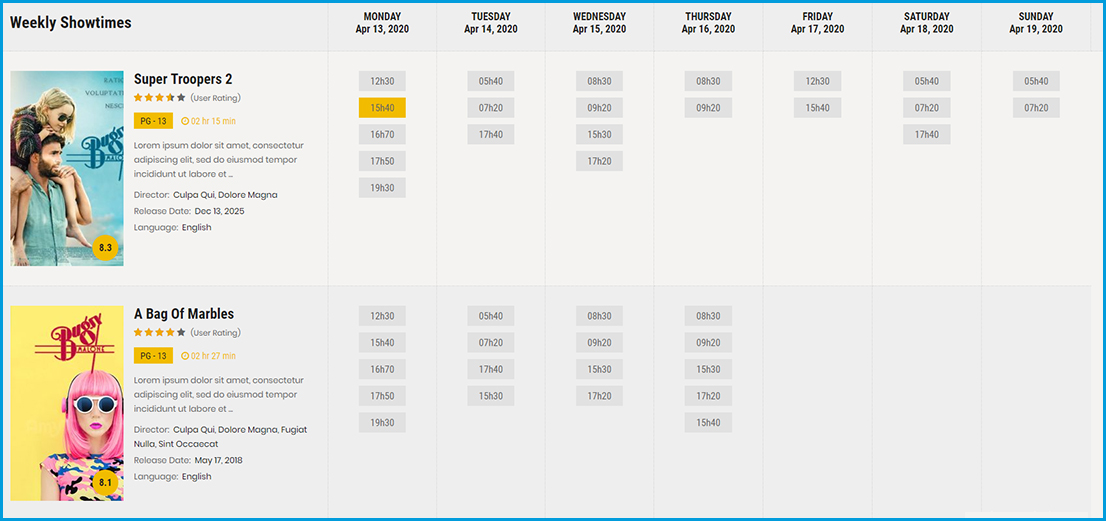
Showtime 2 Shortcode supports to show the movies in the list layout.

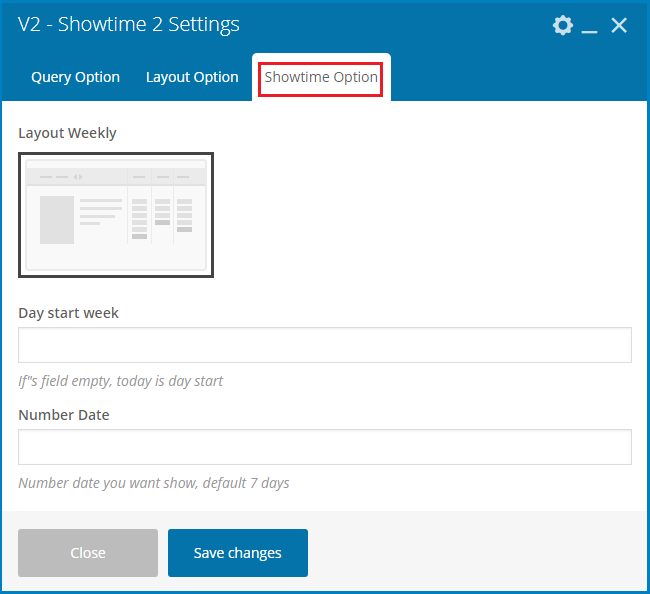
On the front-end you can see
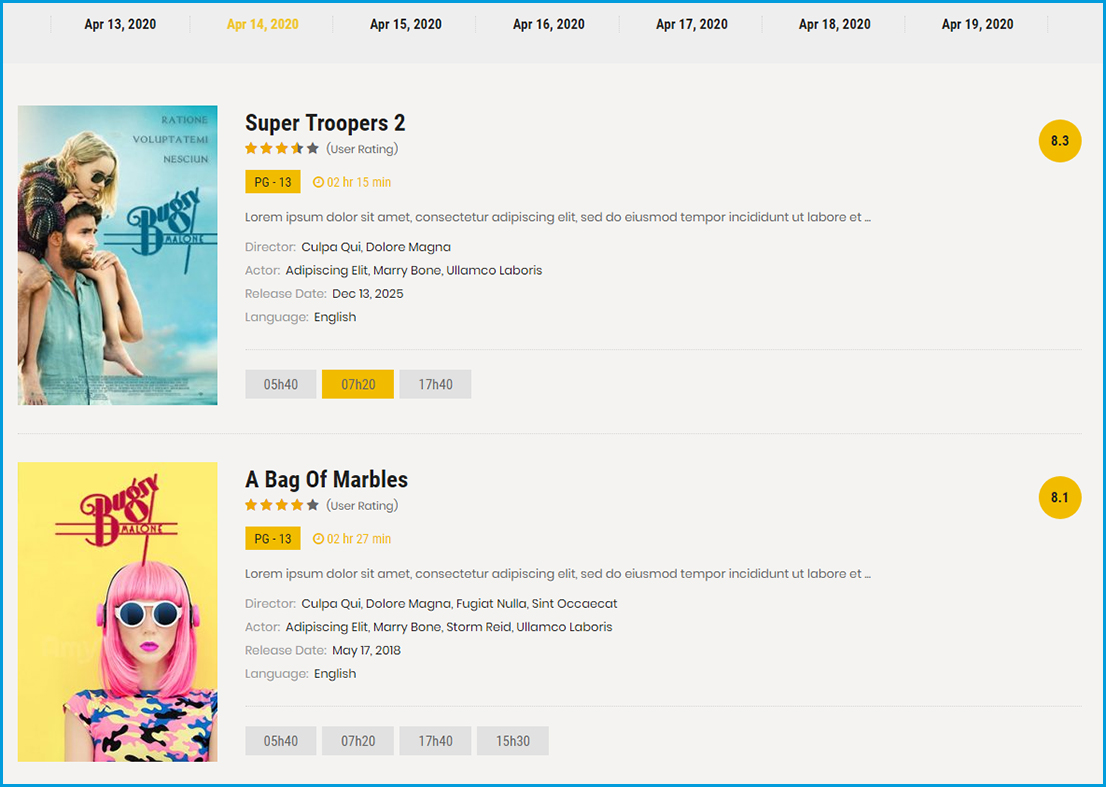
Showtime 3 Shortcode supports to show the movies in the list layout.


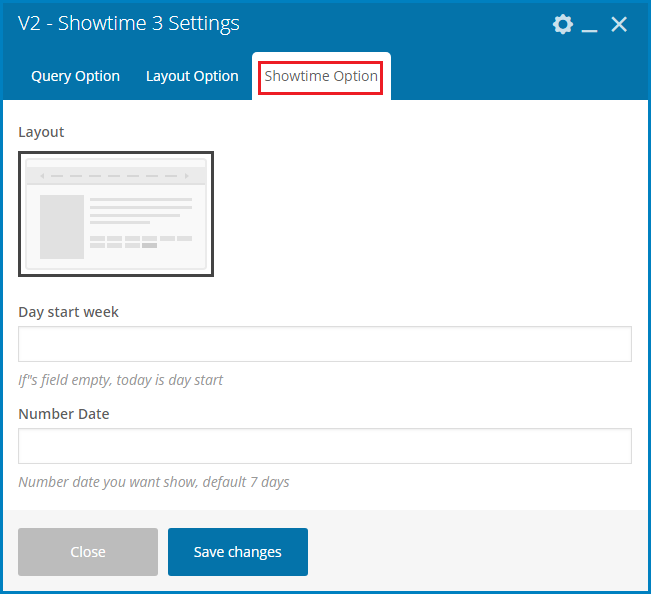
On the front-end you can see
Showtime 4 Shortcode supports to show the movies in the list layout.
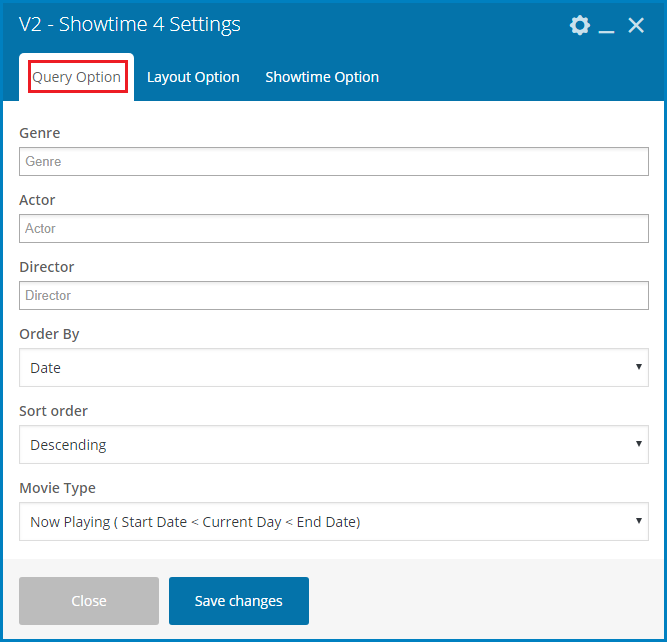

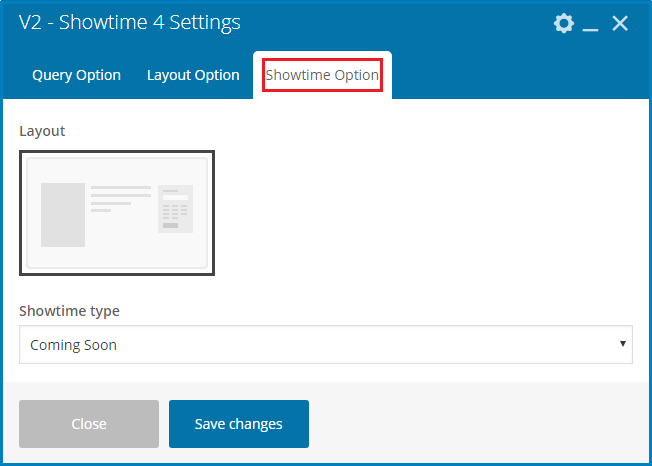
On the front-end you can see
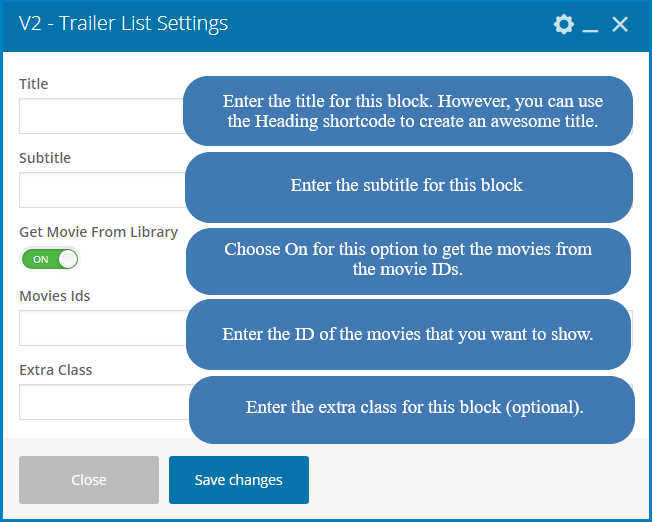
Trailer List shortcode helps to display the list of trailers/ videos for any movies/ games as you want. This shortcode provides you two ways to show the list movies with the trailers.
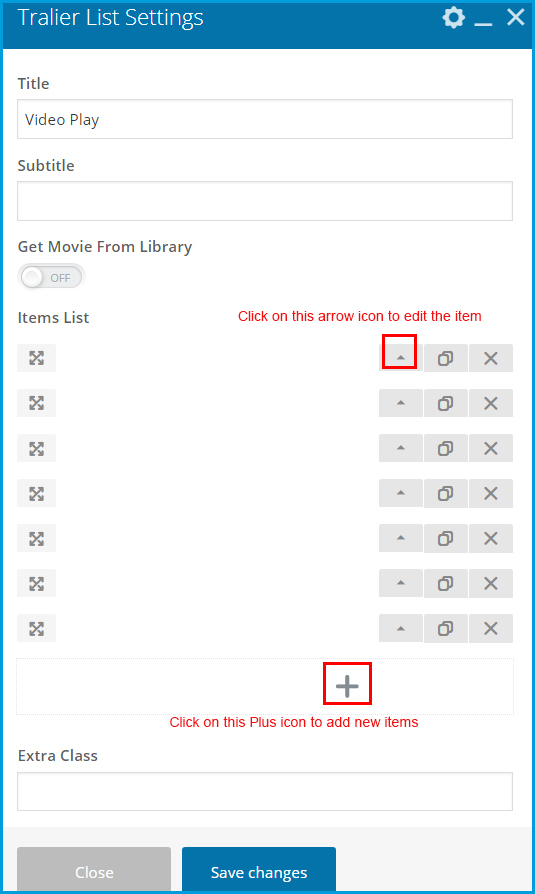
» Click on Plus icon to add new items (add new movies and trailers). And at each item, please click on the Arrow icon to edit the item. And you can add as many items as you want.

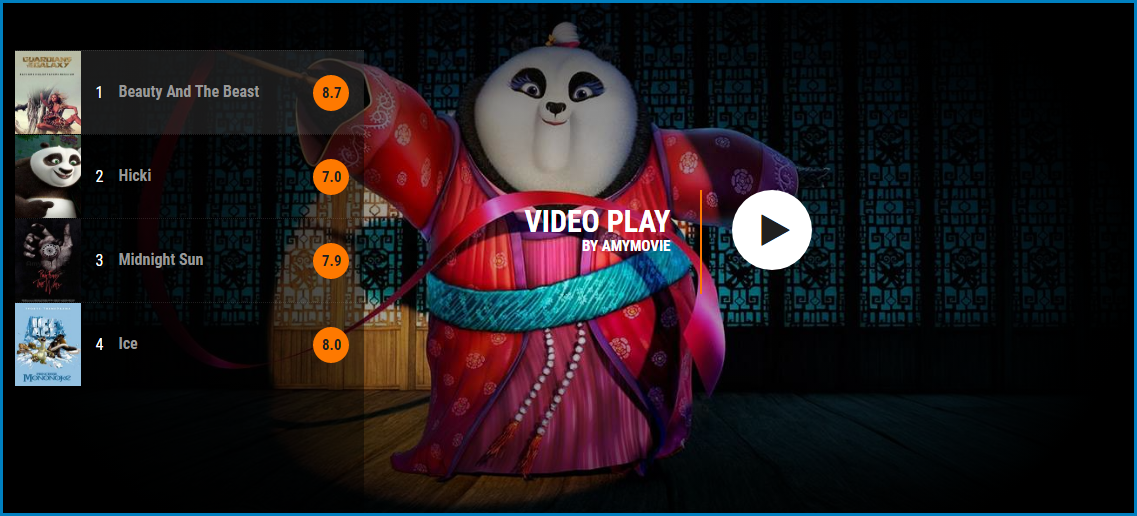
On the front-end you can see
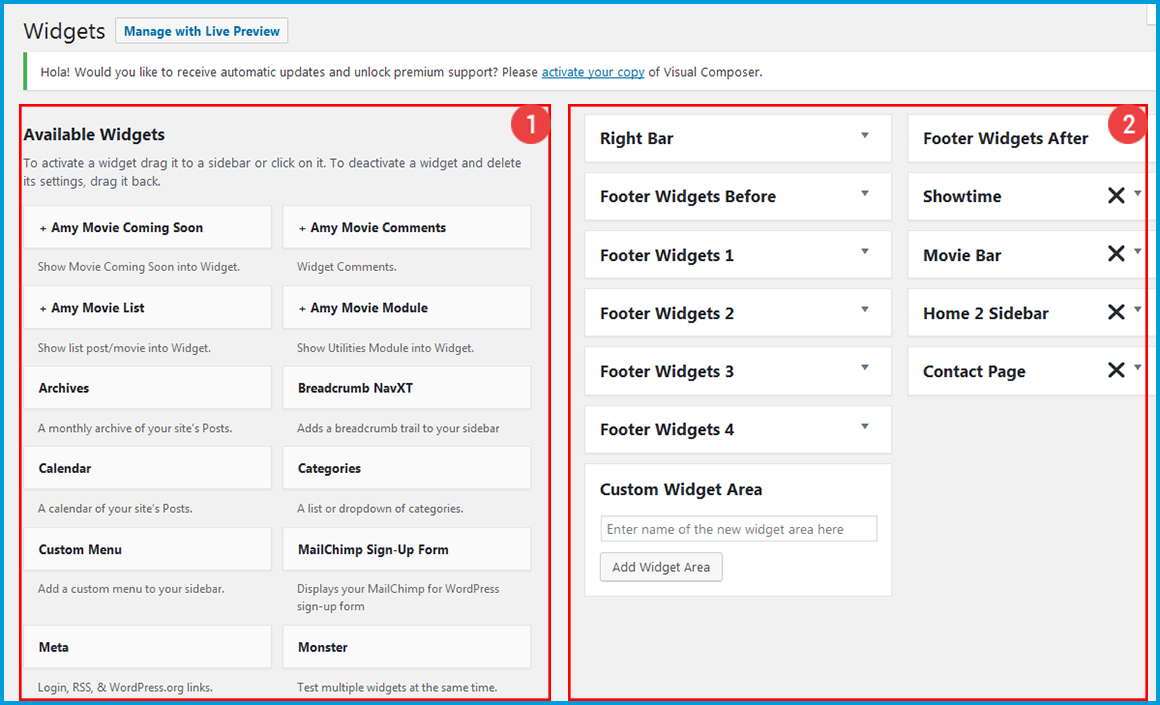
A WordPress Widgets are small blocks that perform a specific function. You can add widgets to sidebars/ widget areas to show on your webpages. At the screenshot above you can see widgets are on your left-hand side and the Widget Areas are on the right-hand side.
You can find more information about widget HERE
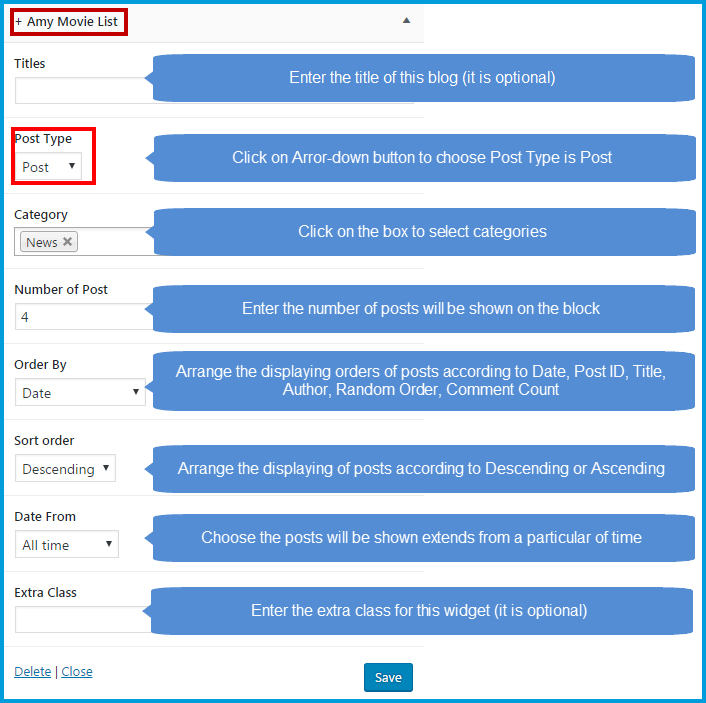
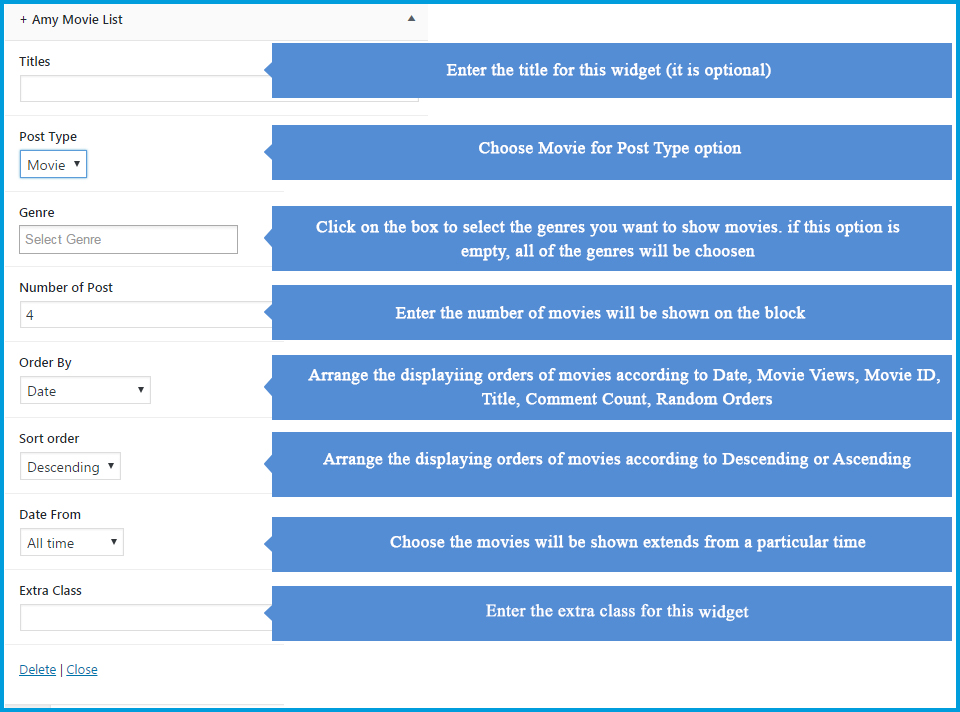
Amy Movie List widget allows you to add the list of the posts or the movies into the sidebar or any Widget Areas.
1. How to show list of the posts
2. How to show list of the movies
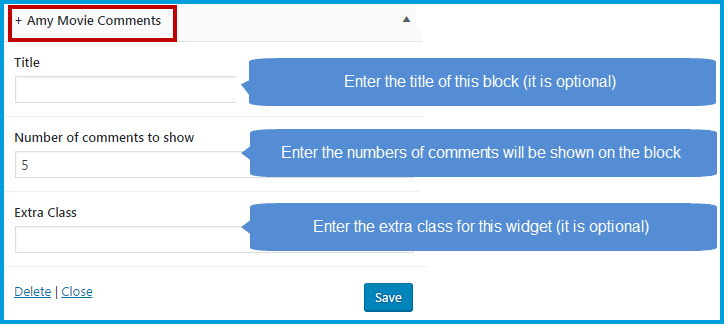
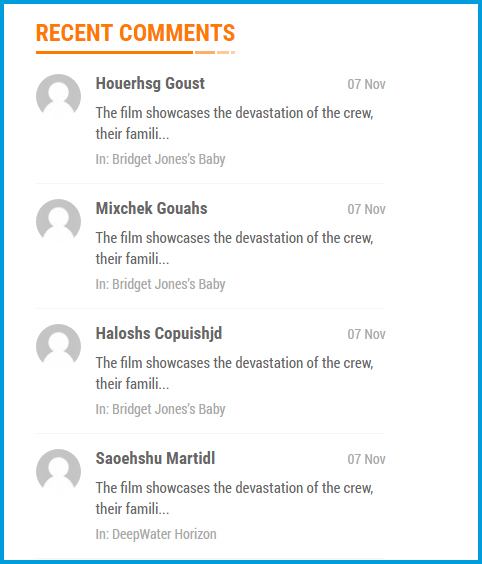
Amy Movie Comment widget allows you to list the comments on the sidebar or the widget area as you want.
At the backend you can see
On the frontend, you can see
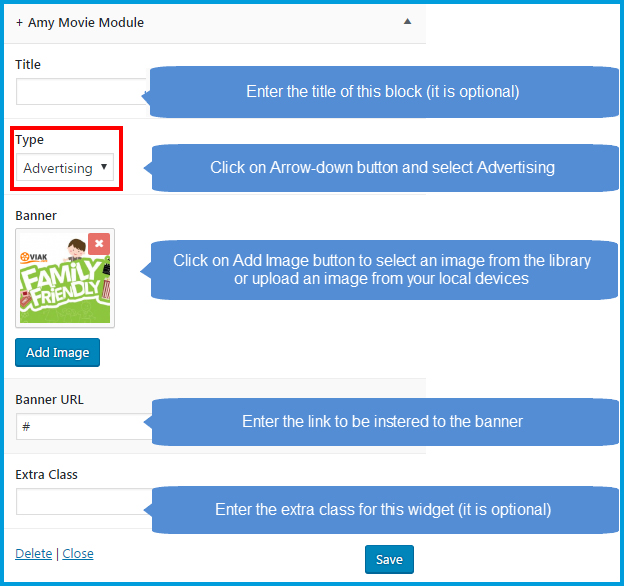
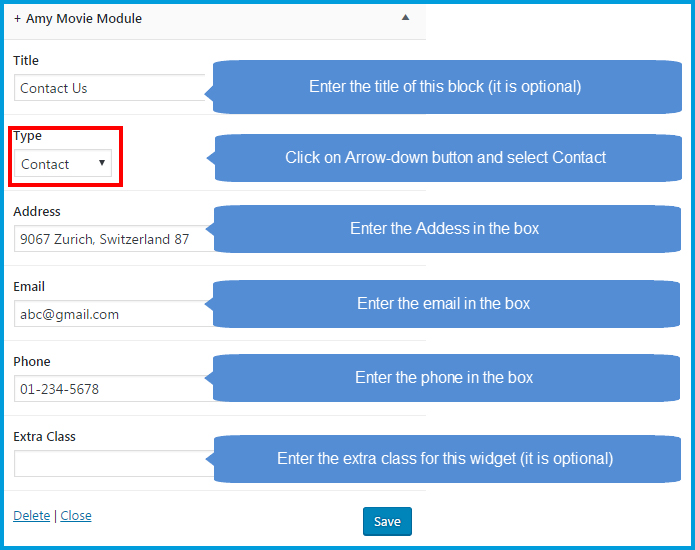
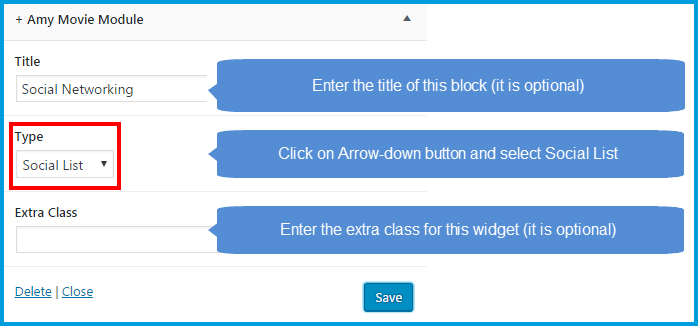
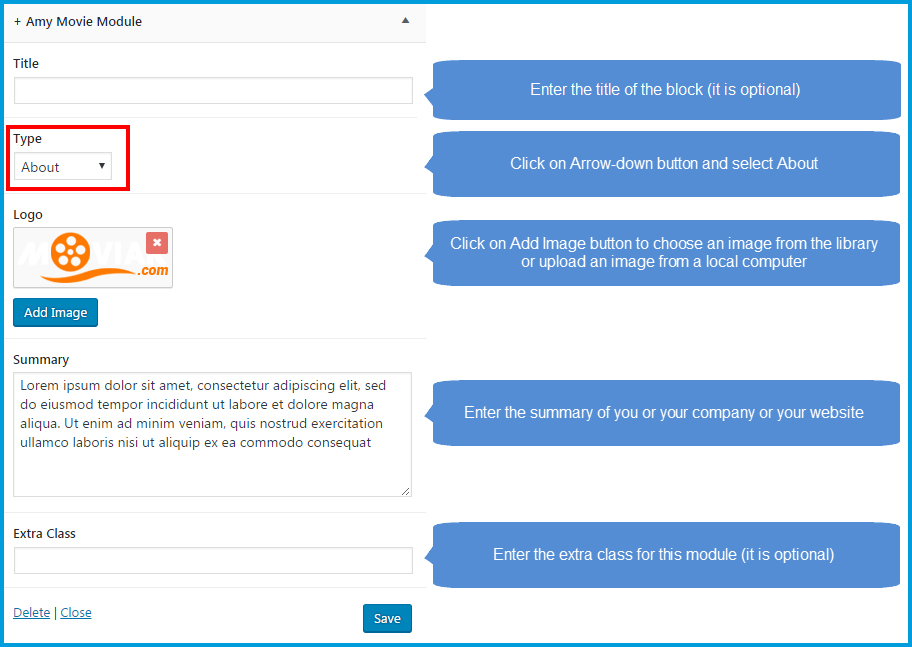
Amy Movie Module Widget allows you to add Advertising module, Contact Form module, Social List module or About module.
1. Advertising module: Advertising Module allows you to add advertising banner and insert a link into it.
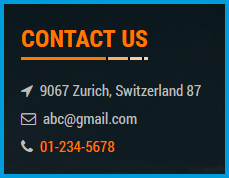
2. Contact Module: Contact module allows you to add some information about your address, phone and email so that visitor can be easier to contact you if they want.
On the frontend, you can see
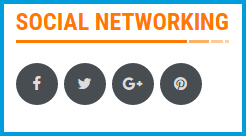
3. Social List Module: Social List module allows you to list the social network information on your module.
On the frontend, you can see
4. About module: About module allows you to add the information (by text) under a banner.
On the frontend, you can see

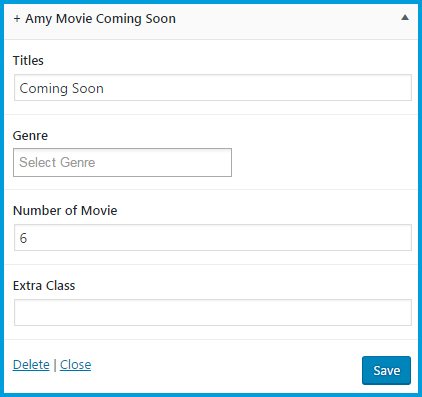
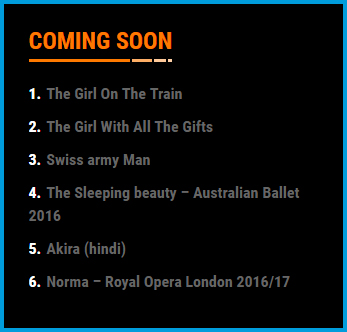
Amy Movie Coming Soon widget allows you to show the list of movie coming soon.
At the backend you can see
On the frontend, you can see
1. What is sidebar/ widget area?
Sidebar/ Widget Areas display the information other than the main content of the webpage. A sidebar will include widgets which are configured by admin. In other word, widgets are only useful when they’re put into Sidebars/ Widget Areas.
2. Global Widget Areas
Global Widget Areas are Widget Areas displayed on all pages. They are Footer Widget after, Footer Widget Before, # Footer Widget. You can enable/ disable Global widget areas at Theme options
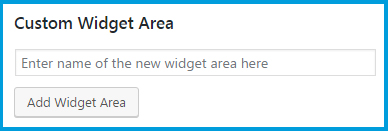
3. Custom Widget Areas
You can create unlimited Widget Areas for your site at Custom Widget Area button and choose one of them is your sidebar
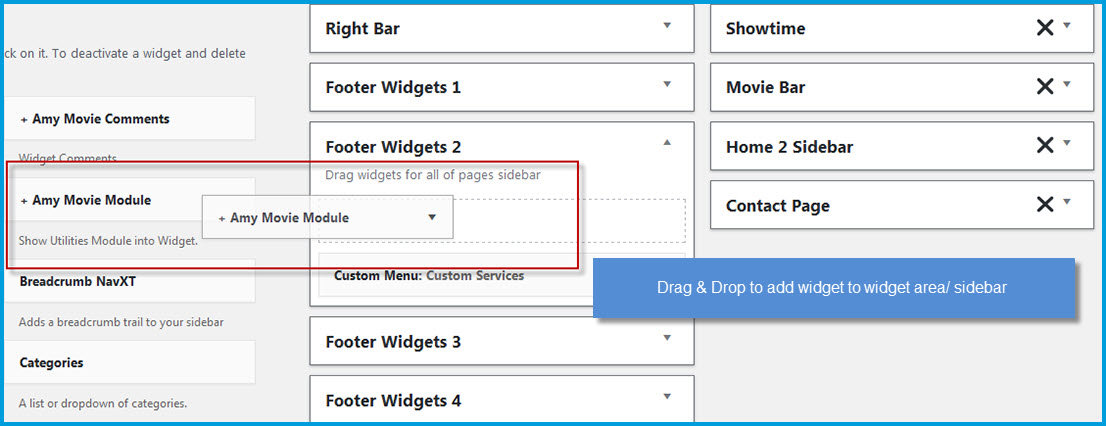
Step 1: From Dashboard => Appearance => Widgets.
Step 2: At Custom Widget Area field, enter the name of new sidebar (widget area).
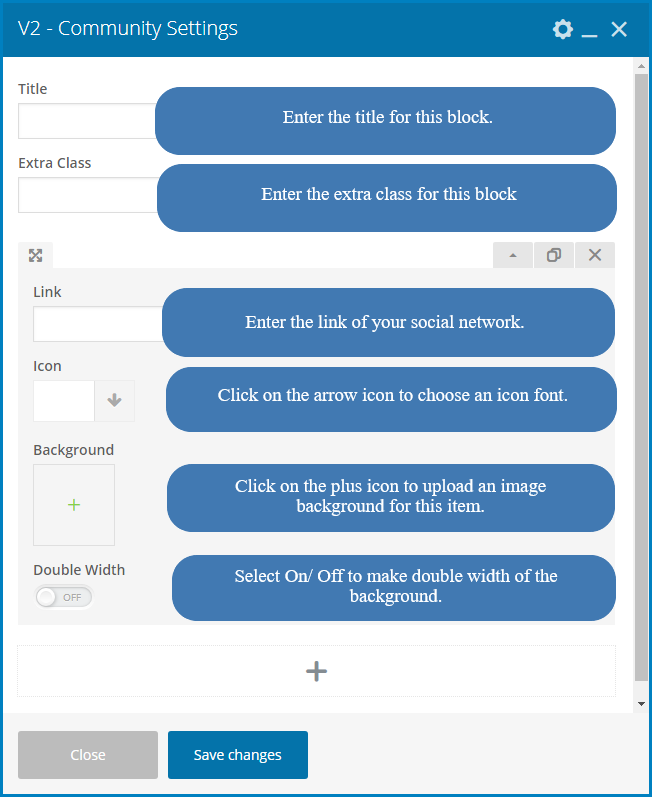
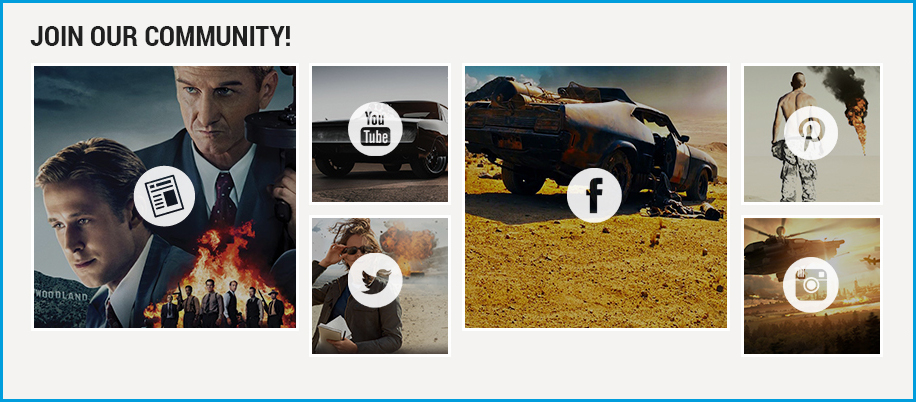
Social
From Dashboard => AmyMovie => Social
AmyMovie totally integrates with Social networks. You can add social links (Facebook, Twitter, Google plus, Pinterest). Click on Save button to save any your change